Earn BISSELL Rewards! Register your product today! See details on back page USER'S GUIDE 6489 SERIES 2 Thank You 3 Safety Instructions 4 Product View 5 Assembly 6-7 8-12 Operations Maintenance and Care 13 Troubleshooting 14 Replacement Parts 14 Accessories 15 Warranty 16 Product Registration 16 Consumer Care
Thanks for buying a BISSELL Vacuum We’re glad you purchased a BISSELL vacuum. Everything we know about floor care went into the design and construction of this complete, high-tech home cleaning system. Your BISSELL Zing canister vacuum is well made, and we back it with a limited one year warranty. We also stand behind it with a knowledgeable, dedicated Consumer Care department, so, should you ever have a problem, you’ll receive fast, considerate assistance.
IMPORTANT SAFETY INSTRUCTIONS When using an electrical appliance, basic precautions should be observed, including the following: Read all instructions before using your CANISTER VACUUM. Always connect to a polarized outlet (left slot is wider than right). Unplug from outlet when not in use and before conducting maintenance. WARNING: To reduce the risk of fire, electric shock, or injury: ■ Unplug from outlet when not in use and before servicing. ■ Do not use with damaged cord or plug.
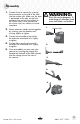
Product view Handle Air Flow Regulator Extension Wands Dirt Cup Release Button Carry Handle Dirt Cup Filter Hose Connector Hose Emptying Button Brush Switch Multi-Surface Floor Nozzle Easy Empty™ Dirt Cup WARNING: Do not plug in your vacuum Combination Crevice Tool/Dusting Brush 4 w w w. b i s s e l l . c o m until you are familiar with all instructions and operating procedures. 800.237.
Assembly 1. Connect hose to vacuum by inserting hose connector on the end of the hose into the suction inlet. Make sure the hose is positioned so the tabs on the hose connector line up with the notches on the suction inlet. Once inserted into the suction inlet, turn clockwise to lock into place. 2. Attach extension wands section together WARNING: Plastic film can be dangerous. To avoid danger of suffocation, keep away from babies and children. 1.
Operations Power cord The power cord is located at the rear of the vacuum. Gently pull out the power cord, watching for the yellow line. Stop pulling the power cord once the yellow line is visible. There is also a red line, which indicates the end of the usable cord. Do not pull the power cord out beyond the red line. Automatic cord rewind Your vacuum is equipped with an automatic cord rewind. When cleaning is finished, press the power button OFF and grasp the plug to disconnect from the electrical outlet.
Operations Special tools Your BISSELL Zing Canister is not only a powerful carpet and rug vacuum cleaner, it’s also a versatile bare floor and above floor vacuum cleaner when you select one of the special tools. Tip: Before cleaning under low furniture, check area first for objects that might harm the unit or block the hose. Floor nozzle Use to vacuum carpets, rugs and bare floors. Swivel head turns to get into tight spaces and fits under cabinets. 1.
Maintenance and care Emptying the dirt cup Empty the dirt cup as soon as the dirt reaches the “FULL” lines on the sides of the dirt cup. 1. Unplug the vacuum from the electrical outlet. 2. Remove the hose by turning the hose connector counter clockwise and pulling it out from the suction inlet. Set hose aside. WARNING: To reduce the risk of electric shock, turn power switch OFF and disconnect plug from electrical outlet before performing maintenance or troubleshooting checks. 2. 3.
Maintenance and care WARNING: To reduce the risk of electric Cleaning the dirt cup filters Use only BISSELL replacement filters in your Zing Canister. 1. Unplug the vacuum from the electrical outlet. 2. The dirt cup filters can be reached by removing the dirt cup from the vacuum, grasping the handle on the bottom of the dirt cup filter assembly and turning counter clockwise to unlock. Pull straight down to remove.
Maintenance and care Cleaning the dirt cup filters (cont) 6. Attach the dirt cup filter back onto the filter frame base by lining up the tabs on the filter base with the notches on the dirt cup filter and turning clockwise to lock back into place. 7. Attach the dirt cup filter screen back on to the dirt cup filter by sliding it down over the dirt cup filter, making sure that the tabs on the bottom of the dirt cup filter screen line up with the notches on the dirt cup filter. 8.
Maintenance and care Replacing the post-motor filter WARNING: Do not operate cleaner with The post-motor filter assists in the filtration process to return cleaner air to the room. Use only BISSELL replacement filters in your Zing Canister. 1. Unplug the vacuum from electrical outlet. 2. Remove the filter door (located on the back of the vacuum) by pushing down on the tab and pulling out and away from the vacuum. damp or wet filters or without all filters in place. 2. 3.
Maintenance and care Clearing clogs from the dirt cup 1. Unplug the vacuum from electrical outlet. 2. Remove the dirt cup from the vacuum, following steps 1-3 of the "Emptying the dirt cup" instructions on page 8. 3. Remove the dirt cup filter assembly from the dirt cup, following step 2 of the "Clean the dirt cup filter" instructions on page 9. 4. Tap the dirt cup filter assembly over a garbage container to remove any dirt or debris from the dirt cup filter screen that surrounds the dirt cup filter. 5.
Troubleshooting WARNING: To reduce the risk of electric shock, turn power OFF and disconnect plug from electrical outlet before performing maintenance or troubleshooting. Vacuum cleaner won’t run Possible causes Remedies 1. Vacuum cleaner is not plugged in 1. Check electrical plug 2. Power button is not pressed down 2. Press power button down Vacuum cleaner won’t pick up or low suction Possible causes Remedies 1. Tools, hose and/or extension wands are blocked 1.
Replacement parts - BISSELL vacuum Item 1 2 3 4 5 6 Part No. Part Name 2 3 203-1771 203-1772 203-1786 203-1792 203-1783 203-1780 1 5 Dirt Cup Filter Screen Dirt Cup Filter Assembly Post-Motor Filter Hose with Handle Dust Tank Blue 280U Bottom Lid Dust Tank Blue 280U 4 6 Accessories Item 1 2 3 1 14 Part No. 203-1773 203-1538 203-1539 2 w w w. b i s s e l l . c o m Part Name Floor Nozzle Extension Wands (2) Combination Crevice Tool/Dusting Brush 3 800.237.
Warranty - BISSELL Zing ® Canister Vacuum This warranty gives you specific legal rights, and you may also have other rights which may vary from state to state. If you need additional instruction regarding this warranty or have questions regarding what it may cover, please contact BISSELL Consumer Care by E-mail, telephone, or regular mail as described below.
Don't forget to register your product! Registering is quick, easy and offers you benefits over the lifetime of your product. You’ll receive: BISSELL Rewards Points Automatically earn points for discounts and free shipping on future purchases. Faster Service Supplying your information now saves you time should you need to contact us with questions regarding your product. Product Support Reminders and Alerts We’ll contact you with any important product maintenance reminders and alerts.
¡Obtenga puntos de recompensa BISSELL! ¡Registre su producto hoy! Consulte los detalles en la página posterior GUÍA DEL USUARIO SERIE 6489 2 Gracias 3 Instrucciones de seguridad 4 Vista del producto 5 Ensamblaje 6-7 8-12 Funcionamiento Mantenimiento y cuidado 13 Solución de problemas 14 Piezas de repuesto 14 Accesorios 15 Garantía 16 Registro del producto 16 Atención al Consumidor
Gracias por comprar una aspiradora BISSELL Nos complace que haya comprado una aspiradora BISSELL. Utilizamos todos nuestros conocimientos sobre el cuidado de pisos para diseñar y fabricar este sistema completo de limpieza para el hogar de alta tecnología. La aspiradora con depósito BISSELL Zing está bien fabricada y la avalamos con una garantía limitada de un año.
IMPORTANTES INSTRUCCIONES DE SEGURIDAD Si utiliza electrodomésticos, debe respetar las medidas de precaución básicas, incluidas las siguientes: Lea todas las instrucciones antes de usar la ASPIRADORA CON DEPÓSITO. Conéctela siempre a un tomacorriente polarizado (la ranura izquierda es más ancha que la derecha). Desenchúfela del tomacorriente cuando no la esté usando y antes de realizar el mantenimiento.
Vista del producto Mango Regulador de flujo de aire Varas de extensión Botón de liberación del contenedor de suciedad Manija para transportar Filtro del contenedor de suciedad Conector de manguera Manguera Botón de vaciado Interruptor del cepillo Boquilla para pisos para diversas superficies Contenedor de suciedad Easy Empty™ ADVERTENCIA: Utensilio combinado con accesorio para ranuras y cepillo para polvo 4 w w w. b i s s e l l .
Ensamblaje 1. Conecte la manguera a la aspiradora. Para ello, inserte el conector de manguera, situado en el extremo de la manguera, en la entrada de succión. Asegúrese de que la manguera esté colocada para que las lengüetas del conector de manguera se alineen con las ranuras de la entrada de succión. Cuando la manguera esté insertada en la entrada de succión, gírela en dirección de las manecillas del reloj para que se trabe. ADVERTENCIA: El empaque de película plástica puede ser peligroso.
Funcionamiento Cable de alimentación El cable de alimentación se encuentra en la parte posterior de la aspiradora. Jale suavemente el cable de alimentación, prestando atención a la línea amarilla. Cuando vea la línea amarilla, deje de jalar el cable de alimentación. También hay una línea roja que indica hasta dónde se puede utilizar el cable. No jale el cable de alimentación más allá de la línea roja. Rebobinado automático del cable La aspiradora está equipada con un rebobinado automático del cable.
Funcionamiento Accesorios especiales CONSEJO: La aspiradora con depósito BISSELL Zing no es solo una potente aspiradora de alfombras y tapetes, sino que también es una aspiradora versátil para pisos sin alfombrar y superficies sobre el nivel del piso cuando usted selecciona uno de los accesorios especiales. Boquilla para pisos Se usa para aspirar alfombras, tapetes y pisos sin alfombrar. El cabezal giratorio es capaz de llegar a lugares estrechos y cabe debajo de gabinetes.
Mantenimiento y cuidado Vaciado del contenedor de suciedad Vacíe el contenedor de suciedad cuando la suciedad alcance las líneas “FULL” (LLENO) en los costados del contenedor. 1. Desenchufe la aspiradora del tomacorriente. 2. Retire la manguera. Para hacerlo, gire el conector de manguera en dirección contraria a las manecillas del reloj y jálelo hacia afuera de la entrada de succión. Deje la manguera a un lado. 3.
Mantenimiento y cuidado Limpieza de los filtros del contenedor de suciedad ADVERTENCIA: Para reducir el riesgo de descargas eléctricas, coloque el interruptor de encendido en la posición OFF y desconecte el enchufe del tomacorriente antes de realizar el mantenimiento o solucionar problemas en la unidad. Use solamente filtros de repuesto BISSELL para la aspiradora con depósito Zing Canister. 1. Desenchufe la aspiradora del tomacorriente. 2.
Mantenimiento y cuidado Limpieza de los filtros del contenedor de suciedad (continuación) 6. Para volver a colocar el filtro del contenedor de suciedad en la base de la estructura de filtro, alinee las lengüetas de la base del filtro con las ranuras del filtro y gírelo en dirección de las manecillas del reloj para bloquearlo en su lugar. 7.
Mantenimiento y cuidado Reemplazo del filtro postmotor El filtro postmotor ayuda a devolver aire más limpio a la habitación durante el proceso de filtración. Use solamente filtros de repuesto BISSELL para la aspiradora con depósito Zing Canister. 1. Desenchufe la aspiradora del tomacorriente. ADVERTENCIA: No use la aspiradora si los filtros están húmedos o mojados, o si no están en su lugar. 2. 2.
Mantenimiento y cuidado Eliminación de las obstrucciones del contenedor de suciedad 1. Desenchufe la aspiradora del tomacorriente. 2. Retire el contenedor de suciedad de la aspiradora siguiendo los pasos 1 al 3 de las instrucciones incluidas en “Vaciado del contenedor de suciedad” en la página 8. 3. Retire el ensamble del filtro del contenedor de suciedad del contenedor de suciedad como se indica en el paso 2 de las instrucciones detalladas en “Limpieza del filtro del contenedor de suciedad” en la página 9.
Solución de problemas ADVERTENCIA: Para reducir el riesgo de descargas eléctricas, coloque el interruptor de encendido en la posición OFF ( ) y desconecte el enchufe del tomacorriente antes de realizar el mantenimiento de la unidad o solucionar problemas. La aspiradora no funciona. Causas posibles 1. Los accesorios, la manguera o las varas de extensión están bloqueados. 2. Los filtros están sucios. 3. El contenedor de suciedad está lleno. 4.
Piezas de repuesto: aspiradora BISSELL Artículo 1 2 3 4 5 6 1 No. de pieza 203-1771 203-1772 203-1786 203-1792 203-1783 203-1780 2 5 Nombre de pieza Malla del filtro del contenedor de suciedad Ensamble del filtro del contenedor de suciedad Filtro postmotor Manguera con mango Depósito de polvo azul 280U Tapa inferior del depósito de polvo azul 280U 3 4 6 Accesorios Artículo 1 2 3 1 14 No.
Garantía: aspiradora con depósito BISSELL Zing® Esta garantía le otorga derechos legales específicos, pero también puede tener otros derechos que varían según el estado. Si necesita instrucciones adicionales con respecto a esta garantía o tiene preguntas sobre lo que puede cubrir, póngase en contacto con Atención al Consumidor de BISSELL por correo electrónico, teléfono o correo postal como se describe a continuación.
No olvide registrar su producto! Registrarse es rápido, fácil y le ofrece beneficios para todo el período de vida útil del producto. Recibirá: Puntos de recompensa BISSELL Obtenga automáticamente puntos para descuentos y entregas a domicilio gratuitas en compras futuras. Servicio más rápido Si envía la información ahora, ahorrará tiempo en caso de que necesite ponerse en contacto con nosotros para hacernos preguntas relacionadas con el producto.