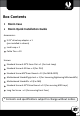
Ronin Quick Installation Guide
Box Contents • Ronin Case • Ronin Quick Installation Guide Accessories: 5.25" drive bay adapter: x 1 (pre-installed in chassis) Lock Loop: x 1 Cable Ties: x 10 Screws: Standard Screw 6-32*5.
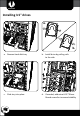
Basic Installation Removing side panels a. Remove thumbscrews Removing Stealth Cover a. Pull to remove 02 b.
Installing 5.25" drives a. Remove ODD Bay b. Squeeze and pull drive-locking mechanism c. Slide drive into drive bay d.
Installing 3.5" drives a. b. a. Remove hard disk tray b. Install drive by pulling rails to the side c. Slide tray into place d.
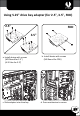
Using 5.25" drive bay adapter (for 2.5", 3.5", FDD) 2.5" FDD 3.5" a. Install device with screws (M3 Round for 2.5") (6-32 Hex for 3.5") c. Slide adapter into drive bay b. Install device with screws (M3 Round for FDD) d.
Replacing side panels a. Install side panels 06 b.
F A B C D E 07
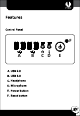
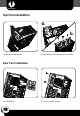
Top Fan Installation a. b. a. Remove top panel b. Install fan and secure with screws Rear Fan Installation a. Install fan 08 b.
Front Fan Installation a. Remove front panel b. Install fans c. Secure filter and fan with screws (Long Fan Screws) d.
Dust Filters Front Fan Filters Bottom Fan and PSU Filter Bottom Fan and PSU Filter 10 Front Fan Filters
Bitfenix Co., Ltd. 3F,No.79, Sec. 1, Sintai 5th Rd., Sijhih city, Taipei, Taiwan, R.O.C. For the most updated information, please visit our official website: http://www.bitfenix.com © 2013 BITFENIX Co., Ltd. All Rights Reserved. All trademarks are registered to their respective owners. Ver 1.