
User's Manual


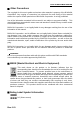


Table Of Contents
- ※ Manual Information & Usage Precautions
- 1. Content Confirmation
- 2. Product Part Names
- 3. Installation & Usage
- 4. Self-Test
- 5. Detailed features
- 5-1 Printer setting using utility program
- 5-2 Stand-alone Configuration Mode
- 5-3 Pause/Cancel
- 5-4 Media Calibration
- 5-5 Smart Media Detection
- 5-6 Gap Sensor Auto Calibration Mode
- 5-7 Black Mark Sensor Auto Calibration Mode
- 5-8 Manual Calibration Mode
- 5-9 Cover Closing Mode
- 5-10 Data Dump Mode
- 5-11 Factory Reset
- 5-12 The Peel-Off (Option)
- 5-13 Using Fan-Fold Paper
- 5-14 Auto Cutter (Option)
- 5-15 Real-Time Clock (Option)
- 6. Cleaning Head
- 7. Appendix

SLP-DX220B/DX223B
3. Installation & Usage
3-1 Power Connection
Connect power to the printer as shown below.
1) Turn off the printer power switch.
2) Check to see that the AC adapter voltage matches that of the power source.
3) Connect the AC adapter jack to the printer power connector.
4) Connect the power cord to the AC adapter.
5) Connect the power cord to a power source/outlet.
※
Do not use an adapter that was not supplied with the printer.
OFF
Power Switch
Power Cord
AC Adapter
Rev. 0.01
- 10 -