
User's Manual


Rev. 1.00
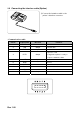
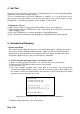
2.7 Using the control panel
Most of the functions of this printer are governed by software, but you can monitor the
printer’s status by looking at the lights on the control panel and for some procedures you
will use the buttons.
• POWER button
Use this button to turn on the power or to turn off the power. If you
press this button when the printer is turn off, the printer is turn on.
And if you press this button during 2 seconds when the printer is
turn on, the printer is turn off.
• FEED button
Use this button to feed the paper or to start the self test and for the
hexadecimal dump mode. (See “4. Self test” for self test. See “5.
Hexadecimal dump” for hexadecimal dump mode.)
• BATT. LED (Blue or red color)
This indicator lights are on when the power is turned on. And this
indicator lights show the battery charge rate. When three LEDs in
blue is on, it means that the battery is fully charged. When two LEDs
or one LED in blue is on, it means that the battery is not fully
charged. And if only one LEDs in red is on, it means that the battery
needs to be charged or changed.
• ERROR LED (Red Color)
This indicator light is on (but not blinking) when the printer is errors.
When this light is on, it means printer rear cover is open. When this
light is blinking, it means the printer is out of paper or the printer
head is heating. If you see this light blinking, turn off the printer for a
few seconds and then turn it back on. If the light is still blinking, call
your supervisor or a service person.
• BT LED (Green Color)
This indicator light is on when the printer is ready to communicate
with host. When this light is on, it means printer interfaces are the
serial communication or the USB communication. Otherwise it
means the Bluetooth communication is connection.
When this light is blinking, it means the Bluetooth communication is