User's Manual SPP-R200 Mobile Printer Rev. 1.08 http://www.bixolon.
SPP-R200 ■ Table of Contents ※ Manual Information & Usage Precautions··································································3 1. Content Confirmation ··································································································10 2. Product Part Names·····································································································11 3.
SPP-R200 ■ Manual Information ※ Manual Information & Usage Precautions This user’s manual contains basic information for product usage as well as for emergency measures that may be required. ※ The following separate manuals provide more detailed content on various technological issues and areas. 1. Windows CE Module Program Manual This manual provides information on the dll files required for Windows CE application program development. 2.
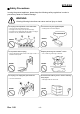
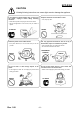
SPP-R200 ■ Safety Precautions In using the present appliance, please keep the following safety regulations in order to prevent any hazard or material damage. WARNING Violating following instructions can cause serious injury or death. Do not plug several products in one multi-outlet. • • • • You must use only the supplied adapter. This can provoke over-heating and a fire. If the plug is wet or dirty, dry or wipe it before usage. If the plug does not fit perfectly with the outlet, do not plug in.
SPP-R200 CAUTION Violating following instructions can cause slight wound or damage the appliance. If you observe a strange smoke, odor or noise from the printer, unplug it before taking following measures. Keep the desiccant out of children’s reach. • If not, they may eat it. • Switch off the printer and unplug the set from the mains. • After the disappearance of the smoke, call your dealer to repair it. TO UNPLUG PROHIBIT PRINTER Install the printer on the stable surface.
SPP-R200 ■ Battery Safety Precautions Make sure to review the user manual carefully prior to product use. Neglecting to heed the following instructions can result in battery overheating, combustion, explosion, damage and/or decline in performance and product life. Danger 1. Do not allow water, seawater, etc. enter or leak into the battery interior.
SPP-R200 10. Do not pierce the battery with a sharp object, such as a nail, or hit it with a heavy object, such as a hammer, and take care not to step on the battery. The battery may rupture or become warped, causing short circuits within that may result in battery overheating, combustion, and/or explosion. 11. Do not solder the battery directly. The heat can melt the insulating materials and/or damage the safety mechanism or safety equipment, resulting in battery overheating, combustion, and/or explosion.
SPP-R200 Caution 1. Do not use or leave the battery in a location exposed to high temperatures or intense direct sunlight, such as within an automobile. Doing so can cause battery overheating and/or combustion. In addition, battery performance and product life may be reduced. 2. The battery contains a safety mechanism to prevent danger.
SPP-R200 Recommended 1. Review the user manual for instructions concerning insertion/removal of batteries into/from the product. 2. As the battery is slightly charged upon factory shipment, use it to confirm proper product operation upon purchase. If product operation cannot be confirmed or longer use of the product is required, use the exclusive charger to charge the battery. 3. To avoid improper use of the battery, review the product user manual carefully. 4.
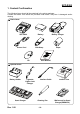
SPP-R200 1. Content Confirmation The following items should all be contained in the printer package. Contact the dealer from which the purchase was made if any item is damaged and/or missing. ※ Basic items SPP-R200 Battery Power Cord Belt Strap CD Battery Charger Paper User Manual ※ Optional items Battery Holder Cigarette Lighter Jack Charger Quad Charger Rev. 1.
SPP-R200 2. Product Part Names • Front Paper Cover Power Button Paper Feed Button Open Button MSR Cover BT Cap (Bluetooth Download Connector) • Rear Belt Strap Hole Battery Interface Cap Cable Connection Power Connection Rev. 1.
SPP-R200 3. Installation & Usage 3-1 Battery Installation 1) Insert the battery on the rear side of the printer, aligning the battery hook properly. 2) Push the battery into the slot until a snapping sound is heard. NOTE As the battery is not charged at the time of purchase, charge the battery prior to product use. (Use the battery charger and/or the optional battery holder.) 3-2 Battery Charging 3-2-1 Battery Charging Usage 1) Turn off the printer power.
SPP-R200 3-2-2 Battery Holder (Optional) Usage 1) Connect the power cord② to the battery charger ①. ④ 2) Connect the battery charger ① to the power connector of the battery holder ③. 3) Plug the power cord ② into an electrical outlet. ③ 4) Insert the battery ④ into the battery holder ③ until a snapping sound is heard. ① ② 3-2-3 Cigarette Lighter Jack Charger (Optional) Usage 1) Open the Interface Cap ①.
SPP-R200 3-2-4 Quad Charger (Optional) Usage 3-2-4-1 Connecting the cables 1) Connect the power cord to the adaptor, and Connect the adaptor to the power connector of the Quad Charger. 2) Plug the power cord into a power Outlet. Input power is 100 ~ 240VAC, 50/60Hz, 1.4A. 3) When power is supplied, the amber and green Lamp turn on for two seconds. WARNING Use only designated AC/DC adaptor. (12VDC, 5A) Rev. 1.
SPP-R200 3-2-4-2 Battery Charging 1) Fasten batteries via the battery hooks into the Quad Charger as shown above. 2) Push the battery in until a snapping sound is emitted. 3) Charging begins as soon as the battery is completely inserted. Batteries are charged to 8.4VDC, 0.8A. 4) Push the hook and pull up to extract the battery. NOTE Battery charging status descriptions are as follows.
SPP-R200 3-3 Paper Installation 1) Press the Open button to open the paper cover. 2) Insert the paper as shown in the image. (Remove any remaining core of a fully used paper roll.) 3) Take care to align the paper correctly. 4) Pull the paper out as shown in the image and close the paper cover. 5) Tear off any excess paper in the direction of the side of the printer. Rev. 1.
SPP-R200 3-4 Belt Strap Usage 1) Insert the belt strap screw into the belt strap hole. Belt Strap Coin 2) Use a coin to tighten the belt strap screw as shown in the image. Belt 3) Undo the belt strap Velcro. 4) Fasten the belt strap to a belt. Belt Rev. 1.08 5) Close the Velcro as shown in the image.
SPP-R200 3-5 Leather Case (Optional) Usage 1) Undo the Velcro. 2) Place the printer into the leather case following the direction shown in the image. 3) Close the Velcro. 4) Affix to a belt using the clip at the rear of the case. Belt NOTE The clip on the leather case can be rotated two stages by 30° per stage (maximum 60°) Rev. 1.
SPP-R200 3-6 Control Panel Usage • Power Button This button is used to turn the printer on and off. When the printer is off, pressing this button for approximately 2 seconds will turn the power on. When the printer is on, pressing this button for approximately 2 seconds will turn the power off. • Paper Feed Button Paper output can be done manually by pressing this button. In addition, self-testing and Hexadecimal Dumping can be done. 1) Refer to “4. Self-Test” for self-test information.
SPP-R200 3-7 MSR Usage 1) Press the MSR cover to open. 2) Insert the card as shown in the image and swipe in the direction of the arrow. (can be done in both directions) 3) When finished using, press the MSR cover to close it. NOTE If the card does not register, first check to see if it is properly aligned. When swiping the card, the recommended swiping speed is 100 ~ 1500 mm/sec. 4. Self-Test Run the self-test when first setting the printer or when encountering a problem, and check the following.
SPP-R200 • Self-Test Printout Sample Boot loader version : VER v2.01 20071005 Firmware version : V01.00 STOB 080901 Bluetooth Firmware version : 3.0.0 Bluetooth BD address : 001901223194 Auth. & Encry.
SPP-R200 5. Label Printing Function 5-1 Label Function Setting Label paper and black mark paper available at the label mode. • Setting Operations 1) Turn on the printer power. 2) Open the paper cover and press and hold down the paper feed button for longer than two seconds. 3) After the buzzer tone is emitted, insert paper and close the cover. 4) Repeat the steps above to return to receipt mode. • Setting Via Memory Switch - Please refer to the memory switch changing section of the Commands Manual.
SPP-R200 6. Peripherals Connection This product can communicate with other devices via Bluetooth communication and cable. 6-1 Bluetooth Connection 1) The printer can be connected to devices equipped with Bluetooth communication capacity (PDAs, PCs, etc.). 2) Use the Bluetooth connection function supported by the device to connect to the printer. NOTE Refer to the Bluetooth Manual for more details on connection.
SPP-R200 7. Printer Cleaning If the interior of the printer is dusty, print quality can decline. In such a case, follow the instructions below to clean the printer. CAUTION • Make sure to turn the printer power off prior to cleaning. • As the print head gets very hot during printing, if intending to clean the print head, turn the printer power off and wait approximately 10 minute before commencement. • When cleaning the print head, take care not to touch the heated portion of the print head.
SPP-R200 8.
SPP-R200 8-2 Certification 1) EMC & Safety Standards • Europe: CE Mark: CE 0984, DEMKO GS: EN60950-1: 2001 • North America: FCC rules part 15C • Safety Standards: CB-scheme: IEC60950-1: 2001 WARNING Use of an unprotected interface cable with this printer conflicts with EMC standards. Users should only use cables approved by BIXOLON.