
User guide


8
August 2012
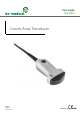
8802 User Guide
(BB0334-I)
Using the Transducer Control Button
The transducer has a control button that you can press to
Start
or
Stop
scanning
(freeze frame). Press the button for more than one second to make a copy of the
image.
Each time the button is pressed, a “beep” is emitted.
Changing Orientation
To change the orientation of the image on the monitor, refer to the applicable scanner
user guide for instructions.
Puncture Facilities
Puncture and biopsy is possible with 8802. The puncture attachment is illustrated in the
following pages with a brief description of its use and operating instructions.
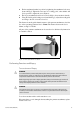
UA1250
The puncture attachment (see Fig 3) comprises an attachment bracket, an attachment
lock screw (item A in Fig. 5.), a needle guide, a needle-guide lock screw (item B in
Fig. 5.) and a variable diameter holder for fine needles (0.6mm or 24 gauge) and
large bore needles (2.4mm or 13 gauge). The guide channel is angled at 18
°
to the
transducer’ s image axis.
Figure 3. Puncture attachment UA 1250
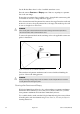
To mount biopsy attachment UA1250 ready for use:
Note: When mounted the attachment lock screw (item A in Fig 3) should be on the
side of the transducer handle opposite to the transducer’s control button.
1
Mount the attachment bracket on the transducer. Fit the indentations in the sides
of the bracket over the raised metal knobs on either side of the transducer handle.
WARNING
It is essential for the patient’s safety that only the correct puncture attachment is used with
8802. Never use unauthorized combinations of transducers and puncture attachments or
other manufacturers’ puncture attachments.
B
A