
Instruction manual
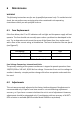


Table Of Contents
- 1 Safety Summary
- 2 Introduction
- 3 Quick Reference
- 4 Operating Instructions
- 4.1 Instrument Hook-Up
- 4.2 Typical Constant Voltage Operation
- 4.3 Setting Current Limit
- 4.4 Typical Constant Current Operation
- 4.5 Constant Voltage/Constant Current Characteristic
- 4.6 Saving the Power Supply’s Current State
- 4.7 Connecting Two Power Supplies in Series
- 4.8 Connecting Two Power Supplies in Parallel
- 5 RS232 Interface
- 6 Maintenance
- 7 Error Messages
- 8 Specifications
- 9 Service Information
- 10 Limited Three-Year Warranty

19
5.1 RS232 Configuration Overview
Baud Rate 9600 bps
Parity Bits none
Data Bits 8
Start Bits 1
Stop Bits 1
Flow Control Xon / Xoff
Termination Character CR (0x13)
Table 1 - RS232 Configuration
5.2 RS232 Commands
Note : All commands are case sensitive, therefore be sure all letters are
CAPITALIZED before sending it to the instrument.
1.VOLT xx.xx<CR>
This command sets the output voltage value. The output voltage takes the
programmed value only if the power supply is in Constant Voltage mode.
Example: The output voltage is set at 5V.
VOLT 05.00<CR>
2. CURR xxx.x<CR>
This command sets the output current value. The output current takes the
programmed value only if the power supply is in Constant Current mode.
Example: The output current is set at 300mA.