Gourmet Oven MODEL GO-36, GO-36T Operation Manual Serial Numbers 122192 and higher
Warranty Information LIMITED ONE YEAR WARRANTY BKI (The "Company") warrants to the original purchaser that at time of shipment from the Company factory, this equipment will be free from defect in materials and workmanship. Written notice of a claim under this warranty must be received by the Company within ONE YEAR from the date of installation, but no longer than ONE YEAR AND THREE MONTHS from date of shipment from the factory.
Gourmet Oven Table of Contents Table of Contents Table of Contents........................................................................................................................................ 1 Introduction ................................................................................................................................................. 2 Safety Precautions..............................................................................................................................
Gourmet Oven Introduction Introduction The BKI GO-36 is a cook and hold gourmet oven. It consists of a cooking cabinet, door assembly and control unit. The cooking cabinet contains rack supports that hold 4 racks and 1 drip pan. To seal the oven cavity, a door with a magnetized door latch is provided. The control unit contains heating elements for cooking as well as a time/temperature computer and manual switches for quick setup and operation.
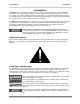
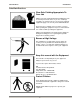
Gourmet Oven Introduction Safe Work Practices Wear Safe Clothing Appropriate To Your Job Always wear your insulated mitts when handling hot racks or touch any hot metal surface. If you lose or damage your mitts, you can buy new ones at your local restaurant equipment supply store or from your local BKI Distributor. Never wear loose clothing such as neckties or scarves while operating this equipment. Keep loose hair tied back or in a hair net while operating this equipment.
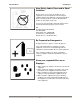
Gourmet Oven Introduction Keep Safety Labels Clean and in Good Condition Do not remove or cover any safety labels on your equipment. Keep all safety labels clean and in good condition. Replace any damaged or missing safety labels. Refer to the Safety Labels section for illustration and location of safety labels on this unit. If you need a new safety label, obtain the number of the specific label illustrated on page 5, then contact: BKI Technical Services Department P.O. Box 80400 Simpsonville, S.C.
Gourmet Oven Introduction Safety Decals 5
Gourmet Oven Introduction Health And Sanitation Practices BKI ovens are manufactured to comply with health regulations and are tested and certified to UL®, CUL®, and NSF® standards. You must operate the equipment properly using only quality products and use meat thermometers to insure meats are thoroughly cooked. Food Handling • Wash hands thoroughly in warm, soapy water after handling raw poultry or meats. • Clean and sanitize all utensils and surfaces that have been in contact with raw products.
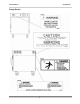
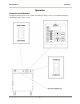
Gourmet Oven Operation Operation Controls and Indicators The figure below depicts the oven’s controls and indicators. Refer to it as necessary while performing operating procedures in this section.
Gourmet Oven Operation Turning the Oven “On” 1. Plug the oven power cord into a receptacle supplying power that matches that specified on the nameplate. The mating receptacle for the GO-36 plug is a NEMA style 6-20. The mating receptacle for the GO-36T plug is a NEMA style 6-30. 2. Place the POWER ON/POWER OFF rocker switch in the POWER ON position. Programming the Oven Press and hold the “START/STOP” button until display alternates between “STOP” and the probe sense temperature.
Gourmet Oven Operation • If the hold temperature has been turned off, the oven will sound an audible alert when the cook time reaches zero. This alarm will sound until the “START/STOP” button is pressed. • If the hold temperature has been set, the controller will regulate the temperature to the desired hold temperature. Once the hold temperature has been achieved, a count up timer will be initiated to track the length of time in the hold mode.
Gourmet Oven Operation Suggested Cooking Instructions Power Level This oven is supplied with a switch that controls the heating elements within the control unit. In the HIGH POWER position, all heating elements are used for cooking. In the LOW POWER position, two of the heating elements are used for cooking. One application for the low power feature is the reconstitution of frozen food. The slow heating rate will avoid overcooking or burning of the outside of the product while the center is still cold.
Gourmet Oven Operation Fowl WHOLE TURKEYS OVEN PREPARATION 1. 2. 3. 4. 5. Preheat oven to 240ºF, set on LOW power. This will take 20 minutes. Set COOK TEMP to 240ºF. Set COOK TIME as shown below. Set HOLD TEMP to 150ºF, if using HOLD cycle. If not holding, set HOLD to OFF. Place Turkey in oven and press START to activate cook cycle. GATHER REQUIRED ITEMS: 1. 2. 3. 4. Whole Turkeys Full-size shallow pans Desired Seasoning Knife (if removing tails) PREPARATION 1. 2. 3. 4. 5.
Gourmet Oven Operation WHOLE CHICKENS (2¼ - 3¼ LBS) OVEN PREPARATION 1. Preheat oven to 350ºF, set on HIGH power. This will take 20 minutes. 2. Set COOK TEMP to 350ºF. 3. Set COOK TIME as shown below. 4. Set HOLD TEMP to 150ºF, if using HOLD cycle. If not holding, set HOLD to OFF. 5. Place Chicken in oven and press START to activate cook cycle. GATHER REQUIRED ITEMS: 1. 2. 3. 4. Whole Chickens Full-size shallow pans Desired Seasoning Knife (if removing tails) PREPARATION 1. 2. 3. 4. 5.
Gourmet Oven Operation TURKEY BREASTS OVEN PREPARATION 1. 2. 3. 4. 5. Preheat oven to 240ºF, set on LOW power. This will take 20 minutes. Set COOK TEMP to 240ºF. Set COOK TIME as shown below. Set HOLD TEMP to 150ºF, if using HOLD cycle. If not holding, set HOLD to OFF. Place Turkey Breasts in oven and press START to activate cook cycle. GATHER REQUIRED ITEMS: 1. 2. 3. 4. Turkey Breasts Full-size shallow pans Desired Seasoning Knife (if removing tails) PREPARATION 1. 2. 3. 4.
Gourmet Oven Operation Pork BABY BACK RIBS OVEN PREPARATION 1. 2. 3. 4. 5. Preheat oven to 225ºF, set on LOW power. This will take 15 minutes. Set COOK TEMP to 225ºF. Set COOK TIME as shown below. Set HOLD TEMP to 150ºF. Place Ribs in oven and press START to activate cook cycle. GATHER REQUIRED ITEMS 1. 2. 3. 4. 5. Baby Back Ribs 18 x 26-inch Sheet Pans 18 x 26-inch Grates Institutional Clear Wrap Desired Seasoning PREPARATION 1. Unwrap ribs and rinse with cold water. 2.
Gourmet Oven Operation PORK RIBS (3½ & DOWN) OVEN PREPARATION 1. 2. 3. 4. 5. Preheat oven to 225ºF, set on LOW power. This will take 15 minutes. Set COOK TEMP to 225ºF. Set COOK TIME as shown below. Set HOLD TEMP to 150ºF. Place Pork Ribs in oven and press START to activate cook cycle. GATHER REQUIRED ITEMS 1. 2. 3. 4. 5. Pork Ribs 18 x 26-inch Sheet Pans 18 x 26-inch Grates Institutional Clear Wrap Desired Seasoning PREPARATION 1. Unwrap ribs and rinse with cold water. 2.
Gourmet Oven Operation Beef PRIME RIB (12-14 LBS BONELESS - NO FAT CAP) #112-A OVEN PREPARATION 1. 2. 3. 4. 5. Preheat oven to 225ºF, set on LOW power. This will take 15 minutes. Set COOK TEMP to 225ºF. Set COOK TIME as shown below. Set HOLD TEMP to 145ºF. Place Prime Rib in oven and press START to activate cook cycle. GATHER REQUIRED ITEMS 1. 2. 3. 4. 5. Prime Ribs - #112A 18 x 26-inch Sheet Pans 18 x 26-inch Grates Institutional Clear Wrap Desired Seasoning PREPARATION 1.
Gourmet Oven Operation PRIME RIB (22-24 LBS BONE-IN WITH FAT CAP) #109 OVEN PREPARATION 1. 2. 3. 4. 5. Preheat oven to 225ºF, set on LOW power. This will take 15 minutes. Set COOK TEMP to 225ºF. Set COOK TIME as shown below. Set HOLD TEMP to 145ºF. Place Prime Rib in oven and press START to activate cook cycle. GATHER REQUIRED ITEMS 1. 2. 3. 4. 5. Prime Ribs - #109 18 x 26-inch Sheet Pans 18 x 26-inch Grates Institutional Clear Wrap Desired Seasoning PREPARATION 1.
Gourmet Oven Operation TOP ROUND (10-12 LBS) OVEN PREPARATION 1. 2. 3. 4. 5. Preheat oven to 225ºF, set on LOW power. This will take 15 minutes. Set COOK TEMP to 225ºF. Set COOK TIME as shown below. Set HOLD TEMP to 145ºF. Place Top Round in oven and press START to activate cook cycle. GATHER REQUIRED ITEMS 1. 2. 3. 4. 5. Top Rounds 18 x 26-inch Sheet Pans 18 x 26-inch Grates Institutional Clear Wrap Desired Seasoning PREPARATION 1. Unwrap Top Round and rinse with cold water. 2.
Gourmet Oven Operation STEAMSHIP ROUND (45-50 LBS. BONE-IN) OVEN PREPARATION 1. 2. 3. 4. 5. Preheat oven to 200ºF, set on LOW power. This will take 15 minutes. Set COOK TEMP to 200ºF. Set COOK TIME to 9:10 (9 hours 10 minutes). Set HOLD TEMP to 140ºF. Place Steamship Round in oven and press START to activate cook cycle. GATHER REQUIRED ITEMS 1. 2. 3. 4. 5. Steamship Round 18 x 26-inch Sheet Pans 18 x 26-inch Grates Institutional Clear Wrap Desired Seasoning PREPARATION 1.
Gourmet Oven Operation CORNED BEEF (8-10 LBS IN BAG WITH BRINE) OVEN PREPARATION 1. 2. 3. 4. 5. Preheat oven to 250ºF, set on LOW power. This will take 15 minutes. Set COOK TEMP to 250ºF. Set COOK TIME as shown below. Set HOLD TEMP to 150ºF. Place Corned Beef in oven and press START to activate cook cycle. GATHER REQUIRED ITEMS 1. Corned Beef 2. 18 x 26-inch Sheet Pans PREPARATION 1. Leave Corned Beef in original bag. DO NOT PUNCTURE. 2. Place in 18 x 26-inch sheet pan (2 per pan).
Gourmet Oven Operation Frozen Entrees DAYTIME ENTREE PREPARATION (BAGS - FROZEN OR THAWED) OVEN PREPARATION 1. 2. 3. 4. 5. Set PREHEAT to OFF. Set COOK TEMP to 350ºF. Set COOK TIME as shown below. Set HOLD TEMP to 150ºF. Press START/STOP button twice. (Cycle light will flash ON and OFF at this time.) This will preheat oven to the cook temperature set but will not activate the time. 6. Place prepared Entree in oven, press START/STOP button once. Cycle light will be ON and cook time will start.
Gourmet Oven Operation OVERNIGHT ENTREE PREPARATION (BAGS - FROZEN) OVEN PREPARATION 1. 2. 3. 4. 5. Set PREHEAT to OFF. Set COOK TEMP to 225ºF, set on LOW power. Set COOK TIME as shown below. Set HOLD TEMP to 150ºF. Press START/STOP button twice. (Cycle light will flash ON and OFF at this time.) This will preheat oven to the cook temperature set but will not activate the time. 6. Place prepared Entree in oven, press START/STOP button once. Cycle light will be ON and cook time will start.
Gourmet Oven Installation Installation Serious injury, equipment damage or death could result if attempting to install this oven. Ensure that an authorized BKI service agent install the oven. Unpacking and Handling It is the owners’ responsibility to file all freight claims with the delivering truck line. Inspect all cartons and crates for damage as soon as they arrive. If damage to cartons or crates is found, or if a shortage is found, note this on the bill of lading (all copies) prior to signing.
Gourmet Oven Installation 9. Carefully lift the oven with the handles and place on top of other oven. 10. Seal the base and the stacking kit piece to the oven bottoms using silicone rubber RTV (S0018) approved for this use. 11. Replace racks and drip pans. Location and Clearance Allow enough air space around the unit to provide for proper ventilation. Wiring Electrocution, equipment failure or property damage could result if an unlicensed electrician performs the electrical installation.
Gourmet Oven Maintenance Maintenance Failure to comply with the maintenance below could result in a serious accident or equipment damage. Failure to remove power from this unit before performing maintenance may cause severe electrical shock. This unit may have more than one disconnect switch. Scheduled Maintenance Oven Cleaning The oven must be cleaned at the end of each business day. It is easier to clean while still warm.
Gourmet Oven Maintenance 5. Remove the rack supports by following the appropriate procedure below: For GO-36: a. Lift the left-side rack support up and off of its mounting studs. b. Once the rack support is off of its studs, tilt the top toward the center of the oven. c. Pull rack support out of oven and clean. d. Repeat these steps for the right-side rack support.
Gourmet Oven Maintenance For GO-36T: a. Lift the left-side rack support with attached baffle up and off of its mounting studs. b. Once the rack support is off of its studs, tilt the top toward the center of the oven. c. Pull rack support with attached baffle out of oven opening. d. Disconnect baffle from rack support and clean both parts.
Gourmet Oven Maintenance e. Repeat these steps for the right-side rack support and baffle. 6. Clean the outside and inside of the oven with warm water, a sponge and approved cleaner which is authorized for use on food surface areas. 7. Wipe the unit dry with a soft cloth. 8. To reinstall rack supports follow the procedures below: For GO-36: a. Insert the left rack support into the oven against the back wall. b. Hook the rack support hangers on the corresponding mounting studs. c.
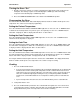
Gourmet Oven Maintenance For GO-36T: a. To install baffle onto rack support, hold the rack side of the support at a 45° angle to a level surface. b. Slide baffle into position as shown allowing hooks on baffle to engage rack support.
Gourmet Oven c. Maintenance While holding the top of the baffle and the rack support together (keeping hooks from disengaging), tilt top of assembly inward as installing into oven.
Gourmet Oven Maintenance d. While holding the pieces with your hand, upright the assembly and install onto studs in oven. Be careful not to disengage the baffle hooks from the rack support. e. Repeat these steps for the right side support. 9. Reinsert the racks and drip pan.
Gourmet Oven Maintenance Troubleshooting Refer to the table below for troubleshooting information. Problem Cause Possible Solution Unit will not turn on Oven is not plugged in. Plug in the oven. Power to unit is not on. Problem with building power panel, circuit breaker/fuse or receptacle. Check circuit breaker or fuses at building power panel. Blown fuse on unit. Contact an authorized BKI service agent for corrective action. Defective power switch.
Gourmet Oven Problem Oven has very slow heat up or recovery. NOTE: This is normal when using the LOW POWER setting. Oven will not come up to temperature Control displays “PROB”. Control displays “EEEE”. Product not cooked thoroughly Cause Possible Solution Defective relay. Contact an authorized BKI service agent for corrective action. Heating elements not functioning. Contact an authorized BKI service agent for corrective action. Oven over-temperature switch defective.
P.O. Box 80400, Simpsonville, S.C. 29680-0400, USA http://www.bkideas.com Made and printed in the U.S.