
Service manual


Multi-Deck Warmer Installation
6
Installation
Unpacking and Handling
YOU are responsible for filling all freight claims with the delivering truck line. Inspect all cartons and crates
for damage as soon as they arrive. If damage to cartons or crates is found, or if a shortage is found, note this
on the bill of lading (all copies) prior to signing.
If damage is found when the equipment is opened, immediately call the delivering truck line and follow up the
call with a written report indicating concealed damage to your shipment. Ask for an immediate inspection of
your concealed damage item. Packaging material MUST be retained to show the inspector from the truck
line.
Do not place heavy objects on top of the unit or damage could occur. The units
are not structurally designed to support excessive external loading.
Move the unit as close as possible to its permanent location before moving it off of the shipping pallet. Make
certain there are no separately packed accessories before discarding packaging.
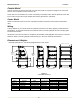
Floor Model
Follow the procedure below to level the unit and mount the kick plates. See Error! Reference source not
found..
1. Slide kick plates, ends first, between the base frame and outer panels. Secure in raised position with
tape. Make sure that the end kick plates fit behind the front and rear kick plates.
2. Using a carpenter’s level on the lowest shelf, level the unit by adjusting the leg levelers at the
corners of the unit.
3. Raise the low end of the unit to level it, do not lower the high end.
4. Check for level side-to-side and front-to-back.
5. Remove the tape holding the kick plates in raised position.
6. Make certain that the kick plates are flush to the floor.
7. Drill 9/64” diameter holes in the base frame to match the pre-drilled holes in the kick plates.
8. Attach the kick plates to the base frame with the #8x1/2” black sheet metal screws provided
(SCR355).
9. Seal kick plates to floor using a silicone-type sealant (Dow Corning RTV #732 or equivalent).