
User's Manual


724-746-5500 | blackbox.com
724-746-5500 | blackbox.com
Page 15
LES301A user manual
Chapter 3: Hardware Setup
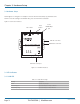
3.1.2 COM Port LED
Table 3-2. COM port LED message.
Message Description
Off No data is transmitted on the COM port
LED is blinking Data is transmitted on the COM port
3.1.3 RUN LED
Table 3-3. RUN LED message.
Message Description
On Jumper JP1 Pin 1 and Pin 2 are shorted to disable AP firmware running
LED is blinking every 0.5 second AP firmware is running normally
3.2 Installation Procedures (LES301A-KIT or LES301AE-KIT)
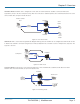
Step 1: Connect an LES301A to the included power supply (PS012 or PS012E) or to a 9–30 VDC source.
Step 2: Connect the LES301A to an Ethernet network. Use a standard straight-through Ethernet cable to connect to a hub/
switch, or connect it to a PC’s Ethernet port via a cross-over Ethernet cable.
NOTE: The PC must be in the same subnetwork as the LES301A.
Step 3: Connect the LES301A’s serial port to a serial device.
NOTE: You may need an adapter (LES30X-TB5) for RS-485 or RS-422 applications.
Step 4: Mount the LES301A to a wall or panel using the included mounting screws. Or, mount the unit to a DIN rail rack using
the DIN Rail Kit (LES30X-DR).
NOTES: Disconnect the device from power source completely before installing and wiring the server.
Do not exceed the maximum allowable current of the power cord and common wire. If you don’t, the wire might overheat
and cause serious damage to the connected and neighboring equipment.
The casing will be too hot to touch when operating in harsh environments. Please handle with care.
NOTE: Ground the LES301A properly through frame ground.