
Computer Hardware User Manual


Page 53
724-746-5500 | blackbox.com
Chapter 3: Installation
3. Installation
3.1 System Setup
NOTE: If you are a first-time user, we recommend that you set up the system
in the same room as a test setup. This will allow you to identify and solve
any cabling problems, and experiment with your system more conveniently.
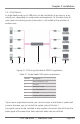
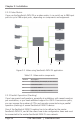
Setup of the ServSwitch DKM FX
1. Install the CPU and I/O boards.
2. Connect the keyboard, mouse, and monitor to the CPU board of the
ServSwitch DKM FX.
3. Connect the ServSwitch DKM FX to the power supply.
4. Open OSD via hotkey and log in with administrator rights in the main menu
under configuration (see Section 4.2.1).
5. Configure initially as requested.
NOTE: After configuring the system, we recommend that you save the
configuration by selecting Configuration > Save and restart the ServSwitch
DKM FX by selecting Restart Matrix.
6. Optional: Establish a network connection between the ServSwitch DKM FX and
the Java tool to set an extended configuration (see Section 4.2.2).
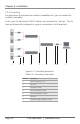
Setup of Extender
1. Connect the CON units to the ServSwitch DKM FX by using the interconnect
cables (CATx or fiber).
2. Connect the CON units to the input devices to be used (for example, keyboard
and mouse).
3. Connect the 5-VDC power supply units to the CON units.
4. Check the basic function of the CON unit by opening the OSD via hotkey.
5. Connect the source (computer, CPU) to the CPU unit of the extender by using
the provided connection cables.
6. Connect the CPU unit to the ServSwitch DKM FX by using the provided
interconnect cables (CATx or fiber).