LES1308A, LES1316A LES1332A, LES1348A 8-/16-/32-/48-Port Advanced Console Server with GSM Modem QS Guide Quick Start Guide Securely manage data center and network equipment from anywhere in the world.
8-/16-/32-/48-Port Advanced Console Server Quick Start Guide Trademarks Used in this Manual Black Box and the Double Diamond logo are registered trademarks of BB Technologies, Inc. Cisco is a registered trademark of Cisco Technology, Inc. Linux is a registered trademark of Linus Torvalds. Nagios is a registered trademark of Nagios Enterprises. Any other trademarks mentioned in this manual are acknowledged to be the property of the trademark owners. Page 2 724-746-5500 | blackbox.
8-/16-/32-/48-Port Advanced Console Server Quick Start Guide This Quick Start Guide walks you through installation, configuration, and local operation or your LES1308A, LES1316A, LES1332A, and LES1348A 8-/16-/32-/48-Port Advanced Console Servers. For more details, please refer to the user’s manual on the CD-ROM. Follow the steps listed below to get started: Step 1: Check kit contents. Your package should contain the following items. If anything is missing or damaged, contact Black Box at 724-746-5500.
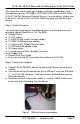
8-/16-/32-/48-Port Advanced Console Server Quick Start Guide • Connect your serial devices to the SERIAL PORTS 1-8/16/32/48. NOTE: If you plan to use out-of-band (OoB) dial-in access, connect the internal modem to the phone line. If you plan to use broadband OoB, connect the access device (such as DSL modem) to NETWORK2. • Plug the Advanced Console Server into the AC power. The Advanced Console Server has dual universal AC power supplies with automatic failover built in.
8-/16-/32-/48-Port Advanced Console Server Quick Start Guide • • • • Log in using the default system user name: root, and the default password: default. A Welcome screen listing the basic configuration steps is displayed. Select “Change the default administration password on the Users page”, enter and confirm a new password for root, and click “Apply.
8-/16-/32-/48-Port Advanced Console Server Quick Start Guide Step 4: Configure serial and network devices. Select “Serial & Network: Serial Port,” which will display the label, mode, and protocol options currently set for the serial port. By default, all the serial ports are set to console server mode (see the user‘s manual for other modes). Figure 4. Serial & Network: Serial Port screen. To configure a serial port, click “Edit.
8-/16-/32-/48-Port Advanced Console Server Quick Start Guide Enter the IP address/DNS name of the host. Edit the permitted services used for accessing this host, for example, HTTPS (TCP port 443), VNC (TCP port 5900), or add custom TCP or UDP port numbers—only the services specified here are tunneled through to the host. All other services are blocked. Specify the level of information to be logged and monitored for each host access. Click “Apply.” The Advanced Console Server has one USB 1.
-/16-/32-/48-Port Advanced Console Server Quick Start Guide Figure 6. Serial & Network: Users & Groups screen. Note: The Advanced Console Server comes with a default certificate for initial configuration purposes only. You will need to direct your browser to (temporarily) proceed and accept this untrusted certificate. It is recommended as soon as possible thereafter you generate and install a new trusted certificate.
8-/16-/32-/48-Port Advanced Console Server Quick Start Guide • • Select “Internal Cellular Modem” on the “System: Dial” menu and check Enable Dial-Out Enter the carrier’s APN e.g. for AT&T (USA) simply enter “i2gold”, for TMobile (USA) enter “epc.tmobile.com”, for InterNode (Aust) enter “internode” and for Telstra (Aust) enter “telstra.internet” Note: Your GSM cellular carrier may have provided you with connection details.
8-/16-/32-/48-Port Advanced Console Server Quick Start Guide Step 8: Out of band access To directly access the Advanced Console Server, it needs to have a Public IP address and it must not have SSH access firewalled. Almost all carriers and cellular service providers offer corporate mobile data service/plans with a Public (static or dynamic) IP address. These plans often have a service fee attached.
8-/16-/32-/48-Port Advanced Console Server Quick Start Guide response sequence can be initiated (such as power cycling a device). Extensive management of UPSs and RPCs using Open Source NUT and Powerman tools. The Manage: Power facility enables both administrators and regular users to monitor and control attached PDU power strips, and servers with embedded IPMI BMCs.
NOTES Page 12 724-746-5500 | blackbox.
NOTES 724-746-5500 | blackbox.
NOTES Page 14 724-746-5500 | blackbox.
NOTES 724-746-5500 | blackbox.
LES1308A, LES1316A, LES1332A, and LES1348A QSG, rev.