July 2010 ASTC3000 ASTCBK ASTCRCB ASTCRCR ASTC3000POE ASTCPOEK ASTCRCG ASTCKEY Auto-Sync Time Clock The Auto-Sync Time Clock is a validated time system with a Web interface and auto discovery. ASTC3000 provides validated time for an accurate time stamp, ASTC3000POEK Kit option provides Power over Ethernet with Full Power Reserve, and the ASTCBK Kit option provides Full Power Reserve.
Trademarks Used in this Manual Ethernet is a registered trademark of Xerox Corporation, Inc. XP, VISTA, IE, Microsoft, Windows, Windows NT, are registered trademarks of Microsoft Corporation in the United States and/or other countries. Bonjour is a trademark of Apple Computer, Inc., registered in the U.S. and other countries. Safari is a registered trademark of Apple Computer, Inc., registered in the U.S. and other countries. Digi Connect ME is a registered trademark of Digi International, Inc.
Table of Contents 1. Auto-Sync Time Clock ................................................................................ 1-1 1.1. How This Manual is Organized..................................................................... 1-1 1.2. General Information .................................................................................. 1-1 1.2.1. What is OATS Compliance? ................................................................... 1-2 1.2.2. Features ..............................................
Auto-Sync Time Clock 5. Getting Started .......................................................................................... 5-1 5.1. Installing the Auto-Sync Utility................................................................. 5-1 5.2. Using the Auto-Sync Utility ...................................................................... 5-2 5.2.1. How to Discover & Connect to a Auto-Sync Time Clock ............................. 5-3 5.2.2. How to Create a Centralized Transaction Report ...............
Chapter 1: Introduction 1. Auto-Sync Time Clock 1.1. How This Manual is Organized The installation, setup and operation procedures in this manual are provided for user assistance. Chapter 1 provides general information with a brief overview of features, and benefits. Chapter 2: provides an overview of system components with step-by-step procedures for installing your Auto-Sync Time Clock. Chapter 3 provides step-by-step procedures for quick startup using a Web browser.
Auto-Sync Time Clock The Auto-Sync Time Clock can be synchronized from a National Institute of Standards and Technology (NIST) NTP (Network Time Protocol) time server, or internal time server via Ethernet® connection (see Figure 1-1). All communication with the Auto-Sync Time Clock is via a network TCP/IP connection. The Auto-Sync Time Clock auto discovery and configuration can be accomplished via simple instructions (see Chapter 3: Quick Start).
Chapter 1: Introduction must record time in hours, minutes and seconds with to-the-second granularity and must be synchronized to a source that is synchronized to within three seconds of the National Institute of Standards and Technology (NIST) atomic clock. Clocks must be synchronized once a day prior to the opening of the market, and remain in synch throughout the day. In addition, firms are to maintain a copy of their clock synchronization procedures on-site.
Auto-Sync Time Clock 1.2.3. Benefits Assures financial institutions’ compliance with OATS Rule 7430 as per FINRA/SEC. The Auto-Sync Time Clock will continue to function and maintain time as a stand-alone unit, even if it does not receive synchronization from an NTP time server. The Auto-Sync Time Clock is the highest quality OATS-compliant time stamp available.
Chapter 1: Introduction 1.3. Auto-Sync Time Clock Installation & Operation Guide The Auto-Sync Time Clock Installation & Operation Guide was designed to assist you in the daily operation of your clock and to provide a comprehensive understanding of the Auto-Sync Time Clock. This Guide can be found on the AutoSync Utility CD that came with your clock. 1.4.
Auto-Sync Time Clock This page intentionally left blank. 1-6 724-746-5500 | blackbox.
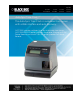
Chapter 2: Installation 2. Installation Basics 2.1. Auto-Sync Time Clock External View Figure 2-1. Auto-Sync Time Clock External View. 2.2. Components • 2 Keys (Important!! - Please store these keys in a safe place as you will need them to remove the cover). One unit with attached AC power adapter [not included with PoE model] and Ethernet cable. • An Auto-Sync Utility CD for the clock (copy configuration to clocks, auto discovery, reports, etc.
Auto-Sync Time Clock Figure 2-2. Auto-Sync Time Clock Cover Removal. 2.4. Unpacking the Clock After removing the upper cover, lift up the Printer Block (A) and remove the Packaging Spacer (B). Figure 2-3. Auto-Sync Time Clock Packaging. NOTE: The serial number can be found on the bottom of your clock. 2.5. Installing the (ASTCBK) Optional Full Power Reserve (FPR) 1. Disconnect the clock AC adapter from the power outlet. NOTE: Failure to do so could result in a hazardous shock. 2.
Chapter 2: Installation Figure 2-4. Top Plate Removal. 4. Disconnect the Ethernet cable at the RJ-45 network connector (see Figure 2-4). You DO NOT have to remove the cable from under the wall mounting plate on the back – just disconnect it at the RJ-45 connector. 5. Lift up the top plate by pulling upwards and towards the back of the clock to remove it. Temporarily set aside. Note the alignment of the top plate during removal – especially the front and rear tabs (see figure to the right). 6.
Auto-Sync Time Clock Figure 2-5. FPR & Mounting Bracket. 8. After the FPR mounting bracket is in its proper position, return the front PCB to its original position seated in its retaining slot. In this position the top rear of the PCB will fit close alongside the FPR mounting bracket (see Figure 2-6). Figure 2-6. Front PCB & FPR Mounting Bracket in Position. 9.
Chapter 2: Installation Insert Plastic Rivet Insert Plastic Rivet Figure 2-7. Auto-Sync Time Clock Rear View. 10. With the FPR battery pack in the holder alongside the network RJ-45 connector, plug in the FPR battery cable (the connector with the black and red wires) into the open brown connector (see Figure 2-7) located just under the battery pack on the PCB at CN4. Figure 2-8. Rear View Showing Cable/Connector Location. 724-746-5500 | blackbox.
Auto-Sync Time Clock NOTE: For units with the FPR option, disconnect the FPR battery pack cable connector if the Auto-Sync Time Clock will not be plugged into AC power for an extended amount of time. Leaving the battery pack connected without charging for a long time could promote battery harm and damage to the clock. 11. Carefully reinstall the top plate by first inserting the rear tabs into the appropriate rear notches, making sure the rear centering tab is in its notch.
Chapter 2: Installation NOTE: After installing the FPR and connecting the unit to AC power for the first time, allow it to charge the battery pack for 24 hours before printing. Failure to do so may result in reduced battery life. When using the optional FPR - keep the clock plugged into an AC power source during normal operation to maintain an adequate charge. The power reserve battery is designed to be used only during limited power outages, not as a power source during normal operation.
Auto-Sync Time Clock Figure 2-10. PoE/FPR & Mounting Bracket. 8. Install the two plastic rivets (1 per each side) through the main clock frame into the locating holes as illustrated in Figure 2-10 to help align and secure the mounting bracket. Figure 2-11. Front PCB & Mounting Bracket. 9. Remove the rear wall mounting plate (see Wall Mounting). Disconnect the AC power connector from the PCB (red & white wires – see Figure 2-12). 2-8 724-746-5500 | blackbox.
Chapter 2: Installation Figure 2-12. Rear View Showing AC Power Line For Removal. 10. Unscrew the Phillips head screw and remove the black ground wire for the AC line (see Figure 2-12). Remove the AC power line from the back of the clock with the transformer at the end. You may have to cut a couple of plastic wire ties to do this. 11. Reinstall the wall mounting plate (see figure below) on the back of the clock using caution to verify that the Ethernet cable is properly routed. 12.
Auto-Sync Time Clock Figure 2-13. Rear View Showing PoE & FPR Cables/Connections. 13. Carefully reinstall the top plate by first inserting the rear tabs into the appropriate rear notches, making sure the rear centering tab is located in its notch. Then push the plate forward making sure to align the sides and front of the plate in the proper position. Finally push the plate downward to lock into position. 14.
Chapter 2: Installation 15. Insert and tighten the two (2) top plate side retaining screws (one on each side). 16. Replace the upper cover of the Auto-Sync Time Clock (see Figure 2-2). 17. Connect the clock Ethernet cable to a network connection (AC power no longer required when equipped with the PoE option).
Auto-Sync Time Clock NOTE: Plugging the AC power cord into a wall socket will cause the printer carriage to move up. When AC power is not connected properly or the PoE is not functioning, the colon will not flash (see Error Messages in Chapter 6). 2.8. Wall Mounting The following procedure is recommended for wall mounting: 1. With the cover removed, the wall mount plate can be removed by using your index finger as shown to pry open the bottom portion (see arrow 1).
Chapter 2: Installation 4. Is the Auto-Sync Time Clock connected to a network connection (Ethernet RJ45)? This step is not required to perform a test printout when first installing the Auto-Sync Time Clock. 5. Is the Auto-Sync Time Clock plugged into an AC wall outlet? (skip this step if equipped with optional PoE). Once you have verified these items, insert a sheet of paper to make a test print.
Auto-Sync Time Clock Carbon Paper: The Auto-Sync Time Clock will print on both carbon and carbonless paper. The imprint will print through up to six copies, depending on the quality of the document used. Carbon and carbonless paper deteriorates over time. Humidity, high temperatures and sunlight accelerate this process. For maximum print performance, use only high grade, uncontaminated carbon or carbonless paper. 2.9.3.
Chapter 2: Installation P. - Paper Detect Only: This setting will disable the Print Bar and automatically print when media is inserted into the Auto-Sync Time Clock and contacts the print margin (Paper Sensor). For this method, you must set a desired print margin using the Margin Selector. S.P. - Paper Detect & Print Switch: This Print Method is for manual printing when the alignment of the imprint on your document is critical.
Auto-Sync Time Clock 2.11. Specifications Power Requirements: 120 VAC ±10%, 60 Hz 100 and 230 VAC ±10%, 50/60 Hz Power Consumption: Normal 4.5W, Maximum 25W. Power Failure Memory Protection: Built-in lithium coin battery (up to 12 months). Communication: 10/100 BaseT (auto-sensing), RJ45 connection. Ambient Conditions: Temperature: -10°C to 45°C (14°F to 113°F) FPR Option: 0°C to 45°C (32°F to 113°F) Humidity: 10% to 90% (non condensing). Dimensions: 176 mm (6.9”) High X 150 mm (5.
Chapter 2: Installation Options Full Power Reserve (FPR): Optional, 9.6V, 700mAh NiCad rechargeable battery. When fully charged, it will maintain normal operations for 6 hours or 400 prints. Power over Ethernet (PoE): Optional, and includes 9.6V, 700mAh NiCad rechargeable battery. 48V in, 13.5V out 2.12. Power over Ethernet Overview With the PoE Option for Auto-Sync Time Clock: Power-over-Ethernet (PoE) is a network standard based on IEEE 802.
Auto-Sync Time Clock This page intentionally left blank. 2-18 724-746-5500 | blackbox.
Chapter 3: Quick-Start 3. Getting Started The following prerequisites are recommended: Ethernet connection to connect the clock to for time sync and configuration. AC power (Auto-Sync Time Clock comes with 6 foot long cable attached to power adapter if not equipped with the PoE option). A web browser for configuring the Auto-Sync Time Clock. It is recommended to install the Utility CD that was included to discover the clock and connect to the web login.
Auto-Sync Time Clock Figure 3-2. Using Safari with Bonjour to Find Auto-Sync Time Clock. Firefox without Bonjour: Use the Auto-Sync Utility which is discussed in detail in Chapter 5 to discover and connect to the clock. If Firefox is your default browser it can be used with the utility to configure the clock. (see next paragraph). Or it is recommended to: Install and start the Auto-Sync Utility on the CD that came with your clock.
Chapter 3: Quick-Start Figure 3-4. Auto-Sync Time Clock Login Screen. NOTE: The Auto-Sync default Clock Name will be auto-sync_ and the clocks MAC address (i.e., auto-sync_00:00:00:00:00:00). In computer networking, a Media Access Control address (MAC address), Ethernet Hardware Address (EHA), hardware address, adapter address or physical address is a quasi-unique identifier assigned to most network adapters or network interface cards (NICs) by the manufacturer for identification.
Auto-Sync Time Clock NOTE: If this is not your first time connecting to this Auto-Sync Time Clock and a “Favorites” bookmark was created in your Web browser, select it from the Favorites/Bookmarks menu, and the Auto-Sync Time Clock Login page will be displayed. In this instance you will NOT have to Bonjour the clock as its location has already been discovered and saved! 3.2.
Chapter 3: Quick-Start Look – Skip Step 4 if the default general print options are acceptable. 5. To define custom print out, click on the Print Lines 1 & 2 link under Print and the Print Lines 1 & 2 screen will appear (see Figure 4-10). Click on the button to save custom Print Lines 1 and/or 2 in the clock flash memory. Look – Skip Step 6 if the default NASDAQ print for Line 1 and the clock IP/MAC address for Line 2 is acceptable.
Auto-Sync Time Clock 10. To define e-mail notification for Backup, Report, and/or Time Sync transactions, (i.e., a clock failure to synchronize with a specific time server), click on the E-mail link under Notification, and the E-Mail Settings screen will appear with the SMTP tab (see Figure 4-15). Click on the e-mail settings. button to save Look – Skip Step 10 if notification of clock transactions is not required. 11.
Chapter 4: Operation 4. General Information After the Auto-Sync Time Clock has been unpacked, wall mounted (optional), connected to a network, and plugged into AC power, the Zeroconf capability should allow the clock to be automatically detected with a Web browser. It is recommended to install and use the Auto-Sync Utility that came on the CD included with your Auto-Sync clock if: Your browser does not support the Bonjour plug-in, or you do not want to install Bonjour.
Auto-Sync Time Clock Certain firewalls will only partially block Bonjour packets, so if you experience intermittent behavior, check the firewall settings and verify that Bonjour is listed as an exception and is allowed to receive incoming packets. Bonjour will configure the Windows firewall appropriately during installation on Windows XP Service Pack 2 and above.
Chapter 4: Operation Name & Assigned IP Enter Name Enter Description Figure 4-1. Auto-Sync Time Clock Web Page. The following links appear on every Auto-Sync web page: Home The “Home” link will always return you to the Auto-Sync Time Clock Information page (see Figure 4-1). Contact The “Contact” link displays support contact information for the Auto-Sync Time Clock. Help The "Help" link selection provides online help.
Auto-Sync Time Clock NOTE: The Auto-Sync Time Clock setup parameters can be customized at any time and do not have to be changed in the following order. However, it is recommended to create a user. NOTE: After logging in, the Clock Information screen will appear. It is recommended to customize the clock name and description to your facility nomenclature. All other fields on this screen are read-only.
Chapter 4: Operation NOTE: The only acceptable characters for a Username and Password are ‘a-z’ upper and lowercase, ‘0-9’, (-) dash, (_) underscore, and (*) asterisk. Please make a note of your Username and Password and keep in a safe place. 4. Click on the Edit button to change the name and/or password of a user. Press the button to save, or to return to main screen with no change. 5.
Auto-Sync Time Clock 5. Check whether or not daylight savings should be applied. This option should only be un-checked in areas where DST is not used and OATS compliance is not required. Select the week, day, and month of the Start and End dates from the dropdown Start and End times (hour/minute). Default = DST enabled. Default = Military (i.e., 17:00 = 5:00pm) Figure 4-4. General Clock Settings. 6. Click on the button to save the general clock settings.
Chapter 4: Operation Figure 4-5. Network Clock Settings. 8. Select to Use DHCP (Dynamic Host Configuration Protocol) which is a protocol used by networked devices (clients) to obtain the parameters necessary for operation in an Internet Protocol network. This is the default. Or Select Use Fixed IP Address when desiring to use a static IP address, and enter the following: Fixed IP address for the Web Clock. Obtained from network administrator. Subnet Mask for the Web Clock.
Auto-Sync Time Clock 4.1.6. How to Set the Print Options 1. Click on the General Settings link under Print, and the Print General Settings screen will appear (see Figure 4-6). 2. Select the Minute Format from the dropdown menu (default = 60th). An example of this would be: if the actual time is 16:30 (4:30PM), 10th = 16.5, 20th = 16.50, 60th = 16:30, and 100th = 16.50. Figure 4-6. Print General Settings. 3. Select the Dual Print, On or Off.
Chapter 4: Operation Print Line 2 Indicator 5. Select to Print Leading Zero, On or Off (default = On). An example of this feature would be: if the actual date is 07/08/2008, with leading zero ON, the display = 07/08/2008, and with OFF, the display = 7/8/2008. 6. Select to Print Direction, Left or Right (default = Left). This defines if you want to Left or Right justify the printout. The following figures illustrate the appearance of left and right justified printing on a typical time card.
Auto-Sync Time Clock Figure 4-9. Example of Both Left & Right Printing. 7. For auto numbering select: Print the same number all the time OR….select Print number Nth times & increment by 1. You must enter the Nth number if using this selection (default value = 1). The Auto-Sync Time Clock will automatically add a sequential number to the printout. The Nth #: field selection will make the automatic number increment or remain constant.
Chapter 4: Operation which can be printed on each line (total allowable length = 150 dots or approximately 21 characters). Also, a maximum of 10 rows can be added. See Appendix A for a character table which shows character size as a % of dots for regular and bold characters. NOTE: Lines cannot be edited. If a mistake is made, press the start over. button and 9. Enter the desired text in the text field, select Regular or Bold from the dropdown button.
Auto-Sync Time Clock NOTE: Only uppercase characters will be printed. Every time you enter text or a symbol, and press the Add Text or Add Symbol buttons that is considered a “row” which appears in the row box. A maximum of 10 rows will be accepted. Trying to save a print line with greater than 150 dots will generate the error message; “Symbol is invalid, exceeded the maximum length”.
Chapter 4: Operation 4. Enter the Sync Retry Attempts: (the default & maximum = 3). This is the # of times that any time server would be tried if time synchronization fails. 5. Select “Ignore Deviation Error” option for the maximum deviation (absolute difference between clock time and NTP time) to be ignored and the clock time set to the NTP Time Server during time synchronization. If not checked (default), and the previous condition occurs, the clock will not be set to that Time Server.
Auto-Sync Time Clock 3. Highlight the desired time server in the list, and click on the buttons to modify or delete an existing time server. , or NOTE: The only editable field for a predefined time server is Enabled, but if the time server was user created, then the Name, Host Name/IP Address, and Enabled fields can be changed. The Last Successful Sync and Last Successful Attempt fields are read only.
Chapter 4: Operation 4.1.7.3. DNS Server Setup 1. Click on the DNS Servers link under Time Sync, and the DNS Servers Settings screen will appear displaying the four (4) default public DNS servers (see Figure 4-14). 2. Enter Domain Name (default = local as Zero Configuration uses dot local). 3. To define your own DNS Server, highlight the desired IP Address and enter your IP address (max. = 46 characters).
Auto-Sync Time Clock 4.1.8. How to Setup E-Mail and SNMP Trap Notification Simple Mail Transfer Protocol (SMTP) is an Internet standard for electronic mail (e-mail) transmission across Internet Protocol (IP) networks. While electronic mail server software uses SMTP to send and receive mail messages, user-level client mail applications typically only use SMTP for sending messages to a mail server for relaying.
Chapter 4: Operation 4. Click the button to save the SMTP e-mail settings. 5. Click on the Account(s) tab and the E-Mail screen to define e-mail destinations will appear (see Figure 4-16). 6. Enter E-mail From Address (maximum length is 155 characters). This is the originator for the e-mail notification. 7. Enter E-mail To Address 1 and E-mail To Address 2 (maximum length is 155 characters each). This is the recipient(s) for e-mail notification. 8.
Auto-Sync Time Clock Figure 4-17. E-Mail Settings for Time Sync Events. 14.Click on the Report & Backup Event(s) tab and the E-Mail Settings screen to select these events for email notification will appear (see Figure 4-18). Figure 4-18. E-Mail Settings for Report & Backup Events. 15.Select to receive e-mail notification for the status of running a scheduled backup and/or transaction report by clicking in the box alongside the selection. 16.
Chapter 4: Operation 4.1.8.2. SNMP Trap Setup Simple Network Management Protocol (SNMP) is used in network management systems to monitor network-attached devices for conditions that warrant administrative attention either on-site or remotely. A network administrator can use SNMP to monitor the availability-performance-error rates either on-site or remotely over a network, which facilitates central clock management.
Auto-Sync Time Clock 5. Click on Enabled to make the SNMP trap server active for alerts. If unchecked, no SNMP trap alerts will be used. 6. Click the button to save the SMTP trap settings. 4.1.9. How to Setup Time Synchronization Schedules At a pre-determined time of the day and day of the week, the Auto-Sync Time Clock can be set to confirm or validate that a time/date synchronization signal has been received. This is called time synchronization or “Signal Validation".
Chapter 4: Operation NOTE: Care must be exercised when setting up Time Sync schedules because a maximum of 8 separate Time Sync schedules can be set up. Each of these 8 schedules could be enabled and have up to a maximum of 12 scheduled time syncs per day. The flash memory in the clock is capable of retaining up to 5 years worth of data created as per OATS Rule 7430 which requires 2 Time Syncs per day.
Auto-Sync Time Clock Frequency Settings used to define contents of a scheduled Report file and the scheduled Backup Transaction file. Figure 4-21. Schedule Settings. 8. Click on the button to save the schedule information, or click on the button to return to the Home page without saving. 4.1.10. How to Setup Report Schedules At a pre-determined time of the day and day of the week, the Auto-Sync Time Clock can be set to send a transaction report file to a designated FTP site (path).
Chapter 4: Operation The following would be created for Daily when: Run every 1 day(s) = a Report file just for the previous day, Run every 2 day(s) = a Report file with the previous 2 days of transactions, Run every 3 day(s) = a Report file with previous 3 days of transactions, And so on with a maximum of 365 days.
Auto-Sync Time Clock Also, use the Auto-Sync Utility CD to get clock configuration and/or transaction files with the built-in FTP capability provided by the utility (see Chapter 5). 4.1.12.1. Utility Settings for FTP Server The Auto-Sync Time Clock can backup and/or restore the configuration and time sync transaction database. The clock utilities can also be used to view transaction report files for a user defined period of time.
Chapter 4: Operation 4.1.12.2. Performing Backup and Restore The Auto-Sync Time Clock has a built in utility that can be used to Backup and/or Restore the clock configuration and transaction files. Please consult Chapter 5 for details on how to use the Auto-Sync Utility to simultaneously update the configuration of multiple clocks using a shared configuration config.bin file which was created from a shared backup procedure. To backup the Configuration & Transaction files stored in the clock: 1.
Auto-Sync Time Clock NOTE: It is recommended to open the text version of the transaction file using MS Word® or Excel rather than Notepad. The filename for the clock transaction file will begin with the last 3 character pairs of the unique clock MAC address (see Figure 6-1) and end in “_ATVSTrans.txt”.
Chapter 4: Operation To restore a Configuration & Transaction file in the clock: 1. From the Backup/Restore link under Utilities, click on the Restore tab to perform a restore for the Auto-Sync Time Clock (see Figure 4-26). 2. Click on the drop down menu to select the type of data you want to restore. The choices are: Configuration, Transaction, or Both. 3.
Auto-Sync Time Clock NOTE: The restore utility is recommended to be used when the clock has been reset to factory default settings. It can also be used to copy the configuration settings from one clock to a single clock. It is recommended to use the Auto-Sync Utility for Updating the configuration of multiple clocks. The error message “Can’t open FTP connection” will appear if an FTP Server cannot be detected, i.e., has not been setup in the Utility Settings. 4.1.12.3.
Chapter 4: Operation 5. Click on the button to save the report settings. 6. Click on the View Transactions tab to view the transactions based upon the previously defined and saved settings (see Figure 4-28). All failed synchronizations will appear in red when viewed in the browser.
Auto-Sync Time Clock “USER TIME SYNC” – Used to designate that a manual time sync has been performed using the Reset function from Diagnostics (see How to Reset the Clock in Chapter 6). Figure 4-28. View Transactions Example. NOTE: The display will only show 25 transactions. Click the or buttons to move backward or forward 25 transactions in the display. When the transaction file is saved as a file, the filename will end in “_rpt” (see Figure 4-24 for an example of a transaction file).
Chapter 5: Utility 5. Getting Started It is recommended to install the Auto-Sync Utility for ease-of-use to discover and connect to your Auto-Sync Time Clock(s). This utility eliminates the need of having to use Bonjour with your browser, which for Internet Explorer might require that you download and/or install the Bonjour plug-in.
Auto-Sync Time Clock Figure 5-2. Setup Maintenance. 3. When the “InstallShield Wizard Complete” screen appears, click on the Finish button to end installation and launch the utility, if checked (see Figure 5-3). Figure 5-3. Finish Install of Auto-Sync Utility. 5.2. Using the Auto-Sync Utility The following procedures discuss how to use the Auto-Sync Utility.
Chapter 5: Utility Replicate a previously created clock configuration to multiple clocks with the feature. Using this function requires knowledge of the operation concepts described in Chapter 4 of this Guide. Update the clock firmware, download configuration, and load IP file. Monitor clock status by showing on-line/off-line clocks. Use Settings feature to: - Change and/or select Domain names - Define email server settings and enable/disable - Define service port (default = 7). 5.2.1.
Auto-Sync Time Clock 2. From the main menu, click on the View menu and select the submenu Settings. The Settings and Auto discovery tabs will appear on top. If necessary, from the Settings screen, click on the Discovery Settings tab to change the discovery settings. This step is optional and should usually be skipped. Only perform this step if you are having discovery problems and need to change the Domain Name, and timeout value.
Chapter 5: Utility Default clock name with MAC address at the end. Figure 5-6. Auto-Sync Time Clock Login. If this is your first time logging into the clock, enter the default Username = Admin Password = password If this is not your first time logging into the clock, enter your case-sensitive Username (max = 20 characters) and your Password (max = 15 characters), then click on the Login button and the Auto-Sync Time Clock Information page will appear (see Figure 5-7).
Auto-Sync Time Clock 5.2.2. How to Create a Centralized Transaction Report NOTE: Before using this function of the Auto-Sync Utility you MUST have performed a Backup of each clock to have created a text transaction report file. Also, all the desired report files must be in the same folder. 1. Startup the Auto-Sync Utility. All of the discovered Auto-Sync Time Clocks will automatically appear in a list with the Domain, Device Name, IP Address, MAC Address, and Status. 2.
Chapter 5: Utility Figure 5-9. Select Report Directory. 7. Press the “Generate Report from File(s)” button and the utility will create the report and automatically open when complete. The report will be created and saved in the same folder with the transaction files that were used to create it. Date Range Selected. Clock name. Transaction Info with example of successful sync shown in blue. Figure 5-10. Example of Transaction Report Created with Auto-Sync Utility. 724-746-5500 | blackbox.
Auto-Sync Time Clock NOTE: The transaction file will automatically be named autosync_time_sync_report.html or .txt (see Figure 5-9). The transaction report file created in either html or text format can be easily edited. Every time you create a report file the previous report file will be overwritten. It is recommended to move the report file to a different location if you do not want that to happen. 5.2.3.
Chapter 5: Utility Click on desired clock(s) Browse to ATVSConfig (.bin) file stored on FTP server Operation status will be displayed here Figure 5-11. Auto Discovery Download. 3. Browse to select the shared clock file using the Windows Open dialog (see Figure 5-12). For example, this file could be a configuration file labeled “ATVSConfig.
Auto-Sync Time Clock 4. Once you have located the original configuration file, click on the now active button to download the clock configuration file to the selected clock(s). NOTE: It is recommended to perform a Backup from the built-in clock Backup Utility before performing any clock firmware updates. FAILURE to do this could result in loss of clock configuration and/or the transaction database! button after browsing NOTE: If updating clock firmware, click on the to and selecting a clock firmware file.
Chapter 5: Utility NOTE: It is recommended to perform a Backup from the built-in clock Backup Utility before performing any clock firmware updates. FAILURE to do this could result in loss of clock configuration and/or the transaction database! button after browsing NOTE: If updating clock firmware, click on the to and selecting a clock firmware file. ONLY PERFORM this function if Black Box recommended. When performing a firmware update, the file would have an “image.
Auto-Sync Time Clock View Menu Functions Settings – Use this function to enter discovery settings for Domain name to allow discovery in multiple domains. Also, set clock discovery timeout of Auto-Sync Utility function. Domains can be deleted from the list to browse (see Figure 5-14). NOTE: Each domain will be searched for the amount of time set in the “Clock discovery timeout” field before searching the next domain in the “List of domains to browse” list on the right (see Figure 5-14 for an example).
Chapter 5: Utility Figure 5-15. View Utility Settings – Monitoring Settings. From the Monitoring Settings tab click on the Mail Account Settings (see Figure 5-16) to; - Enter email from and To address used for email notification; Figure 5-16. View Utility Settings – Monitoring Account Settings. Click on the Other Settings tab (see Figure 5-17) to; - Enter the service port number (the default = 7). Enter any unused port number from 1 thru 65535.
Auto-Sync Time Clock Log – Use this function to view a continuous log of Auto-Sync Utility functions (see Figure 5-18) from the auto-sync_Util.log file. The log is arranged in ascending order by date. Figure 5-18. View Utility Log Information. Advanced options – Use this menu to perform the advanced Auto-Sync Utility functions, which include the previously discussed Manual discovery, Download and Report functions.
Chapter 5: Utility Figure 5-20. Auto-Sync Utility Get Configuration File. NOTE: Operation status will appear below. Press the clear button to clear status. From Advanced options Clock Config/Transaction file to; Get selected clock configuration: copy the configuration file from the selected clock to a binary file with the name “ATVSConfig.bin”. This file will be located in a folder called Configuration at the following path Program Files/Auto-Sync Utility/Configuration.
Auto-Sync Time Clock Figure 5-21. Auto-Sync Utility Get Transaction File. Sort By – Use this function to resort the list of discovered Auto-Sync Time Clocks by; Device Name, MAC Address, IP Address, Status, and Version (firmware). The list will automatically be generated in the order that the clocks are discovered. Clock Firmware version – Use this function (see Figure 5-22) to show the clock firmware version in the list of discovered Auto-Sync Time Clocks.
Chapter 5: Utility Help Menu Functions About – Use this function to display the About screen (see Figure 5-23). Click on the OK button to close. Figure 5-23. Auto-Sync Utility About Screen. User Guide – Use this function to open the PDF version of the Auto-Sync Time Clock User Guide from the Auto-Sync Utility CD. 724-746-5500 | blackbox.
Auto-Sync Time Clock This page intentionally left blank. 5-18 724-746-5500 | blackbox.
Chapter 6: Maintenance To prevent damage to the Auto-Sync Time Clock, it is recommended to use only paper type media. Special care should be taken to avoid inserting paper with staples, paper clips, or other fastening devices directly under the print frame as damage can occur. Care should also be taken when inserting and removing paper from the clock. Upon inserting, make sure the paper does not bend or crumple, because it may jam the machine.
Auto-Sync Time Clock 6.2. How to Manually Time Sync the Clock Use this function to ensure the clock is able to sync with the desired time server, and/or force a time sync to set the time. 1. Click on the Diagnostics link under Clock, and the Clock Diagnostics screen will appear. Then click on the Time Sync tab and the Time Sync screen will appear (see Figure 6-2). Figure 6-2. Manual Time Sync Clock. 2. Select Yes and press the button to manually Time Sync the clock.
Chapter 6: Maintenance 6.3. How to Perform LCD Display Clock Diagnostics 1. Click on the Diagnostics link under Clock, and the Clock Diagnostics screen will appear. Then click on the LCD Display tab and the LCD Display screen will appear (see Figure 6-3). Figure 6-3. LCD Display Clock Diagnostics. button to test the clock LCD display by lighting all the 2. Press the segments/symbols on the clock LCD (see Figure 6-4). This allows the user to verify that all segments and symbols work.
Auto-Sync Time Clock Status Area Information Figure 6-5. Clock Reset. NOTE: If any of the clock reset commands fail, you will see a red “Failed” in the status area. All of the reset commands will appear in the transaction report highlighted in orange. See the following for an example of reset commands when using View Transactions from the Reports Utility : 01/06/2009 08:46:26 : - USER - All transaction(s) have been deleted 01/06/2009 08:47:13 : - USER - Clock print counter has been reset to : 1 2.
Chapter 6: Maintenance 4. Select Yes for, “Do you want to reset the print number?” by pressing the button. The status will be displayed after the operation. If everything is Ok, you will see “Successful” in the Status field. This will reset the Print Number to 1 or to any value specified. 6.5. How to Perform Remote Connection Test 1. Click on the Diagnostics link under Clock, and the Clock Diagnostics screen will appear.
Auto-Sync Time Clock 6.6. Display Messages 6.6.1. Normal Startup When the AC power is connected to the clock, the display on the clock will flash “boot”, then sequentially display the complete IP address twice, and finally show the normal display of date and time. See the following figure for an example. For example, an IP = 192.168.57.
Chapter 6: Maintenance 6-7. Colon Status. 6.6.3. Time Synchronization Validation At a pre-determined time of the day and day of the week (see How to Setup Time Synchronization Schedules), the Auto-Sync Time Clock can be set to confirm or validate that a time/date synchronization signal has been received. This is called time synchronization or “Signal Validation". The factory default time validation is set for 00:00 or (12:00 AM midnight), Sunday through Saturday.
Auto-Sync Time Clock NOTE: An error message can be cleared by removing the cover and pressing the “Reset” button (see Figure 6-9). The Reset button will NOT clear the configuration and/or transaction information (i.e., DST & print line styles) stored in the clock flash memory. Conversely, it is not recommended to clear an error by using the Reset command from the clock web interface as this could reset the clock configuration. Figure 6-9. Reset Button Location. Table 6-1. Error Messages.
Chapter 6: Maintenance Error Message E2 Pr E 3 Pr and E 4 Pr Cause Solution Timing Sensor, Carriage Stuck. Unlock cover and remove. Set Auto-Sync Time Clock on side with the ribbon side up. Press the Reset button to reset the printer carriage and blow air into the printer platen to remove or dislodge jammed objects. If the error reoccurs, check the wires and cables to verify all are connected properly. Home Sensor, Carriage Stuck. Unlock cover and remove.
Auto-Sync Time Clock Should you need further assistance in clearing an error message: 1. Visit our website at: http://www.blackbox.com 2. Call us 24/7 at: 1 (724) 746-5500 or fax (724)-746-0746 3. E-mail us at: info@blackbox.com NOTE: There is no ribbon life counter which shows the remaining ribbon life. However, the ribbon cartridge generally has a life span of approximately 6,000 print cycles.
Chapter 7: WAN Service Discovery This chapter discusses special issues that might be related to configuring the AutoSync Time Clock for Wide Area Network (WAN) service discovery. 7. Wide Area Service Discovery “Wide Area Service Discovery” is the expansion of mDNS protocol, which allows the devices to register their services in the companywide DNS server so they can be discovered across the subnets.
Auto-Sync Time Clock Figure 7-2. Configure DNS Server Settings. 3. Change the domain name from “local” to the domain name of your network. For example, you companywide domain name might be “apple.com” or “dnssd.org”. 4. Enter the IP address of your companywide DNS server as one of the four DNS servers in the list. button to save the new DNS Server configuration. This process 5. Click the could take 1-2 minutes to complete. The clock should now be ready for Wide Area Service Discovery. 7.2.
Chapter 7: WAN Service Discovery 3. In the Domain Name field, enter the domain name of your network and press the Red Arrow button to load the Domain Name in the list on the right for discovery of all clocks in your companywide domain (see Figure 7-3). For example, the domain name of your companywide network might be “abc.net”. Figure 7-3. Discovery Settings. 4. Select the desired domains in the “List of domains to browse” or click on “Select All domain(s). 5.
Auto-Sync Time Clock This page intentionally left blank. 7-4 724-746-5500 | blackbox.
Chapter 8: Frequently Asked Questions (FAQs) FAQ-1. How do I find and connect to my Auto-Sync Time Clock using the auto discovery Zero Configuration Protocol? Please install and run the Auto-Sync Utility that came on the CD with your clock. See Chapter 5 of this Guide. Consult the Quick-Start Guide that came with your clock.
Auto-Sync Time Clock FAQ-6. If I do not require centralized reporting, do I still need to install ATVS software to use the Auto-Sync Time Clock? No. No software-No server-No central management = Minimal IT staff involvement. However, it is recommended to install the Utility that came on the CD with your clock for auto discovery and advanced functions. FAQ-7. Can the time on the Auto-Sync Time Clock be manipulated? No. The Auto- Sync Time Clock has no external programming buttons.
Chapter 8: Frequently Asked Questions (FAQs) FAQ-12. How do I setup my clock for custom print lines? You can create 2 custom print lines and save them in the clock’s flash memory. Consult the Installation and Operation Guide, see How to Set the Print Options in Chapter 4 of this Guide. Visit www.blackbox.com for additional support information. FAQ-13.
Auto-Sync Time Clock FAQ-17. How do I Backup a configuration file for multiple clocks? Select the Backup/Restore Utility from the browser and select “Configuration” from the dropdown menu. Next, click Shared for the question, “Is this backup button, file going to be shared to multiple clocks?” Press the and the status box will display the active status, “Backup is running” followed by “Successful”.
Chapter 8: Frequently Asked Questions (FAQs) NOTE: Each clocks transaction records should be maintained with backups to provide OATS compliance insurance. NOTE: Each clocks transaction records when backed up to the FTP server will appear as a text file with a unique filename which has the clocks MAC address. These clock transaction text files could be combined, for example, in Excel or Word to form a combined clock transaction report.
Auto-Sync Time Clock The clocks that were found in your network domain will appear in the list. FAQ-24. I have assigned a static IP address to the clock but I can’t find the clock using the Auto-Sync utility? Make sure no other device is using the IP address that is assigned to the clock. If that is the case, change the IP address to different value. Make sure the clock is not assigned a local-link (private) IP address such as; 169.254.x.
Appendix A Character Spacing The following table can be used as a guideline to estimate the amount of space used by each character in regular and/or bold font when printed. NOTE: If the month symbol is selected, the month will be printed using three alphabetical letters. When NU MONTH (numerical Month) symbol is selected, the month is printed as a number (i.e., 1, 2, 3, 4 … 12). Auto Sync Time Clock Character Table Character Regular Font Length Bold Font Length 0 07 = 4.67% 10 = 6.67% 1 07 = 4.
Auto-Sync Time Clock A-2 Character Regular Font Length Bold Font Length O 07 = 4.67% 10 = 6.67% P 07 = 4.67% 10 = 6.67% Q 07 = 4.67% 10 = 6.67% R 07 = 4.67% 10 = 6.67% S 07 = 4.67% 10 = 6.67% T 07 = 4.67% 10 = 6.67% U 07 = 4.67% 10 = 6.67% V 07 = 4.67% 10 = 6.67% W 07 = 4.67% 10 = 6.67% X 07 = 4.67% 10 = 6.67% Y 07 = 4.67% 10 = 6.67% Z 07 = 4.67% 10 = 6.67% & 07 = 4.67% 10 = 6.67% 2-DIGIT YEAR 19 = 12.60% 25 = 16.67% MONTH 21 = 14.00% 30 = 20.
Appendix A Character Regular Font Length Bold Font Length BLOCK 07 = 4.67% MAC ADDR 119 = 79.33% IP MAC ADDR 140 = 93.33% Ç 07 = 4.67% 10 = 6.67% Ä 07 = 4.67% 10 = 6.67% É 07 = 4.67% 10 = 6.67% Ö 07 = 4.67% 10 = 6.67% Ü 07 = 4.67% 10 = 6.67% Ñ 07 = 4.67% 10 = 6.67% WEEK NO. 21 = 14.00% 30 = 20.00% JULIAN DATE 21 = 14.00% 30 = 20.00% 4-DIGIT YEAR 28 = 18.60% 40 = 26.67% NUM MONTH 14 = 9.33% 20 = 13.
Auto-Sync Time Clock NOTE: System allows user to configure up to 32 time servers System provides 18 Stratum 1 NTP servers for user to select as default listed below Host Name Location Number bigben.cac.washington.edu University of Washington, Seattle, 1 WA montpelier.ilan.caltech.edu California Institute of Technology, 4 Pasadena, CA nist1.symmetricom.com Symmetricom, San Jose, California 5 nist1-dc.WiTime.net WiTime, Virginia 6 nist1-la.WiTime.net WiTime, Los Angeles, California 7 nist1-ny.WiTime.
Appendix A Term FINRA Description Financial Industry Regulatory Authority. FPR Full Power Reserve, battery backup in case of power failure. FTP File Transfer Protocol, is a network protocol used to transfer data from one computer to another through a network, such as the Internet. NASDAQ National Association of Securities Dealers Automated, American stock exchange. NIST National Institute of Standards and Technology, NTP Network Time Protocol.
Auto-Sync Time Clock This page intentionally left blank. A-6 724-746-5500 | blackbox.
AJR-199400 SKU, rev. 0 724-746-5500 | blackbox.