
Time Clock User Manual


Auto-Sync Time Clock
2-2 724-746-5500 | blackbox.com
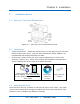
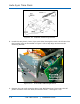
Figure 2-2. Auto-Sync Time Clock Cover Removal.
2.4. Unpacking the Clock
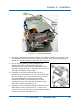
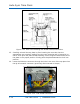
After removing the upper cover, lift up the Printer Block (A) and remove the
Packaging Spacer (B).
Figure 2-3. Auto-Sync Time Clock Packaging.
NOTE: The serial number can be found on the bottom of your clock.
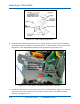
2.5. Installing the (ASTCBK) Optional Full Power Reserve (FPR)
1. Disconnect the clock AC adapter from the power outlet.
NOTE: Failure to do so could result in a hazardous shock.
2. Insert the key, turn the key clockwise, and remove the upper cover of the Auto-
Sync Clock (see Figure 2-2).
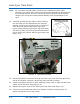
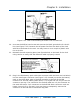
3. Remove one small Phillips head retaining screw from the right and left front
sides of the top plate (see Figure 2-4).