
Time Clock User Manual


Chapter 2: Installation
724-746-5500 | blackbox.com 2-7
NOTE: After installing the FPR and connecting the unit to AC power for the first
time, allow it to charge the battery pack for 24 hours before printing.
Failure to do so may result in reduced battery life. When using the optional
FPR - keep the clock plugged into an AC power source during normal
operation to maintain an adequate charge. The power reserve battery is
designed to be used only during limited power outages, not as a power
source during normal operation. The FPR can maintain normal operation for
up to 6 hours or 400 print stamps.
2.6. Installing the (ASTCPOEK) Optional PoE with FPR
If your Auto-Sync Time Clock came equipped with the PoE option skip to Step 17.
1. Disconnect the clock AC adapter from power outlet.
NOTE: Failure to do so could result in a hazardous shock.
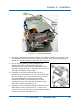
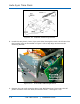
2. Insert the key, turn the key clockwise, and remove the upper cover of the Auto-
Sync Time Clock (see Figure 2-2).
3. Remove one small Phillips head retaining screw from the right and left front
sides of the top plate (see Figure 2-9).
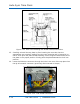
4. Disconnect the Ethernet cable at the RJ-45 network connector (see Figure 2-4).
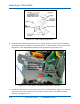
5. Lift up the top plate by pulling upwards and towards the back of the clock to
remove it (see Figure 2-4) and temporarily set aside. Note the alignment of the
top plate during removal – especially the front and rear tabs.
6. Carefully lift the front PCB up and out of its retaining slot. This is the PCB with
the coin battery on it. Just lift the PCB up enough to provide adequate clearance
for the PoE/FPR mounting bracket (see Figure 2-11) to be inserted into its
retaining slot.
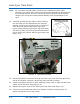
7. Carefully insert the PoE/FPR mounting bracket (see Figure 2-10). It will fit only
one way as it must slide over the rectangular shaped RJ-45 network connector
(see Figure 2-7). Also, ensure that the mounting frame fits properly in the side
slots (see Figure 2-11).