
User's Manual


121
CHAPTER 8: Modem Testing
3. Type the Escape Sequence (+++AT<CR> or <BREAK>AT<CR>)
which brings your modem into Command mode, while still main-
taining the connection with the remote modem.
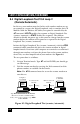
4. Type ATU2 and hit ENTER. The local modem responds to this
command by transmitting an unscrambled marking signal, which
causes the remote modem to place itself in Digital Loopback mode.
Then the local modem exits Command mode and enters pseudo
On-line mode.
5. Type data from your keyboard. For this test, typing multiple upper
case "U" characters is a good way to send an alternating test pattern
of ones and zeros. The data received by the remote modem will
enter its analog receiver, be converted to digital data, be reconvert-
ed into analog, and then looped through its transmitter back to the
local modem. Your modem passes this test if the data entered from
the local keyboard is the same as the data received on your
monitor.
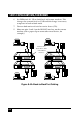
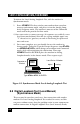
8.5 Back-to-Back Test
This test lets you connect two Series II Modems with an RJ11 cable to
verify proper operation. (See Figure 8-4A on the next page.) Using a
Series II Modem that is known to be operational, you can test a second
Modem that is suspect.
1. Plug the modular ends of an RJ11 cable into both Modems’ LEASE
jacks (336+ models) or LINE jacks (336 models).
2. Force DTR ON in both local and remote modems (Switch #1
DOWN).
3. Enter the command AT$SB9600$BA0&W0<CR> on both local
and remote modems. This sets the serial speed to 9600 bps. Make
sure that the terminal/computer is also set for 9600 bps.
4. Set both modems in Leased-Line mode (DIP-Switch # 10 DOWN).
5. Set one Series II Modem to Answer enabled (DIP-Switch #5 UP)
and the other Modem to Originate enabled (DIP-Switch #5
DOWN). Note that it does not matter which modem (local/remote)
is set to Answer/Originate—just so they are set opposite.