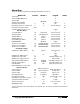
MAY 2007 MC200A Version 3 FaxReceiver MC200A ® 1000 Park Drive • Lawrence, PA 15055-1018 • 724-746-5500 • Fax 724-746-0746 © Copyright 2006. Black Box Corporation. All rights reserved.
Table of Contents Table of Contents Introduction 2 4 Easy Configuration Features System Architecture 4 4 4 Menu Map 5 The Process 6 Important Information 6 Connections Reset Button 7 11 FAX CONFIGURATION UTILITY 12 General Settings 13 TCP/IP Settings 14 e-mail Settings 16 FAX Settings 17 TelNet Settings 19 Configuration 12 Benefits of using Telnet: 20 UNIT IP SETTINGS 23 UNIT EMAIL SETTINGS 25 UNIT FAX SETTINGS 28 TELNET 20 The FaxViewer 32 Troubleshooting 35 Glossary 39 Te
COPYRIGHT © Copyright 2006 Black Box. All rights reserved. No part of this publication may be reproduced, transmitted, transcribed, stored in a retrieval system, or translated into any language or any computer language, in any form or by any third party, without prior permission of Black Box. DISCLAIMER Black Box reserves the right to revise this publication and to make changes from time to time to the contents hereof without obligation to notify any person or organization of such revision or changes.
Introduction The Black Box FaxReceiver MC200A is designed to receive a fax and convert it into an email to allow distribution that is more convenient and unwanted faxes can be electronically deleted. The Black Box Fax-Receiver receives the fax and puts it into a mail-server mailbox. From there, you or an administrator can read and re-distribute the fax to the appropriate email recipient on the network or print it if necessary.
Menu Map The menu driven setup allows the following parameters to be set up: MENU ITEM # CHARS 1) Setup IP 2) Setup SMTP Mailserver 3) Setup Fax 4) Reboot after quitting 5) Change Telnet port 4 6) Change Telnet session time-out 2 P) Change Telnet password 253 !) Redirect debug to this screen Unit IP settings 1) Unit IP address 16 2) Subnet Mask 16 3) DNS Address 1 16 4) DNS Address 2 16 5) Unit Gateway address 16 6) DHCP/RARP 7) Timeserver 1 address 16 8) Timeserver 2 address 16 9) Timeserver 3 address 16
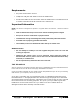
Requirements AC power outlet within 10 feet. Telephone wall jack and cable to reach the FaxReceiver An Ethernet cable for the connection from the FaxReceiver to an Ethernet hub or switch connection that will connect to the mail server. Important Information NOTE: The device is designed to operate in a typical office environment. Choose a location that is: Well-ventilated and away from sources of heat including direct sunlight. Away from sources of vibration or physical shock.
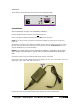
Installation The illustration shows the setup of the ports and the diagnostic LEDs. Connections See the drawings on page 7 for installation examples. Plug the PCMCIA modem card into the top or bottom slot. Insert your Ethernet RJ45 connection into the LAN jack on the front. NOTE: If you do not have your Ethernet connection plugged in, there will be no lights on power up.
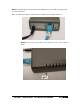
NOTE: It will take about 10 seconds for the FaxReceiver to be ready to accept a fax or telnet connection. When your Ethernet cable is connected to a network, the link light will be on. NOTE: There is a green light inside the unit that can be seen. See the picture below.
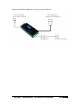
Typical installation replacing an incoming fax machine: Copyright 2006 Ringdale User Manual, 62-15820000 Page 9 of 49
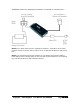
Installation where an outgoing fax machine is required on incoming line: NOTE: If you daisy chain from an outgoing fax machine, it should be set to either not auto answer or answer after 4 rings or more so that the FaxReceiver will pickup first. NOTE: You should also set the fax machine to tone dialing and not pulse dialing. Pulse dialing causes voltage spikes on the line that can be mistaken for an incoming ring, and the FaxReceiver will attempt to answer.
LEDs The LEDs are itemized as follows: LK (Yellow) LED The Link LED indicates that the port is functionally connected to an external port. It lights up solid when the connected hub is turned on and connected to the LAN. If the LED does not light up, there may be a problem with the cabling or the Ethernet hub. These last two LEDs enable monitoring of the traffic passing through the device. TX (Red) LED The Transmit LED blinks when a data packet is being sent from the FaxReceiver.
Configuration The complete configuration can be done with any Telnet client, like HyperTerminal or simply using the Windows Command prompt “telnet”. This will work on any FaxReceiver that is on the same virtual network. Black Box has provided a FaxConfig utility that allows you to perform the basic IP configuration of any FaxReceiver that is on the same physical network. These are the steps necessary to configure the FaxReceiver using the Windows command prompt telnet client.
General Settings Using your mouse, double-click on the IP Address of the FaxReceiver to view or configure the properties of, or click once to select it and then click the Properties button and it will bring up the following screen: 1) The default Device Name is derived from the FaxReceiver’s Hardware Address. You can change it to something that will better identify it for you if you have multiple FaxReceivers. 2) The Hardware description and Firmware revision is provided for technical support.
TCP/IP SETTINGS 1) Enter an unused IP Address from your network, or click on the DHCP/RARP Enable. NOTE: If you change to an address that is NOT in the same network range that your PC is, you will still be able to see the FaxReceiver with the FaxConfig utility, but you will not be able to change any parameters until you are on the same subnet. 2) If you are not using DHCP or RARP, make certain that the Subnet Mask is correct. 3) If you are not using DHCP or RARP, set the Default Gateway.
6) Time Server IP 1,2, & 3. The 192.043.244.018 address is the time server at NCAR. You can change this to a preferred timeserver and add two more timeservers. Without a timeserver the timestamp will be incorrect and your spam filter may trap the email. NOTE: All timeservers send the time UT. In order to set the time stamps correctly you must adjust your Time Zone Offset under the Fax Settings tab. There is a list of public timeservers at this URL: http://tf.nist.gov/service/time-servers.
E-MAIL SETTINGS 1) Mail Server SMTP Address – Use the TCP/IP tab to change this. 2) Mailserver SMTP IP Port – The default is 25. This is most common. Other common ports used are 26, and 2525. 3) Mailserver Login Name – Often this is an email address. When a fax is received in the email box, it will come from this user. Max 58 characters. 4) Mailserver Login Password – This is the password for the above email account. There is a maximum of 58 characters. NOTE: case-sensitive.
FAX SETTINGS 1) Fax reply I.D. is sent to the Sending Fax. 20 characters. This is usually displayed on the display of the sending fax after establishing contact, or recorded in its log/print-out. It is not mandatory to have an ID. If it is not set, the FaxReceiver will send an ID of 20 spaces to the distant fax. 2) Fax number – This is the telephone number of the FaxReceiver. Not required. Max 20 characters. 3) Company Name – This is the company that is the proud owner of the FaxReceiver. Not required.
6) Answer Delay – This specifies the number of rings before the FaxReceiver answers the call. This would be used if you have the FaxReceiver daisychained with a regular phone that you answer first. Maximum is 30 rings. 7) Time Zone Offset – This is the offset from UT. If you are in Greenwich, England, this number will be 0. If your time zone is east of Greenwich, England), the number is positive. If your time zone is west of GMT, the number is negative.
TELNET SETTINGS Select the TelNet tab. 1) Telnet port – This will enable the end user to set up a port that the company does not block (e.g. port 80 or even port 25). That means that you will be able to telnet into the FaxReceiver from your desk, enable debug, send a fax to the unit (also from your desk), and figure out what is going wrong. If you change the TELNET port number and don't reboot, the new number takes effect on the *second* new telnet session. i.e. open telnet on default port 23.
TELNET Once you have configured the initial IP address or set your PC to the same network as the FaxReceiver, you can use Telnet to configure the parameters. BENEFITS OF USING TELNET: 1) You can use HyperTerminal or any other telnet utility to perform the setup procedures. 2) The FaxReceiver does not have to be on the same physical network as long as you have a virtual connection to the network that it is attached to.
c. Type in “telnet xx.xx.xx.xx” (where xx.xx.xx.xx is the IP address that you configured for the FaxReceiver) and press Enter. d. If a password was set will respond “Enter Password”. If a password has not been set, you will *not* be prompted for a password when you telnet into the device.
For each line item to be altered, type the option or menu number and press the Enter key, then enter the information and press the Enter key. NOTE: If you leave the telnet session inactive for over two minutes, it will time out, disconnect, and report: “Inactivity Timeout (2 minutes) – disconnecting”. You can change this timeout, with option number 6. If you set it to 0, it will not timeout. This parameter resets to 2 after each time you quit.
UNIT IP SETTINGS Enter a 1 to configure the IP addresses of the FaxReceiver ModuLAN 200. Your Network Administrator should provide the Unit IP and Unit Gateway address. 1) Unit IP address .......... 011.022.033.044 – should be changed to an unused IP address on your network. NOTE: If you use static IP addressing, and you have a DHCP server, this IP address should be added to your DHCP Server’s static IP address list.
5, 6, 7) Timeserver 1 address....192.043.244.018 – The 192.043.244.018 address is the time server at NCAR. You can change this to a preferred timeserver and add two more timeservers. Without a timeserver the timestamp will be incorrect and your spam filter may trap the email. NOTE: All timeservers send the time UT. In order to set the time stamps correctly you must adjust your Time Zone Offset in the Setup Fax section. There is a list of public timeservers at this URL: http://tf.nist.
UNIT EMAIL SETTINGS Enter a 2 to setup the SMTP Mailserver. Your email service administrator should provide the items 1-5. In some cases the Mailserver login name and Destination Email address will often be the same email address. 1) Mailserver SMTP IP address – The Mail Server SMTP Address can be entered either as a URL (for example smtp-server.austin.rr.com) or an IP Address. Using the URL is recommended if you may be changing ISP’s, but have your own mail server.
6) Reply e-mail Address – If the person who receives the fax does a reply, it will go to this address. 7) Reply Name – This is the name that shows in the email header when you receive a fax. 8) Check Mailserver connection – After you have set the parameters, use option 6 to send a test email to verify your email settings. You will get an email similar to the below. R) Press R when you have the Unit Email settings configured.
Copyright 2006 Ringdale User Manual, 62-15820000 Page 27 of 49
UNIT FAX SETTINGS Enter a 3 to setup the Fax Settings. 1) Fax reply I.D. is sent to the Sending Fax. 20 characters. This is usually displayed on the display of the sending fax after establishing contact, or recorded in its log/print-out. It is not mandatory to have an ID. If it is not set, the FaxReceiver will send an ID of 20 spaces to the distant fax. 2) Fax number – This is the telephone number of the FaxReceiver. Not required. Max 20 characters.
9) Daylight Saving – (Off) – This is a toggle. When you are in Daylight Saving time (summer months) this should be on. R) Press R when you have the Unit Fax settings configured. 4) Reboot after quitting (Disabled) – This setting is Enabled if you change an IP address and want to get your new IP address without disconnecting power. Ensure you select "Save settings" when quitting after setting the reboot option, otherwise changes you have made will be lost.
P) Change Telnet password – If you do not change this, anyone can access the unit and change the settings. Max 253 characters. For the telnet password, all ASCII and non-ASCII characters may be used except control characters (those with HEX codes below 0x20).
Receiving a Fax The FaxReceiver is a silent operation device. Connect the FaxReceiver to a fax line. When a fax is received, the Destination Email address will be sent an email. When this occurs, the red Transmit LED will light. The email will have the subject: “Incoming Fax”. The email will have a message similar to this: Black Box® FaxReceiver RFR 102 (v1.
The FaxViewer The FaxViewer is a free tool provided to 1) easily print the FaxReceiver image in standard format, 2) easily view the FaxReceiver image, and 3) save a multi-page FaxReceiver image as a single RFX document. With this FaxViewer set as your default GIF viewer you can take a look at a fax, if you want it, print it and without any fuss it will be formatted correctly. It is a standalone utility. Just drag the program to your Desktop, and double-click to run it.
To use the FaxViewer: 1) Open the FaxViewer utility. 2) When you get e-mail with multiple GIF files, open the email in a separate window. 3) Click in the attach block. Then do a Ctrl / A – or - select the Edit menu, and do a Select All then drag and drop the images anywhere on the FaxViewer application. 4) If the last page is showing, but the Page shows 1, then you need to reverse the page order. To do this, click on Image Page, then Page Order, and then Reverse Image Order.
5) As soon as the fax starts to come in, the FaxReceiver needs to set up and send the GIF header, which has the values for the size of the "canvas". At that stage however, it only knows the width of the incoming fax. There is no way to know how long it is going to be. So the length is set to a fixed value that corresponds to the longest sheet of standard paper it can expect to be sent by a fax machine. The FaxViewer software has an option, under the Options tab, "Force Background to white".
Troubleshooting PROBLEM: LEDs do not flash at power-up CAUSE: Power cord not connected or the Ethernet cable is not attached to a live Ethernet network. The LEDs are driven by the Ethernet chip and will not flash unless an Ethernet network is attached. SOLUTION: Check the green light on the power brick. Look inside the unit for the light inside. Check the Ethernet connections. PROBLEM: It does not accept a fax. CAUSE: The modem card may not be plugged all of the way in.
PROBLEM: I got an "Incoming Fax" email, and when I brought this email up, it had a message that said "OE removed access to the following unsafe attachments in your email". CAUSE: Outlook Express is configured to view attachments as viruses. SOLUTION: In Outlook Express, click on the Tools menu and select Options. Click on the Security tab. Take the check out of "Do not allow attachments to be saved or opened that could potentially be a virus”. PROBLEM: I am getting poor quality images in the Fax TIFFs.
PROBLEM: I enabled the DHCP setting, but do not know what address was used. SOLUTION: After the IP address is assigned, ping the address or range of addresses that it could have. Then within 5 minutes, use the ARP -A command to see the IP Addresses assigned in that range. Look for IP Address assigned to the Physical Address that has the last six digits matching the FaxReceiver’s serial number. Example: C:\WINNT\system32>arp -a Interface: 11.22.33.
QUESTION: My debugger output does not look correct. Can I send it to Tech Support? ANSWER: Yes. Using your mouse, right-click on the blue bar at the top of your telnet session, and select Edit, then Select All. Next right-click on the blue bar at the top of your telnet session, and select Edit, then Copy. Open an email, and do a Paste or Ctrl/v. Send the email to support@BlackBox.com. QUESTION: I would like to be able to disable/enable the FaxReceiver from a remote location.
Glossary ARP – Address Resolution Protocol A TCP/IP protocol used to obtain a node's physical address. A client station broadcasts an ARP request onto the network with the IP address of the target node it wishes to communicate with, and the node with that address responds by sending back its physical address so that packets can be transmitted. ARP returns the layer 2 address for a layer 3 address. BMP – (BitMaP) Also known as a "bump" file, it is Windows' native bitmapped graphics file format.
PING -- Packet Internet Groper is a protocol primarily used to troubleshoot IP network problems. RARP -- (Reverse ARP) A TCP/IP protocol used by a diskless workstation to obtain its IP address. Upon startup, the client station sends out a RARP request in an Ethernet frame to the RARP server, which returns the layer 3 address for a layer 2 address (performing the opposite function of an ARP). RLE – Run Length Encoded is a simple form of compression.
Technical Specifications Network 10/100 base Ethernet LAN Connection RJ45 10baseT Protocols ICMP, NPMP, NTP, Ping, RARP, SMTP. TCP/IP, UDP Email login types CRAM-MD5, LOGIN (AUTH=LOGIN) and non-authenticated. Phone Line PCMCIA Fax/Modem Card V.90 or V.92 56K Power Supply External PSU Input: 100 - 240 volts AC Frequency: 47-63 Hz Output: 5 Vdc 2.5 A (uses less than 5 watts) Approvals CE, UL and CSA Part No.: MC200A Trademark Recognition ModuLAN®, and FaxReceiver™ are trademarks of ITC, Black Box.
Legal Notices FCC Requirements for Telephone-Line Equipment 1. The Federal Communications Commission (FCC) has established rules which permit this device to be directly connected to the telephone network with standardized jacks. This equipment should not be used on party lines or coin lines. 2. If this device is malfunctioning, it may also be causing harm to the telephone network; this device should be disconnected until the source of the problem can be determined and until the repair has been made.
Normas Oficiales Mexicanas (NOM) Electrical Safety Statement Instrucciones De Seguridad 1. 2. Todas las instrucciones de seguridad y operación deberán ser leídas antes de que el aparato eléctrico sea operado. Las instrucciones de seguridad y operación deberán ser guardadas para referencia futura. 3. Todas las advertencias en el aparato eléctrico y en sus instrucciones de operación deben ser respetadas. 4. Todas las instrucciones de operación y uso deben ser seguidas. 5.
14. El equipo eléctrico debe ser limpiado únicamente de acuerdo a las recomendaciones del fabricante. 15. En caso de existir, una antena externa deberá ser localizada lejos de las lineas de energia. 16. El cable de corriente deberá ser desconectado del cuando el equipo no sea usado por un largo periodo de tiempo. 17. Cuidado debe ser tomado de tal manera que objectos liquidos no sean derramados sobre la cubierta u orificios de ventilación. 18.
Certification Notice for Equipment Used in Canada The Industry Canada label identifies certified equipment. This certification means that the equipment meets certain telecommunications-network protective, operation, and safety requirements. Industry Canada does not guarantee the equipment will operate to the user’s satisfaction. Before installing this equipment, users should ensure that it is permissible to be connected to the facilities of the local telecommunications company.
Federal Communications Commission and Industry Canada Radio Frequency Interference Statements This equipment generates, uses, and can radiate radio-frequency energy, and if not installed and used properly, that is, in strict accordance with the manufacturer’s instructions, may cause interference to radio communication.
Federal Communications Commission and Industry Canada Radio Frequency Interference Statements Class B Digital Device. This equipment has been tested and found to comply with the limits for a Class B computing device pursuant to Part 15 of the FCC Rules. These limits are designed to provide reasonable protection against harmful interference in a residential installation. However, there is no guarantee that interference will not occur in a particular installation.
Technical Support Telephone: 724-746-5500 Answered in 20 seconds or less! Fax: 800-321-0746 Answered in 15 minutes or less! Website: http://www.blackbox.com/ Before you call Please have the following information ready: Serial number of the unit. Network Information: IP address of FaxReceiver, Mail Server, and Default Gateway. Type of Fax cards installed in the FaxReceiver. The symptoms of the problem.
CUSTOMER SUPPORT INFORMATION Order toll-free in the US: Call 877-877-BBOX (outside US call 724-746-5500) FREE Technical Support 24 hours a day, 7 days a week: Call 724-746-5500 or fax 724-746-0746. Mailing address: Black Box Corp, 1000 Park Drive, Lawrence, PA 15055-1018. Web site: www.blackbox.com E-mail: info@blackbox.com. © Copyright 2006 Black Box Corporation. All rights reserved. © Copyright 2006. Black Box Corporation. All rights reserved.