
Specifications


Copyright © 2012 Black Box Network Services. All Rights Reserved.
724-746-5500 | blackbox.com 19
Creating Digital Signage
2. Creating Digital Signage
This section describes how to create your digital signs. If you are new to the iCOMPEL see Terms you need to know
before you begin.
The details in this section apply equally to creating content for a stand-alone iCOMPEL and for creating content for a
channel publisher .
Click on the links below for more information on:
Schedules
Layouts
Zones
Playlists
Files and Folders
Media types
Enhancing your digital signage
2.1 Using Schedules
Your iCOMPEL is designed to run continuously. You control which Layouts are displayed on what days and at what
times by creating a Schedule. A Schedule always contains at least one Schedule Entry , which defines at least one
iCOMPEL action that often specifies which Layout to display. A Schedule Entry does not necessarily specify a Layout
change, it could specify some other action, for example switching the Audio to Mute.
The Schedule Entries define periods of time during which actions occur. The program of Schedule Entries is based on a
one-week cycle. The Default Schedule Entry defines the Layout that appears, or the actions that occur, when no other
Schedule entry is active.
The iCOMPEL always displays the Schedule with the most recent start time. Once a Schedule starts running it continues
until another Schedule is set to begin. If there is only one Schedule it runs indefinitely.
A Schedule might have a Schedule Entry playing Layout X running from 4:00 pm to 6:00 pm, Mondays to Fridays; another
Schedule Entry playing Layout Y running from 2:00 pm to 8:00 pm on Saturdays and Sundays; and the default Schedule
Entry, playing Layout Z running at all other times.
Whenever you make a change to a Schedule or Layout, remember to click the Activate Schedule and Layouts button to
implement your changes.
You can temporarily interrupt a Schedule by using a Schedule Override .
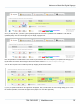
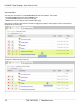
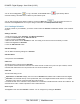
The Schedules page
This lists all the Schedules that have been configured for this channel. Click on Schedules in the Menu bar and select
Manage Schedules from the drop down menu, and click the Add Schedule tab. By clicking the Add Schedule box you
will be able add a new Schedule and define its properties.
10
111
19
25
27
33
46
39
71
25
21
24