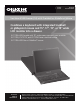
May 2010 KVT319A KVT319A-WIDE KVT315A KVT317A ServView KVM Drawer (1U) with Trackball or GlidePoint Mouse Combines a keyboard with integrated trackball BLACK BOX or glidepoint mouse and 15", 17", 19", or 19" wide LCD monitor into a drawer. ® KVT319A-WIDE model with 19" wide-screen monitor is now available. KVT315A, KVT317A, and KVT319A have a trackball mouse. KVT319A-WIDE has a GlidePoint® mouse. Customer Support Information Order toll-free in the U.S.: Call 877-877-BBOX (outside U.S.
ServView KVM Drawer (1U) with Trackball or GlidePoint Mouse and LCD Trademarks Used in This Manual Black Box and the Double Diamond logo are registered trademarks, and ServTray and ServSwitch are trademarks, of BB Technologies, Inc. Centronics is a registered trademark of Centronics Corporation. GlidePoint is a registered trademark of Cirque Corporation. PS/2 is a registered trademark of International Business Machines Corporation. UL is a registered trademark of Underwriters Laboratories Inc.
FCC and IC RFI Statements Federal Communications Commission and Industry Canada Radio Frequency Interference Statements This equipment generates, uses, and can radiate radio-frequency energy, and if not installed and used properly, that is, in strict accordance with the manufacturer’s instructions, may cause interference to radio communication.
ServView KVM Drawer (1U) with Trackball or GlidePoint Mouse and LCD Instrucciones de Seguridad (Normas Oficiales Mexicanas Electrical Safety Statement) 1. Todas las instrucciones de seguridad y operación deberán ser leídas antes de que el aparato eléctrico sea operado. 2. Las instrucciones de seguridad y operación deberán ser guardadas para referencia futura. 3. Todas las advertencias en el aparato eléctrico y en sus instrucciones de operación deben ser respetadas. 4.
Table of Contents 1. Specifications .................................................................................................................................................................... 6 2. Overview .................................................................................................................................................................... 8 2.1 Introduction.............................................................................................................
ServView KVM Drawer (1U) with Trackball or GlidePoint Mouse and LCD 1. Specifications Approvals: ServView KVM Drawer: CE, FCC; Power supply: UL®, TUV, CE Backlight: (4) cold cathode fluorescent tubes Brightness (cd/m2): KVT315A, KVT317A, KVT319A: 250; KVT319A-WIDE: 300 Color: KVT315A, KVT317A: 16.2 million; KVT319A, KVT319A-WIDE: 16.7 million Contrast Ratio (Typical): KVT315A: 300:1; KVT317A: 350:1; KVT319A: 500:1 KVT319A-WIDE: 1000:1 Display Area: KVT315A: 12" x 9" 930.5 x 22.9 cm); KVT317A: 13.3" x 10.
Chapter 1: Specifications Size: KVT315A, KVT317A: 1.8"H x 17.3"W x 17.3"D (4.6 x 43.9 x 43.9 cm); KVT319A: 1.8"H x 17.4"W x 18.9"D (4.6 x 44.2 x 48 cm); KVT319A-WIDE: 1.7"H x 23.6"W x 17.4"D (4.4 x 60 x 44.2) Weight: KVT315A: 41.8 lb. (19 kg); KVT317A: 44 lb. (20 kg); KVT319A: 48.4 lb. (22 kg); KVT319A-WIDE: 40 lb.
ServView KVM Drawer (1U) with Trackball or GlidePoint Mouse and LCD 2. Overview 2.1 Introduction The ServView KVM Drawer (1U) with Trackball Mouse and 15", 17", or 19", LCD (KVT315A, KVT317A, KVT319A) combines a keyboard with integrated trackball mouse and monitor into a drawer. The ServView KVM Drawer (1U) with GlidePoint Mouse (KVT319A-WIDE) combines a keyboard with integrated GlidePoint mouse and 19" monitor into a drawer.
Chapter 2: Overview 2.3 Hardware Description 2.3.1 KVT315A, KVT317A, KVT319A Figure 2-1 shows the KVM drawer’s components. Table 2-1 describes these components. 6 4 5 3 7 9 2 8 1 Figure 2-1. The ServView KVM Drawer (KVT315A, KVT317A, KVT319A) assembly. Table 2-1. The ServView KVM Drawer’s components.
ServView KVM Drawer (1U) with Trackball or GlidePoint Mouse and LCD 2.3.2 KVT319A-WIDE 1 6 2 3 4 7 5 8 9 Figure 2-2. The ServView KVM Drawer (KVT319A-WIDE) assembly. Table 2-2. The ServView KVM Drawer’s components.
Chapter 3: Installation 3. Installation 3.1 How to Use the Slides with the KVT315A, KVT317A, or KVT319A 1. Install each rear L-bracket using two fasteners shown in Figure 3-1. Leave the fasteners slightly loose. Fasteners Rear bracket Fasteners Rear bracket Figure 3-1. Installing the rear L-bracket to the LCD keyboard drawer. 2. Measure the front and rear mounting depth of the rack. 3. Align eash rear L-bracket to a suitable length and tighen the fasteners shown in Figure 3-2.
ServView KVM Drawer (1U) with Trackball or GlidePoint Mouse and LCD Rack Rack LCD keyboard drawer Figure 3-3. Installing the LCD keyboard drawer into the rack. 3.2 How to Use the Slides with the KVT319A-WIDE 1. Attach the left and right mounting bracket to the rack’s 19" mounting rails. 2. Adjust the mounting bracket to fit your rack. 3. Install the (8) M6 screws and cup washers (included), but do not tighten them yet. Rear side Left bracket Right bracket Front side Figure 3-4.
Chapter 3: Installation 4. Pull out the left and right inner slide members. \ Inner slide member Inner slide member Figure 3-5. Pull out inner slide members. 5. Pick up the LCD tray. 6. Insert the LCD tray into the mounting bracket. 7. Pull and hold the left and right black arrow buttons on the rail. 8. Return the LCD tray to park position. Mounting bracket Figure 3-6. Inserting the LCD into the mounting bracket. 9. Using the included (4) M3.2 screws, attach the rear kit to the LCD tray.
ServView KVM Drawer (1U) with Trackball or GlidePoint Mouse and LCD Front side Rear kit M3.2 screws Figure 3-7. Secure the rear kit to the mounting bracket. 10. Tighten the (8) M6 screws to complete the installation. M6 screw Figure 3-8. Complete the installation. Page 14 724-746-5500 | blackbox.
Chapter 3: Installation 3.3 Connect to a Server via USB Interface Figure 3-9. Example of connecting a 4-in-1 USB cable to a server via a USB interface. Figure 3-10. Example of connecting a 4-in-1 combo KVM cable to a server via a PS/2 interface.
ServView KVM Drawer (1U) with Trackball or GlidePoint Mouse and LCD 4. Operation 4.1 On-Screen Display Operation Figure 4-1. Membrane switches. Table 4-1. Switches and their functions. Icon Switch Function Power light Power light Green=On Orange=Power saving Power LCD Power on/off LCD OSD menu buttons Display the OSD menu Arrow keys Scroll through menu options and adjust the displayed control (to auto adjust, press the Exit button for five seconds.
Chapter 3: Installation Figure 4-2. OSD configuration page. Table 4-2. OSD configuration page menu functions. Icon Description Image: Use to enter setup for brightness, contrast, color temp., red, green, and blue. Geometry: Use to enter setup for the auto adjust, H position, V position, phase, and clock. Video: Use to enter setup for color, tint, sharpness, noise reduction, DCDi, and TV. Audio: Use to enter setup for volume, bass, treble, balance, AVL, and mute.
ServView KVM Drawer (1U) with Trackball or GlidePoint Mouse and LCD 5. Troubleshooting 5.1 Calling Black Box If you determine that your ServView KVM Drawer is malfunctioning, do not attempt to alter or repair the unit. It contains no userserviceable parts. Contact Black Box at 724-746-5500. Before you do, make a record of the history of the problem. We will be able to provide more efficient and accurate assistance if you have a complete description, including: • the nature and duration of the problem.
Black Box Tech Support: FREE! Live. 24/7. Tech support the way it should be. Great tech support is just 20 seconds away at 724-746-5500 or blackbox.com. About Black Box Black Box Network Services is your source for more than 118,000 networking and infrastructure products. You’ll find everything from cabinets and racks and power and surge protection products to media converters and Ethernet switches all supported by free, live 24/7 Tech support available in 20 seconds or less. © Copyright 2010.