
Server User Manual

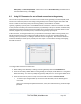

Assuming you have already set up the target console server as a gateway in your SDT Connector
client (with username/ password etc), select this gateway and click the Host icon to create a
host. Or, select File -> New Host.
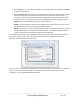
Enter 127.0.0.1 as the Host Address and select Serial Port 2 for Service. In Descriptive Name,
enter something such as Loopback ports, or Local serial ports. Click OK.
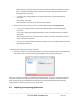
Click Serial Port 2 icon for Telnet access to the serial console on the device attached to serial
port #2 on the gateway.
To enable SDT Connector to access to devices connected to the gateway’s serial ports, you must also
configure the Console server itself to allow port forwarded network access to itself, and enable access to
the nominated serial port:
Browse to the Console server and select Serial Port from Serial & Network.
Click Edit next to selected Port # (for example, Port 2 if the target device is attached to the
second serial port). Make sure the port’s serial configuration is appropriate for the attached
device.
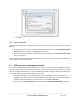
Scroll down to Console server Setting and select Console server Mode. Check Telnet (or SSH)
and scroll to the bottom and click Apply.
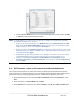
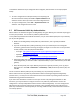
Select Network Hosts from Serial & Network and click Add Host.
In the IP Address/DNS Name field enter 127.0.0.1 (this is the Black Box network loopback
address) and enter Loopback in Description.
Remove all entries under Permitted Services, select TCP, and enter 200n in Port. (This
configures the Telnet port enabled in the previous step, so for Port 2 you would enter 2002.)
Click Add, then scroll to the bottom and click Apply.
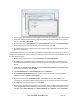
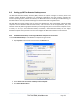
Administrators by default have gateway and serial port access privileges; however for Users to
access the gateway and the serial port, you will need to give those Users the required access
privileges. Select Users & Groups from Serial & Network. Click Add User. Enter a Username,
_____________________________________________________________________
724-746-5500 | blackbox.com Page 115