
Server User Manual


Once the SSH connection has been established, the system asks you to accept the key. Answer yes and
the fingerprint will be added to the list of known hosts. For more details on Fingerprinting, refer to
Chapter 15.6.
If the system asks you to supply a password, then there is a problem with uploading keys. The
keys should remove any need to supply a password.
4.6.3 Configure the slaves and their serial ports
You can now begin setting up the Slaves and configuring Slave serial ports from the Master console
server:
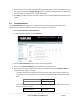
Select Serial & Network: Cascaded Ports on the Master’s Management Console:
To add clustering support, select Add Slave.
Note You can’t add any Slaves until you automatically or manually generate SSH keys.
To define and configure a Slave:
Enter the remote IP Address (or DNS Name) for the Slave console server.
Enter a brief Description and a short Label for the Slave (use a convention here that enables you
to effectively manage large networks of clustered console servers and the connected devices).
Enter the full number of serial ports on the Slave unit in Number of Ports.
Click Apply. This will establish the SSH tunnel between the Master and the new Slave.
The Serial & Network: Cascaded Ports menu displays all the Slaves and the port numbers that have
been allocated on the Master. If the Master console server has 16 ports of its own, then ports 1-16 are
pre-allocated to the Master. The first Slave added will be assigned port number 17 and up.
_____________________________________________________________________
724-746-5500 | blackbox.com Page 65