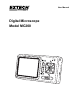
User Manual Digital Microscope Model MC200
Contents 1. Product Introduction 1.1 Packing Contents 1.2 Microscope Functions 1.3 Microscope Operation 1.4 Microscope Programming Functions 1.5 External Interfaces 2. Program Installation 2.1 Insert Installation CD (Step 1) 16 2.2 Install Application Program (Step 2) 2.3 Install Driver (Step 3) 2.4 Quit Installation Program (Step 4) 3. Application Program 3.1 Video Preview Window 3.2 Photos Preview Window 3.3 Main Menu 3.4 Main Button. 3.4 Files List (Type) 3.6 Special Function Modes 4.
1. Product Introduction 1.1 Packing Contents The product box includes one instrument and the accessories listed below. Please charge the lithium battery for 6 to 8 hours before using the instrument for the first time. An SD Card has been installed in the instrument. Please refer to item (4) of Section 1.5 for instructions on the removal and installation of SD cards.
6. Display Screen: Displays images. 7. Function Menu /Delete : In the observation mode, press this button to open the Function Menu ( ). In the Photo browsing mode (Album), press this button to delete photos [please refer to item (4) of Section 1.4]. This button is also used to delete videos in the Video Play mode. 8. Preview Photos /Back : Press this button to enter or exit the preview photos mode ( ). In other modes, this button moves back or exits a programming level. 9.
17. Wrist strap: Wrist Strap connection [please refer to item (6) of Section 1.5]. 18. USB Port: This port is used to connect the instrument to a PC via a USB cable [please refer to item (6) of Section 1.4 and item (1) of Section 1.5]. 19. TV Signal Output Socket: Used to connect a television [please refer to item (5) of Section 1.4 and item (2) of Section 1.5]. 20. Camera Lens 21. Battery Compartment [please refer to item (5) of Section 1.5]. 22. SD Card Slot [please refer to item (4) of Section 1.
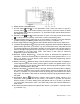
1.3 Microscope Operation First, determine if the photo will be a standard long shot or a flush shot (lens placed against article to photograph) and then adjust Focus dial as desired. (1) Focus dial: The focus dial is labeled to indicate the magnification amount (L, H, and ). L is for a low optical magnification (10x), H is for a High optical magnification (40x) and is for a long shot. Rotate the dial to the left for smaller magnification, and to the right for larger magnification.
1.4 Microscope Programming Functions There are 8 programming function modes. Press the Function Menu /Delete button to view the function icons and names (see diagram). From other than the basic observation mode, press the Preview Photo /Back button to return to the basic observation mode and then press the Menu/Delete button to access the Function Menu. The following is displayed: (1) Camera : Observation mode.
The modes that are shown with the symbol are for automatic repetition mode. When one of these modes is selected, use the or button to stop/start the repetition. The repetition will automatically stop if other modes are subsequently selected. For the light sources and six modes of lamp modes, please refer to the following graphics.
(D) Special Effects : press button to choose the following special effects: Normal : General mode without special effects. Grey Scale : Shows grey scale to more easily identify images. Reverse-phase : Displays complementary colors to strengthen faint-colored or overly-lit images. Relief : Displays pronounced image edges. (E) Brightness : Use the and buttons to adjust the light’s brightness in the observation mode.
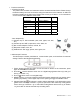
The Digital magnification can be adjusted using the zoom out ( ) and zoom in ( ) buttons. The magnification is divided into 8 stages and can be up to 4 times with 0.5 times per stage. The image can be enlarged to fifty times when combining optical and digital magnifications. The magnification at different stages is as follows: 10x optical mag. [10* (1+0.5*stage)] Stage 1 2 3 4 Mag. 15x 20x 25x 30x Stage 5 6 7 8 Mag.
(M) Preview mode: Press MC200 window. to enter the photo browsing mode. Viewed saved photos in the button The series number of the current photo is shown at the upper left. Press the to move to the next photo. Press the button to move to the previous photo. Enlarge and shrink a photo using the & buttons. After enlarging a photo, move the photo up, down, left, and right using the 、 、 、 buttons. Press the button to return the original photo.
(A) Open File : Press the (Camera) button in the Video Play mode to enter the file select function. Select the desired file and press to play. Use and to select items such as file type, file slot, file folder and file. Use and to view available options. (A-1) File Type: (including .3gp and .mp4). Choose ALL to see all file types. (A-2) File Folders include C and D. The SD card is inserted into slot (folder) D. (A-3) File Folder: Files in the folder. (A-4) Select the file to be opened.
(4) Album : This mode allows photo browsing of all pictures. Refer to the diagram below. Use the , , and buttons to select images and press to open an image on the full screen. Press to delete an image. The confirmation window will be displayed before the deletion. Select (Y) for deletion and (N) for cancel. : USB storage mode. Install an SD card to be used as a USB storage (5) USB Drive device. For the installation of the USB interface cable, please refer to item (1) of Section 1.
balance mode be used to achieve optimum results. (C) Status display : Press this button to display an image’s information icons. The user can select the number of status icons to view for an image. (D) Factory default : Revert to factory default settings. (E) Delete DSC/VID : delete VID stored on the SD Card and files in the DSC folder. The VID is for video and the DSC folder is for storing photos. (8) About : Provides the firmware revision level. Press and then to exit this mode. 1.
(4) Install an SD Card: Disconnect all external connections before proceeding. The battery compartment cover and the battery must first be removed to access the micro SD card holder. There is also a metal bracket that is used to hold the SD card securely in place. Install the SD Card by first opening the metal bracket and placing the battery carefully in place. Close the metal bracket, reinstall the battery, and secure the battery compartment cover.
2. Program Installation For detailed instructions on the software installation, please refer to the Manual on the supplied Installation CD. The Program is installed according to the following 4 steps: 2.1 Insert Installation CD (Step 1) Insert the supplied Installation CD into the PC CD-ROM Drive. The PC should automatically read the disk and display the start-up prompt screen process. If the computer does not automatically read the CD, please open the Installation CD and select Autorun.
3. Application Program The software program is divided into 5 main areas discussed next. For detailed instructions please refer to the Operation Manual supplied on the Installation CD. 1 Main menu 2 Main Buttons 3 Video Preview Window 4 Image Preview window 5 Files list 3.1 Video Preview Window Refer to the diagram above. After connecting the MC200 to a PC and running the software, video information, videos, files, as well as operational icons and special functions are displayed. 3.
editing tools are listed below: (5) (6) Delete Image : Press to delete the image displayed in the preview window. (7) Video REC /Stop Video REC : To record or stop recording video. Recorded video information will be displayed in the Video Information Preview Window. The compression coding feature can be set by clicking and selecting “Set->Video Information Compression” in the Main Menu. It is recommended that the user install the DivX encoder to achieve better compression results and quality.
4. Maintenance and Safety Please read the following information carefully before use. 4.1 Maintenance Please observe the following items with regard to instrument storage and use: (1) Keep the instrument dry: Do not place the product in a humid environment. (2) Avoid temperature extremes: Temperature extremes (moving the instrument from a very cold to a very warm environment, for example) will cause internal condensation. Keep the instrument packaged when not in use.
4.3 Depth of Field Optical Magnification Icon on MC200 Working Distance FOV 40x 40 0mm (0.00”) 1.54mm (0.06”) 10x 10 5mm (0.20”) 5.4mm (0.21”) 20mm (0.79”) 20mm (0.79”) 3x 4.4 Safety Instructions (1) Do not use this instrument in areas where electronic/electrical equipment is prohibited. (2) Do not allow the instrument to become wet. This device is not water-proof. (3) Do not expose this instrument to chemicals, explosive hazards or fire sources.