SAVE THIS USE AND CARE BOOK LEASE ESTE INSTRUCTIVO ANTES DE USAR EL PRODUCTO Premium Iron (English, see page 2) Plancha de primera (Español, consulte la página 7) Model/Modelo 8 62984 Sears, Roebuck and Co.
IMPORTANT SAFETY INSTRUCTIONS When using your iron, basic safety precautions should always be followed, including the following: READ ALL INSTRUCTIONS BEFORE USING. ■ Use iron only for its intended use. ■ To protect against a risk of electric shock, do not immerse the iron in water or other liquid. ■ The iron should always be turned Off before unplugging from an outlet. Push the I/0 button and the light will go out. Never yank cord to disconnect from outlet; instead grasp plug and pull to disconnect.
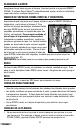
1. Water Fill Hole Cover 2. Spray Nozzle 3. Temperature Selector/Smart Steam™ Dial 4. Magnifying Lens 5. Spray Button 6. Surge of Steam Button 6 5 8 7 4 3 9 10 2 7. Comfort-Grip™ handle 8. Pivoting Cord 9. Push I/0 (ON/OFF) Button and Auto-Off Light 1 10. Cord Wrap/Stable Heel Rest 11. Fabric Guide 12. Water Window with FULL Mark 13. 2-Way Steam CleanTM/Steam/Dry Lever 14 13 12 11 14.
consider using distilled or demineralized water. Once a month however, use tap water to maintain steam performance. 4. Plug in the iron. Push the ON/OFF (I/0) button and a light will come on (B). Turn the Temperature Selector Dial to the appropriate setting for your fabric. Use the Fabric Guide on the iron (See A) to select the setting (check the garment label for fabric type and manufacturer's recommended setting). NOTE: The Magnifying Lens enlarges the numbers for easy temperature setting at a glance.
SPRAY Push the SPRAY button for a fine mist of water. If spray is light, pump the SPRAY button several times. Check to be sure the iron is filled with water. DRY Move the Lever to the DRY position to iron without steam. IRONING TIPS • Always read garment labels and follow manufacturer's ironing instructions. • Synthetics are heat-sensitive and may glaze or melt at high temperatures. Use lower settings. If you are unsure of a garment's fiber, test a small area (on an inside seam or hem) before ironing.
STORING THE IRON 1. Allow the iron to shut off automatically or press the ON/OFF button to turn it off manually. The light will go out. 2. Unplug the iron and allow it to cool. Wrap the cord around the heel rest and secure it with the cord clip. (E) 3. Store the iron on its heel rest to prevent water leaking from the Soleplate. E Need Help? IRON WON'T HEAT? Is the iron plugged in? Is the Power Light on? If not, press the ON/OFF(l/0) button.
INSTRUCCIONES DE SEGURIDAD Cuando use su plancha, siempre debe tomar algunas precauciones básicas, incluyendo las siguientes: POR FAVOR LEA TODAS LAS INSTRUCCIONES ANTES DE USAR ■ Utilice la plancha únicamente para planchar. ■ Para evitar el riesgo de un choque eléctrico, no sumerja la plancha en agua o cualquier otro líquido. ■ La plancha siempre debe de estar apagada antes de desconectarla de un tomacorriente. Oprima el botón l/0 y se apagará la luz.
INSTRUCCIONES ESPECIALES ■ Para evitar una sobrecarga eléctrica, no opere otro aparato de alto consumo en el mismo circuito. ■ Si es nacesario el uso de un cable de extensión, debe utilizar uno con un enchufe polarizado, calificadao para no menos de 10 amperes y autorizado por UL, CSA o NOM. Los cables calificados para amperajes menores pueden sobrecalentarse. Acomode el cable de modo que nadie tropiece ni tire de él. CONSERVE ESTAS INSTRUCCIONES 1. Tapa del orificio de llenado 2. Rociador de agua 3.
Como usar NOTA: Antes de usar por primera vez, retire cualquier sello o etiqueta adherida a la plancha o a la suela. 1. Ajuste el control a Smart Steam. Alce la tapa de llenado de agua. Sujete la plancha verticalmente y vierta agua a través del orificio, utilizando una taza limpia, hasta que el nivel indique FULL (lleno), en la ventana (A). No sobrellene. NOTA: Asegúrese de vertir el agua directament dentro del orificio de llenado. Cierre la tapa. Llene conforme sea necesario. 2.
PLANCHADO A VAPOR Asegúrese de que haya agua en el tanque. Ajuste el control a la posición SMART STEAM. El sistema Smart Steam™, automáticamente ajusta y emite la cantidad de vapor adecuada a cualquier temperatura. EMISION DE VAPOR EN FORMA VERTICAL Y HORIZONTAL Asegúrese de que haya agua en el tanque, ajuste el control a SMART STEAM y la temperatura, por lo menos al número 4.
Desconecte la plancha. 2. Abra el orificio de ilenado y vacíe la plancha, con la punta hacia abajo, sobre una pila. El agua saldrá a través del orificio de llenado. COMO LIMPIAR EL EXTERIOR DE LA PLANCHA 1. Permita que la plancha se enfríe completamente. Para los modelos con suela de alumino, limpie la suela y la superficie, con un paño húmedo o esponja y un detergente suave. Nunca use abrasivos, limpiadores fuertes, o fibras que puedan rayar o descolorar la plancha. 2.
¿Necesita ayuda? ¿LA PLANCHA NO CALIENTA? 1. ¿Está conectada la plancha? ¿Está encendida la luz del interruptor? Sino, oprima el botón ON/OFF(l/0). Si la luz no se enciende, ¿funciona una lámpara al enchufarla al mismo tomacorriente? Si funciona, entonces existe un problema con la plancha. ¿LA PLANCHA NO PRODUCE VAPOR? 1. Asegúrese de que haya suficiente agua en el tanque. 2. ¿Está la guía ajustada a la posición SMART STEAM? No, ajústela a esa posición. 3.