ELECTRONIC WINDOW AIR CONDITIONER INSTRUCTION MANUAL CATALOG NUMBER BD06WT BD08WT BD10WT BD12WT BD145WT ditioner Thank you for choosing BLACK+DECKER! WARNING Cancer and Reproductive Harm www.p65warnings.ca.gov PLEASE READ BEFORE RETURNING THIS PRODUCT FOR ANY REASON. If you have a question or experience a problem with your BLACK+DECKER purchase, go to www.blackanddecker.com/instantanswers If you can’t find the answer or do not have access to the Internet, call 844-299-0879 from 10:30 a.m. to 6:30 p.m.
CONTENTS SAFETY INFORMATION Important Safety Instructions..........................................................................................................................................................4 Battery Information...........................................................................................................................................................5 Grounding Instructions ....................................................................................................
SAFETY INFORMATION DANGER WARNING DANGER - Immediate hazards which WILL result in severe personal injury or death WARNING - Hazards or unsafe practices which COULD result in severe personal injury or death CAUTION CAUTION - Hazards or unsafe practices which COULD result in minor personal injury IMPORTANT SAFETY INSTRUCTIONS WARNING When using electrical appliances, basic safety precautions should be followed, including the following: Air conditioner must be connected to proper electrical outlet with t
SAFETY INFORMATION WARNING BATTERY INFORMATION KEEP OUT OF REACH OF CHILDREN. Swallowing may lead to serious injury or death. Severe burns can occur within 2 hours of ingestion. Immediately see a doctor and have the doctor phone (202) 625- 3333 collect. Keep in original package until ready to use. Dispose of used batteries immediately. Risk LITHIUM COIN CELL SAFETY NOTICE: Keep lithium coin batteries out of the reach of small children; coin cell batteries can be accidentally ingested.
SAFETY INFORMATION GROUNDING INSTRUCTIONS ELECTRICAL REQUIREMENTS In the event of malfunction or breakdown, grounding provides a path of least resistance for electric current to reduce the risk of electric shock. The appliance must be connected to a cord having an equipmentgrounding conductor and a grounding plug. The plug must be plugged into an appropriate outlet that is properly installed and grounded in accordance with all local codes and ordinances.
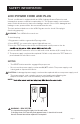
SAFETY INFORMATION LCDI POWER CORD AND PLUG This air conditioner is equipped with an LCDI (Leakage Current Detection and Interruption) power cord that is required by UL. This power supply cord contains state-of-the-art electronics that sense leakage current. If the cord is damaged and leakage occurs, power will be disconnected from the unit. The test and reset buttons on the LCDI Plug are used to check if the plug is functioning properly. WARNING: Test LCDI before each use. To test the plug: 1.
SAFETY INFORMATION WARNING SAFETY GUIDELINES To prevent injury to the user or other people and property damage, the following instructions must be followed. Incorrect operation due to ignoring of instructions may cause harm or damage. ALWAYS DO THIS NEVER DO THIS • Your air conditioner should be used in such a way that it is protected from moisture. e.g. condensation, splashed water, etc. Do not place or store your air conditioner where it can fall or be pulled into water or any other liquid.
SET UP & USE NOTE: All the illustrations in this manual are for explanation purpose only. The air conditioner you have may be slightly different. WINDOW REQUIREMENTS: H Your air conditioner is designed to install in standard double hung windows with opening widths of 23 to 36 inches (584mm to 914mm) . BD06WT: 14''(330mm) BD08WT BD10WT BD12WT BD145WT: 15 1/2” (394mm) H H WARNING • Do not, under any circumstances, cut or remove the third (ground) prong from the power cord.
SET UP & USE PREPARE THE WINDOW through the condenser, for heat removal. The rear of the unit must be outdoors, not inside a building or garage.
w sash sash am am ing ng SET UP & USE C: Align the holes in the top rail with those in the top of the unit as shown in Fig. B Fig. B B. Slide the free end “I“ section of the panel directly into the cabinet as shown in Fig. 2. Slide the panel down. Be sure to leave enough space to slip the top and bottom of the frame into the rails on the cabinet. Fig. 2 " " D: Secure the top rail to the unit with the 3/8 Screws as shown in Fig. C.
SET UP & USE SECURE THE ACCORDION PANELS Using 2 people, keep a firm grip on the air conditioner, carefully place the unit into the window opening so the bottom of the air conditioner frame is against the window sill (Fig. 5A and H Fig. 5B). H:About 3/4 to 1 Carefully for 5 to 8K); close the window H:About 1 to 1the / fortop 10 to12K); behind rail of the unit. 3 8 Fig.
SET UP & USE INSTALL WEATHER STRIPPING (only be applicable to Energy star models) In order to minimize air leaks between the room air conditioner and the window opening, trim the weather stripping with a proper length, peel off the protective backing and plug any gaps if needed (Fig.11). Fig. 11 IF AC IS BLOCKED BY STORM WINDOW Add wood as shown in Fig.12 or remove storm window before air conditioner is installed.
SET UP & USE AIR CONDITIONER FEATURES WARNING: IMPORTANT SAFETY INSTRUCTIONS before operating this appliance. CAUTION: Please always wait 3 minutes when turning unit off then on again, and when changing from cool to fan and back to cool. This prevents compressor from overheating & possible circuit breaker tripping. To begin operating the air conditioner, follow these steps: 1. Set the thermostat to the highest number (coldest or cooler setting). 2. Set the selector control to the highest COOL setting.
SET UP & USE PARTS & FEATURES Horizontal Louvers Remote Control MODE TIMER SPEED ENERGY SAVER ONE TOUCH SLEEP Control Panel MODE TIMER SPEED ENERGY SAVER ONE TOUCH SLEEP Filter Control Panel Page 15
SET UP & USE BATTERY INSTRUCTIONS Coin Lock sign Unlock sign Battery cover Lock sign Coin LockUnlock sign sign Note: CR2032 Battery Not Included Lock sign Coin Groove Battery cover Coin Unlock sign Battery cover Step 1: Insert a coin vertically in the groove on the battery Unlock sign Groove Groove Battery cover cover, clockwise rotation of 45 degrees, make sure that the groove is aligned with the “unlock” sign as shown Positive (+) side up Battery below and remove the battery cover.
SET UP & USE REMOTE CONTROL Power Button Mode Button MODE Temp Down - Temp Up + Timer button Speed Button Energy Saver One Touch TIMER SPEED ENERGY SAVER ONE TOUCH Sleep Button SLEEP POWER BUTTON Operation starts when this button is pressed and stops when the button is pressed again. NOTE: If the unit has ENERGY SAVER function, it will initiate automatically the Energy Saver function under Cool, Dry, and Auto (only AutoCooling and Auto-Fan) modes.
SET UP & USE OPERATING INSTRUCTIONS The unit can be controlled by the unit control alone or with the remote. NOTE: The outline of the operation panel is based on typical model, the function is the same with your air conditioner while there may be some slight differences in appearance. TO ADJUST FAN SPEEDS: Press Fan button to select the Fan Speed in four steps-Auto, Low, Med or High. Each time the button is pressed, the fan speed mode is shifted. CHECK FILTER FEATURE: TO TURN UNIT ON OR OFF: feature.
SET UP & USE TO OPERATE ON AUTO FEATURE: • When you set the air conditioner in AUTO mode, it will automatically select cooling, heating (cooling only models without), or fan only operation depending on what temperature you have selected and the room temperature. • The air conditioner will control room temperature automatically round the temperature point set by you. • In this mode, the fan speed cannot be adjusted, it starts automatically at a speed according to the room temperature.
CLEANING & CARE DANGER 1. Be sure to unplug the unit before cleaning or servicing. CABINET CLEANING • Be sure to unplug the air conditioner to prevent be dusted with an oil-free cloth or washed with a cloth dampened in a solution of warm water and mild liquid dishwashing detergent. Rinse thoroughly and wipe dry. 2. Do not use gasoline, thinner or other chemicals to clean the unit. • Never use harsh cleaners, wax or polish on the cabinet front. 3.
TROUBLESHOOTING & WARRANTY BEFORE YOU CALL FOR SERVICE IF THE AIR CONDITIONER FAILS TO OPERATE: A) Check to make sure that the air conditioner is plugged in securely. If it is not, remove the plug from the outlet, wait 10 seconds and plug it in again securely. B) Check for a blown circuit fuse or a tripped main circuit breaker. If these seem to be operating properly, test the outlet with another appliance. WARNING IF NONE OF THE ABOVE SOLVES THE PROBLEM, CONTACT A QUALIFIED TECHNICIAN.
TROUBLESHOOTING Troubleshoot your problem by using the chart below. If the air conditioner still does not work properly, contact BLACK+DECKER customer service center or the nearest authorized service center. Customers must never troubleshoot internal components. TROUBLE Air conditioner does not start ANALYSIS • House fuse blown or circuit breaker tripped. Replace fuse with time delay type or reset circuit breaker. • Plug Current Device Tripped. Press the RESET button. • Power is OFF. Turn power ON.
TROUBLESHOOTING & WARRANTY LIMITED WARRANTY Any repair, replacement, or warranty service, and all questions about this product should be directed to BLACK+DECKER at 844-299-0879 from the USA or Puerto Rico. W. Appliance Co. warrants to the original purchaser that the product will be free from defects in material, parts and workmanship for the period designated for this product.
BLACK & DECKER, BLACK+DECKER, the BLACK & DECKER and BLACK+DECKER logos and product names and the orange and black color scheme are trademarks of The Black & Decker Corporation, used under license. All rights reserved. Product in this box may differ slightly from that pictured. Does not affect function. Not all accessories shown in photography are included in this package. Imported by W Appliance, Inc.