
Manual


8
WARNING: To reduce the risk of injury,
do not place fingers or other objects inside the
Power Unit, other than the attachments
designed to work with the Power Unit.
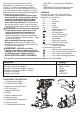
Lock the Power Unit by setting the forward/
To remove an attachment, depress the
off the tool.
as shown and push it onto the Power Unit
until it snaps into place and an audible click
is heard.
gently pulling it away from the Power Unit.
NOTE: Only use attachments that are spe
cifically designed for and compatible with
the Power Unit.
NOTE: Refer to individual attachment
instruction manuals for specific safety
warnings and operating instructions before
operating attachments with the Power Unit.
OPERATING: DRILL/
SCREWDRIVER ATTACHMENT
SAFETY WARNINGS AND INSTRUCTIONS:
DRILLS
1. Hold drill firmly with one hand on the grip
and the other hand on the bottom of the
battery pack unless an auxillary handle
has been supplied with the tool. Use
auxillary handle if supplied with the tool.
2. When attaching accessories in the drill
chuck, hand tighten the keyless chuck firmly.
WARNING: Drill may stall (if overloaded
expect the stall. Grip the drill firmly with both
hands to control the twisting action and prevent
loss of control which could cause personal
injury. If a stall does occur, release the trigger
immediately and determine the reason for the
stall before restarting.
WARNING: Let the tool work at its own
pace. Do not overload.
WARNING: Before drilling into walls,
floors or ceilings, check for the location of
wiring and pipes.
FITTING AND REMOVING A DRILL BIT OR
SCREWDRIVER BIT
exchange of bits.
clockwise with one hand while holding the
rear part with the other.
front part counterclockwise.
the magnetic bit holder.
SCREW DRIVING
screwdriver bit.
a small amount of washing liquid or soap as
a lubricant.
straight line with the screw.
For driving fasteners, the reversing button
should be pushed to the left. Use reverse
fasteners. When moving from forward to
reverse, or vice versa, always release the
trigger switch first.
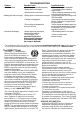
KEYLESS CHUCK - FIGURE E
WARNING: To reduce the risk of injury,
turn off and remove battery from the tool before
making any adjustments or removing or
installing attachments or accessories.
WARNING: Do not attempt to tighten or
gripping the front part of the chuck and turning
the tool on. Damage to the chuck and personal
injury may occur when changing accessories.
To insert a drill bit or other accessory:
one hand and use your other hand to
rotate the front half in the counterclockwise
direction, as viewed from the chuck end.
2. Insert the bit or other accessory fully into
the chuck, and tighten securely by holding
the rear half of the chuck and rotating the
front portion in the clockwise direction as
viewed from the chuck end.
D
E
12