
User's Manual


USE OF EXTENSION CORDS
Makesuretheextensioncordisingoodconditionbeforeusing.Alwaysusethepropersize
extensioncordswiththetool–thatis,properwiresizeforvariouslengthsofcordandheavy
enoughtocarrythecurrentthetoolwilldraw.Useofanundersizedcordwillcauseadropin
linevoltageresultinginlossofpowerandoverheating.Forpropersizecordsseechartbelow.
MOTOR
Besureyourpowersupplyagreeswithnameplatemarking.120VoltsAConlymeansyour
toolwilloperateonstandard60Hzhouseholdpower.DonotoperateACtoolsonDC.A
ratingof120voltsAC/DCmeansthatyoutoolwilloperateonstandard60HzACorDC
power.Thisinformationisprintedonthenameplate.Lowervoltagewillcauselossofpower
andcanresultinover-heating.AllBlack&Deckertoolsarefactory-tested;ifthistooldoes
notoperate,checkthepowersupply.
SAVE THESE INSTRUCTIONS
ASSEMBLY
WARNING: Laceration Hazard. Beforeattemptinganyofthefollowingoperations,make
surethatthetoolisswitchedoffandunpluggedandthatthesawbladehasstopped.Used
sawbladescanbehot.
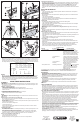
Fitting the saw blade (gure A)
-Holdthesawblade(9)asshown,withteethfacingforward.
-Pushthelever(3)downwards.
-Inserttheshankofthesawbladeintothebladeholder(10)asfarasitwillgo.
-Releasethelever.
Connecting a vacuum cleaner to the tool
1.Attachvacuumadapter(purchaseseparately)tobackport.
2.Attachvacuumcleanerhosetovacuumadapter.
USE
WARNING: To reduce the risk of injury,neverusethetoolwhenthesawshoeisloose
orremoved.
Adjusting the shoe plate for bevel cuts (gure B)
Theshoeplatecanbesettomakeeitherastraightcutoraleftorrightbevelcutatanangle
of45°.Loosenthescrews(11).
-Pulltheshoeplate(6)forward,rotatetheshoeplatetotheleftorrightandpushitbackinto
the45°location.
-Tightenthetwoscrews(11).
Toresettheshoeplateforstraightcuts:
-Loosenthescrews(11).
-Pulltheshoeplate(6)forward,rotatetothecenterandpushitbackintothe0°location.
-Tightenthetwoscrews(11).
Switching On and Off
-Toswitchthetoolon,pressthevariablespeedswitch(1).Thetoolspeeddependsonhow
faryoudepresstheswitch.
-Forcontinuousoperation,pressthelock-onbutton(2)andreleasethevariablespeed
switch.Thisoptionisavailableonlyatfullspeed.
-Toswitchthetooloff,releasethevariablespeedswitch.Toswitchthetooloff,whenin
continuousoperation,pressthevariablespeedswitchoncemoreandreleaseit.
How to Use the Sightline
®
Feature (gure C)
-Useapenciltomarkthecuttingline.
-Positionthejigsawovertheline(12).
Viewingfromdirectlyabovethejigsawthelineofcutcanbeeasilyfollowed.
B
C
E
F
Saw blade storage (gure D)
Sawblades(9)canbestoredinthestoragecompartment(14)locatedonthesideofthetool.
-Openthecoverofthesawbladestoragecompartment(13)byholdingthetabonthetopof
thedoorandpullingoutwards.
-Removeorstoresawblades(9)inthestoragecompartment.NOTE:Bladesareheldin
placebyamagnet.Toremove,pressoneitherendofthebladetolifttheoppositeend.
-Closethecoverofthesawbladestoragecompartment(13)andmakesurethatitislatched
closed.
HINTS FOR OPTIMUM USE
General
-Useahighspeedforwood,amediumspeedforaluminumandPVCandalowspeedfor
metalsotherthenaluminum.
Sawing laminates
Asthesawbladecutsontheupwardstroke,splinteringmayoccuronthesurfaceclosestto
theshoeplate.
-Useafine-toothsawblade.
-Sawfromthebacksurfaceoftheworkpiece.
-Tominimizesplintering,clampapieceofscrapwoodorhardboardtobothsidesofthe
workpieceandsawthroughthissandwich.
Sawing metal
-Beawarethatsawingmetaltakesmuchmoretimethansawingwood.
-Useasawbladesuitableforsawingmetal.
-Whencuttingthinmetal,clampapieceofscrapwoodtothebacksurfaceoftheworkpiece
andcutthroughthissandwich.
-Spreadafilmofoilalongtheintendedlineofcut.
WARNING: Do not use a vacuum when cutting metal. Metalfilingswillbehotandmay
causeafire.
Rip Fence
Rippingandcirclecuttingwithoutapencillineareeasilydonewitharipfenceandcircleguide
(availableatextracost).
Attaching Rip Fence (gure E & F)
-Insertripfenceintoslotontherightsideofsawshoeasshownwithcrossbarfacingdown.
-Placescrew(14)intoholeinbottomofshoe.
-Alignclampbar(15)overscrewwithlippededgefacingdownandpointingtowardstherear
ofthesaw.
-Usingaphillipsscrewdriver,runthescrewintothethreadedholeinthebarclamp.
-Adjusttowidthofcutandtightenscrew.
Circle Cutting
-Insertripfenceintoslotontherightsideofsawshoewithcrossbarfacingup.
-Adjustripfencesothatdistancefrombladetoholeincrossbaristhedesiredradiusand
tightenscrew.
-Placesawsothatcenterofholeincrossbarisovercenterofcircletobecut(makepocket
cut,drillholeforbladeorcutinwardfromedgeofmaterialtogetbladeintoposition).
-Whensawisproperlypositioned,driveasmallnailthroughholeincrossbarintoexact
centerofcircletobecut.Usingripfenceasapivotarm,begincuttingcircle.
Troubleshooting
Problem Possible Cause Possible Solution
• Unitwillnotstart. •Cordnotpluggedin. •Plugtoolintoaworkingoutlet.
•Circuitfuseisblown. •Replacecircuitfuse.(Iftheproduct
repeatedlycausesthecircuitfuseto
blow,discontinueuseimmediatelyand
haveitservicedataBlack&Decker
servicecenterorauthorizedservicer.)
•Circuitbreakeris •Resetcircuitbreaker.(Iftheproduct
tripped. repeatedlycausesthecircuitbreaker
totrip,discontinueuseimmediatelyand
haveitservicedataBlack&Decker
servicecenterorauthorizedservicer.)
•Cordorswitchis •Havecordorswitchreplacedat
damaged. Black&DeckerServiceCenteror
AuthorizedServicer.
• Shoeplateisloose. •Retainingscrewloose. •Loosenthescrew closesttotheblade
ontheundersideoftheshoeplate.
Tightenthescrewfarthestfromthe
bladebyturningcounterclockwise
(lefthandthread)
Forassistancewithyourproduct,visitourwebsitewww.blackanddecker.comforthe
locationoftheservicecenternearestyouorcalltheBLACK&DECKERhelplineat
1-800-544-6986.
MAINTENANCE
Useonlymildsoapanddampclothtocleanthetool.Neverletanyliquidgetinsidethetool;
neverimmerseanypartofthetoolintoaliquid.
IMPORTANT:ToassureproductSAFETYandRELIABILITY,repairs,maintenanceand
adjustmentshouldbeperformedbyauthorizedservicecentersorotherqualifiedservice
personnel,alwaysusingidenticalreplacementparts.
ACCESSORIES
Recommendedaccessoriesforusewithyourtoolareavailablefromyourlocaldealeror
authorizedservicecenter.Ifyouneedassistanceregardingaccessories,pleasecall:
1-800-544-6986.
WARNING:Theuseofanyaccessorynotrecommendedforusewiththistoolcouldbe
hazardous.
SERVICE INFORMATION
AllBlack&DeckerServiceCentersarestaffedwithtrainedpersonneltoprovidecustomers
withefficientandreliablepowertoolservice.Whetheryouneedtechnicaladvice,repair,or
genuinefactoryreplacementparts,contacttheBlack&Deckerlocationnearestyou.Tofind
yourlocalservicelocation,refertotheyellowpagedirectoryunder“Tools—Electric”orcall:
1-800-544-6986 or visit www.blackanddecker.com
FULL TWO-YEAR HOME USE WARRANTY
Black&Decker(U.S.)Inc.warrantsthisproductfortwoyearsagainstanydefectsinmaterial
orworkmanship.Thedefectiveproductwillbereplacedorrepairedatnochargeineitherof
twoways.
Thefirst,whichwillresultinexchangesonly,istoreturntheproducttotheretailerfromwhom
itwaspurchased(providedthatthestoreisaparticipatingretailer).Returnsshouldbemade
withinthetimeperiodoftheretailer’spolicyforexchanges(usually30to90daysafterthe
sale).Proofofpurchasemayberequired.Pleasecheckwiththeretailerfortheirspecific
returnpolicyregardingreturnsthatarebeyondthetimesetforexchanges.
Thesecondoptionistotakeorsendtheproduct(prepaid)toaBlack&Deckerownedor
authorizedServiceCenterforrepairorreplacementatouroption.Proofofpurchasemaybe
required.Black&DeckerownedandauthorizedServiceCentersarelistedunder
“Tools-Electric”intheyellowpagesofthephonedirectory.
Thiswarrantydoesnotapplytoaccessories.Thiswarrantygivesyouspecificlegalrightsand
youmayhaveotherrightswhichvaryfromstatetostateorprovincetoprovince.Shouldyou
haveanyquestions,contactthemanagerofyournearestBlack&DeckerServiceCenter.
Thisproductisnotintendedforcommercialuse.
FREE WARNING LABEL REPLACEMENT:Ifyourwarninglabelsbecomeillegibleorare
missing,call1-800-544-6986 forafreereplacement.
LATIN AMERICA:ThiswarrantydoesnotapplytoproductssoldinLatinAmerica.For
productssoldinLatinAmerica,checkcountryspecificwarrantyinformationcontainedinthe
packaging,callthelocalcompanyorseethewebsiteforwarrantyinformation.
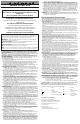
Minimum Gauge for Cord Sets
Volts Total Length of Cord in Feet
120V 0-25 26-50 51-100 101-150
(0-7,6m)(7,6-15,2m)(15,2-30,4m)(30,4-45,7m)
240V 0-50 51-100 101-200 201-300
(0-15,2m)(15,2-30,4m)(30,4-60,9m)(60,9-91,4m)
Ampere Rating
More Notmore AmericanWireGage
Than Than
0 - 6 18 16 16 14
6 - 10 18 16 14 12
10 - 12 16 16 14 12
12 - 16 14 12 NotRecommended
A
See ‘Tools-
Electric’
– Yellow Pages –
for Service &
Sales
Black&Decker
(U.S.)Inc.,
701E.JoppaRd.
Towson,MD21286
U.S.A.
9
10
3
6
4
11
12
9
13
15
14
D