
Operation Manual


28
ENGLISH
• When attempting mitre cuts, follow the same
procedure detailed above, however, use the area
marked 45˚ on the ‘sight guide’.
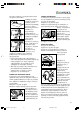
ADJUSTING THE PARALLEL FENCE
Your circular saw includes a parallel fence. This permits
the sawing of a straight line parallel to the edge of the
workpiece. To assemble and adjust the parallel fence,
proceed as follows:
Disconnect the plug from the electricity supply.
Loosen the locking screw
(15) at the forward end of
the saw base. Slide the
parallel fence (8) along
its guide until the desired
measurement is indicated. Tighten the locking screw (15).
SETTING THE MITRING ADJUSTMENT
Your circular saw can cut at angles up to 45˚. To adjust
the angle of your circular saw, proceed as follows:
Disconnect the plug from the electricity supply.
Loosen the locking
screw (13). Loosen the
locking lever (22) if fitted
on your product. Move
your circular saw around
the mitre scale (12) until
the desired angle is
indicated. Tighten the locking screw (13). Tighten the
locking lever (22) if fitted on your product.
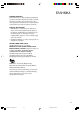
CHANGING THE BLADE
Proceed as follows:
Disconnect the plug from the electricity supply.
Retract the blade guard
(7). Insert a screwdriver
through the hole in the
blade to prevent rotation
of the blade.
Unlock and remove
screw (5). Loosen
anticlockwise using a
13mm spanner, remove
the outer washer (24)
and remove the blade.
Insert the new blade,
ensuring that the arrow
on the blade points in the same direction as the arrow
on the body of your circular saw. Fit the outer washer
(24) with the raised centre portion pointing away from
the blade. Ensure that this washer is correctly located on
the flats of the spindle. Fit the saw blade locking screw
(5). Insert a screwdriver through the hole in the blade
to prevent rotation of the blade. Tighten the sawblade
locking screw clockwise using a 13mm spanner.
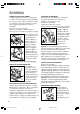
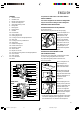
ADJUSTING THE RIVING KNIFE
The riving knife (6) prevents the saw blade from
jamming during rip sawing operations. You must check
the position of the riving knife whenever the saw blade
is replaced, or whenever the clearance is affected.
Proceed as follows:
Disconnect the plug from the electricity supply.
Through the opening in
the blade guard, locate
the two riving knife
screws.
If your circular saw
does not have an
opening in the blade
guard, adjust the cutting
depth to locate the
riving knife screws.
Loosen the two riving
knife screws. Adjust the
riving knife to give a radial clearance of 2-3mm and a
tooth peak clearance of 2-3mm. Tighten the two riving
knife screws.
Your saw is now ready for use.
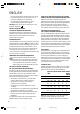
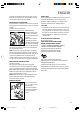
OPERATING YOUR CIRCULAR SAW
To switch your circular
saw on, depress the
lock-off button (25) and
squeeze the on/off
trigger switch (20).
To stop your circular
saw, release the
trigger switch.
HOLDING YOUR CIRCULAR SAW
The front handle (10) makes it easier to guide the saw
properly. Switch the machine on before you start
sawing the workpiece. Guide the saw without pushing
3mm
2
m
m
6
•
22
•
•
13
•
12
7
•
26
•
5
•
24
•
23
•
8
15
•
•
CD600 Circ saw ML p01-41 07/01/2000, 3:43 pm28