
User's Manual


8
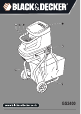
Features
1. On/off switch
2. Direction selector
3. Overload protection button
4. Funnel
5. Stand
6. Collection bag
7. Adjustment knob
Assembly
Warning! Before assembly, make sure that the tool is
switched off and unplugged.
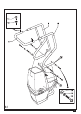
Assembling the stand (g. A1 - A3)
Warning! Seek assistance when tting the stand.
The appliance is too heavy to be handled by one person.
u Turn the appliance upside down and place it on the oor.
u Align the holes in the support legs with those in the
appliance. Match the leg mark with the mark on the
housing.
- Left leg nozzle mark "L".
- Right leg nozzle mark "R".
u Secure the legs on the appliance using the Allen screws (13),
the spring washers (14) and the saddle washers (15) as
shown (g. A1).
u Slide the end frame (8) over the right leg (10) and left leg (9).
u Secure the end frame using the screw (11) and the lock
washer (12).
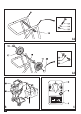
u Align the holes in the wheel shaft (16) with those in the
stand (g. A2).
u Secure the wheel shaft with the saddle washers (15),
spring washers (14) and the Allen screws (13) as shown.
Fitting the wheels (g. A3)
u Fit the wheel (17) on the wheel shaft (16).
u Secure the wheel with the at washer (18), the spring
washer (14) and the Allen screw (19).
u Fit the wheel cover (20) by clicking it on the wheel.
u Repeat the above procedure for the other wheel.
Fitting the collection bag (g. B)
u Place the collection bag (6) under the outlet opening as
shown.
u Fit the handles of the collection bag over the hooks (21).
Use
Warning! Let the tool work at its own pace. Do not overload.
u Do not switch the appliance off before it is completely
empty, as it may clog and be difcult to restart.
u Remove soil and stones from plant roots before shredding.
u Firmly hold branches when feeding them into the shredder.
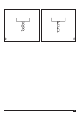
Switching on and off (g. C)
Switching on
u Set the direction selector (2) to left position.
u Press the I button of the on/off switch.
Switching off
u Press the O button of the on/off switch.
Warning! Do not operate the direction selector/switches in
sequence using abrupt motions. Sudden switching may
generate current spikes potentially damaging the shredder.
Clearing a blockage (g. C)
If the appliance becomes jammed by branches which are too
thick or hard, or foreign bodies, the shredder will most of the
time release itself automatically. The rotating direction will
automatically reverse thereby releasing the material back
through the top. To return the rotation back to normal, proceed
as follows:
u Switch off and wait until the cutting blade has stopped
completely.
u Switch on again with and the appliance will be back to
forward rotation.
When the material is jammed:
u Switch the appliance off.
u Set the direction selector (2) to the right position.
u Press the I button until the blockage is removed.
Warning! Branches may be ejected from the inlet funnel when
the appliance is running in reverse.
If the blockage has not cleared:
u Switch off and unplug the appliance.
u Use a piece of wood to loosen the debris within the cutting
chamber.
u Replace the plug in the mains socket and operate the
appliance as described above to remove any debris.
Warning! Always switch off and unplug the appliance when
removing a blockage. Do not attempt to remove blockages by
hand through the inlet funnel or outlet opening. Keep your
hands clear of the cutting chamber.
Hints for optimum use
u Shred dry materials last, as this will help to clear moist
material from the shredder.
u Do not allow material to pile up and compost prior to
shredding.
u You may feed shreddings into the shredder for a second
time to further reduce their volume.
u Refer to the chart at the end of this text.