TM MILL & BREW™ 12-CUP PROGRAMMABLE COFFEE MAKER u s e & c a re m a n u a l CM5000
CO NTE NTS Important Safeguards 1 Getting to know your Mill & Brew™ Cof fee Maker 2–3 Mill & Brew™ Cof fee Maker Product Benefits 4 Getting to know your Control Panel 5 Before Brewing 6 Programming your Mill & Brew™ Cof fee Maker 6–7 4 Elements to Brew the Perfect Cup 8 Tips for a Perfect Cup of Cof fee 9 Brewing Cof fee 10 –11 Care and Cleaning 12–13 Troubleshooting 14 Warranty and Customer Ser vice Information 15
Please Read and Save this Use and Care Book. IMPORTANT SAFEGUARDS. When using electrical appliances, basic safety precautions should always be followed including the following: • To disconnect, turn the unit OFF, • Read all instructions. then remove plug from wall outlet. • Do not touch hot surfaces. Use handles • Do not use this appliance for other or knobs. than intended use. • To protect against fire, electric shock • Keep lid on the carafe when in use.
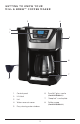
G E T T I NG TO KN OW YO UR MIL L & B R EW ™ CO F F E E M A K E R 3 4 2 1 5 6 7 8 6. Duralife™ glass carafe 1. Control panel 2. Lift latch 3. Lid 7. “Keep hot” carafe plate 4. Water reservoir cover 8. Coffee scoop 5.
G E T T I NG TO KN OW YO UR M IL L & B R EW ™ CO F F E E M A K E R 1. 2-in-1 grinder and permanent filter basket 1 (Part# CM5000-03) 2. Washable brew basket 2 (Part# CM5000-04) 3. Lift latch 4. Grinder lid 5.
M IL L & B R EW ™ CO F F E E M A K E R PR ODUC T B E NE F ITS Brew Strength Selector Customize the flavor of your coffee by selecting from three brew strength settings: regular, strong, or bold. Fresh Brew Timer After the brew cycle is complete, the time since brewed will be displayed in 1-minute increments. This information will be in place of the digital clock during keep warm.
GE T TI NG TO KN OW YO UR CO N TROL PANEL Indicates the delay start timer is set Brew strength settings Indicates if the whole bean grinder function has been turned OFF ( ) or ON ( ) Optimal grind setting correlating with the number of cups to be brewed Clock / Backlit LCD Display Grind: Cycles through optimal grind settings (4, 6, 8, 10, 12) correlating with the number of cups to be brewed. Also, turns the grinder OFF ( )for brewing pre-ground coffee. Power: Turns the unit ON or OFF.
BE FO R E B R E WIN G 1. Carefully unpack your coffeemaker, removing all packaging materials, labels, and/or stickers from your coffeemaker. 2. Clean your coffeemaker thoroughly before using for the first time. Wash the Glass Carafe, Washable Brew Basket, 2-in-1 Grinder and Permanent Filter Basket, and Removable Showerhead in warm, soapy water. Rinse and dry, then place back into your coffeemaker. 3. Clean the inside of your coffeemaker by running two full brewing cycles with water only, no coffee. a.
PRO G R A M M I NG YO UR M IL L & B R EW ™ CO F F E E MA K E R 1. After the digital clock is set, press the PROG button. The timer icon ( begin to flash and display will read 12:00. ) will 2. Press the HR button and then MIN button to select the time you would like automatic brewing to begin (for example: 7:30 AM). Make sure the PM light is not on, if needed. 3. The timer display will flash several times then switch back to the current time of day. 4.
4 E L E M EN TS TO B R E W THE P E RFECT CUP Water Quality Coffee Freshness A truly fresh cup of coffee only comes from freshly ground coffee beans. In fact, once a coffee bean is broken or ground, its flavor will begin to degrade over time. Your Mill & Brew™ coffee maker maximizes the freshness of your coffee by grinding the coffee beans just prior to brewing. A great cup of coffee starts with fresh, quality water.
T I P S FOR A P ER F EC T C UP O F CO F F E E • A clean coffee maker is always important. Regular cleaning is required for the best tasting coffee. • To maximize the freshness of your coffee, use the integrated grinder to grind your coffee beans just before brewing. • Always store your coffee in a cool, dry place. Once coffee has been opened, keep it tightly sealed in an airtight container.
BR E W I NG COF F E E 1. Fill the carafe with the desired amount of fresh, cold water and pour into the water reservoir. Do not fill with more than 12 cups of water. 2. Close the water reservoir cover and place the carafe on the Keep Hot carafe plate. 3. (a) Open the grinder lid using the lift latch and (b) add the desired amount of coffee into the 2-in-1 Grinder and Permanent Filter. 1 3a 3b 4. Secure the integrated grinder lid back into place.
BR E W I NG COF F E E 6. (b) If using ground coffee, push the GRIND button to cycle through the grind settings until you reach the symbol to turn the grinder OFF for brewing pre-ground coffee. 7. To set the Auto Brew delay start, adjustable auto-off, and Brew Strength Selector, follow the detailed instructions in the “Programming your Mill & Brew™” section. 6b ground coffee 8. Press the ON-OFF/Power Button just once to begin the brew cycle.
C A RE AN D C LE A N IN G Cleaning your coffee maker, following the directions below is recommended after every use. This product contains no user serviceable parts. Cleaning 1. Make sure your coffee maker is turned OFF, unplugged and allow to cool. 2. Wipe the outside of your coffee maker and carafe warming plate with a soft, damp cloth. 3. Remove the Washable Brew Basket and 2-in-1 Grinder and Permanent Filter Basket, and discard the coffee grounds. 4.
C AR E A N D C L EA N IN G Descaling with Vinegar With regular use, minerals and hard water can clog your coffee maker. A full cleaning with vinegar is recommended once a month. 1. Pour white vinegar into the water reservoir up to the 6-cup mark on the water window. Add fresh, cold water up to the 10-cup mark. 2. Put the 2-in-1 Grinder and Permanent Filter and Washable Brew Basket into the Mill & Brew™ Assembly and close the cover. Set empty carafe on the “Keep Hot” carafe plate. 3.
T RO U B L ES HO OTIN G PROBLEM POSSIBLE CAUSE SOLUTION Coffee maker does not turn on. Coffee maker is not plugged in. Make sure appliance is plugged into a working outlet. Coffee maker is leaking. Water reservoir may be overfilled. Make sure water reservoir has not been filled beyond the 12-cup MAX line. Carafe may not be correctly placed on the “Keep Hot” carafe plate Make sure carafe is placed correctly on the “Keep Hot” carafe plate.
WA RR AN T Y AN D C USTO M E R SE RVI CE IN FOR M AT I ON For service, repair or any questions regarding your appliance, call the appropriate 800 number listed within this section. Please DO NOT return the product to the place of purchase. Also, please DO NOT mail product back to manufacturer, nor bring it to a service center. You may also want to consult the website listed in this manual.
NOT ES
www.BlackAndDeckerAppliances.com © 2014 Spectrum Brands, Inc., Middleton, WI 53562 2014-2-20-65: Rev-01 T22-5000926 BLACK & DECKER and the BLACK & DECKER Logo are registered trademarks of The Black & Decker Corporation, or one of its affiliates, and used under license.