
Operating instructions


Drain-Rooter™
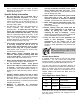
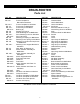
Cutter Application Chart (Table 2)
Cutter
Catalog
#
Typical
Applications
Arrow
Head
AH
Ideal for heavy
cutting and scraping.
Flexible Arrow
Head
FAH
More flexibility than
Arrow Head; can
take sharp turns in
small lines.
Boring
Gimlet
BG
To remove or retrieve
loose objects.
Down
Head
Boring
Gimlet
DHBG
Leads cable down
drain line rather than
up vent or across
tee.
1-1/4"
Side
Cutter
1-1/4SCB
Works well in grease
stoppages, scrapes
walls of pipe.
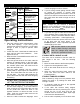
Operating Instructions
1. Place the machine within approximately 2 feet
of the drain opening. If you can’t get the
machine this close to the opening, run the cable
through a hose or pipe to prevent cable
whipping.
2. Loosen the chuck. Hand feed the cable into the
drain until you reach some resistance.
Then
tighten the chuck.
3. Make sure the Forward/Off/Reverse switch is in
the
Forward
position.
4. With both gloved hands on the cable, start the
machine by stepping gently on the foot pedal.
The harder you press on the pedal, the faster
the variable speed motor will rotate and the
faster the cable will feed.
5.
Feed the cable carefully. Use the variable
speed pedal to adjust speed as resistance is
met. Don’t feed faster than the cable can go
into the drain. Too much cable between the
power cable feed and drain will cause whipping
and kinking.
DO NOT USE TOO MUCH FORCE –
LET THE CUTTER DO THE WORK.
6. Don't leave too much slack in the cable since
this will cause whipping. If the cable starts to
bend or build up too much twist, take your foot
off the pedal and rotate the drum in the
opposite direction to relieve the twist on the
cable. Push any excess cable back into the
drum and then continue.
7. When the cable reaches the stoppage, move
the cable back and forth as the drum is rotating
until the stoppage has been cleared.
8. If you’re having trouble getting around bends,
try putting the machine in reverse while
applying steady pressure to the cable. Don’t do
this for more than a few seconds at a time since
this could cause the cable to tangle or kink in
the drum.
!
CAUTION
Do not use reverse to pull the cable out of the
drain. Always run your machine in
Forward
,
whether you are feeding the cable into the line or
pulling it out. Use reverse
only
to release cable if
it should become caught in the line.
9. If you still can’t get the cable around the bend,
you’re probably using a cable that’s too large in
diameter. Switch to a smaller diameter cable if
necessary. (See Table 1 - Cable Applications)
10.
After the line has been opened, return the cable
to the drum with the motor switch in the
Forward
position. This is important to prevent
cable tangling in the drum.
Hint:
It's often helpful to have a small
stream of water running in the line to
wash the cuttings away while the
machine is in operation and after.
IF CABLE GETS CAUGHT IN LINE
The motor can be reversed to free the cable if it
gets caught in the line. Use the following
procedure:
1. Move the motor switch to the Reverse position.
2. Tighten the chuck against the cable.
3. Pull on the cable while the drum is turning in
reverse.
4. When the cable has been freed, loosen the
chuck and move the motor switch to the
Forward position.
IF CABLE TANGLES IN DRUM
This is caused by using too much pressure when
feeding the cable or by feeding the cable while
running in reverse.
1. To untangle, rotate the drum in the opposite
direction to relieve the twist.
2. If the cable has become badly tangled,
disassemble the drum by loosening the screws
around the rim of the drum and pull the
container front off the drum. (Note: Open cage
units cannot be disassembled.)
3. Pull the cable completely out of the drum shell.
!
5