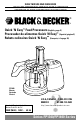
SAVE THIS USE AND CARE BOOK LEASE ESTE INSTRUCTIVO ANTES DE USAR EL PRODUCTO CONSERVER CE GUIDE D’ENTRETIEN ET D’UTILISATION ® * Quick ‘N Easy™ Food Processors (English, page 2) Procesador de alimentos Quick ‘N Easy™ (Español, página 9) Robots culinaires Quick ‘N Easy mc (Français, à la page 16) FP1400 Shown Ilustrada Illustré ? U.S.A./CANADA 1-800-231-9786 MEXICO 01-800-714-2503 Household Products Limited de México S. de R.L. de C.V. 350W (MAX) 120V 60 Hz http://www.householdproductsinc.
IMPORTANT SAFEGUARDS When using electrical appliances, basic safety precautions should always be followed, including the following. ■ Read all instructions. ■ To protect against risk of electrical shock, do not put base, cord, or plug in water or other liquid. ■ Close supervision is necessary when any appliance is used by or near children. ■ Turn unit off and unplug from outlet when not in use, before putting on or taking off parts, and before cleaning.
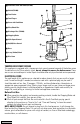
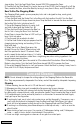
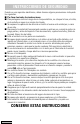
Continuous Flow Side Chute (FP1400) Shield (FP1400) Food Pusher Food Fingers Cover with Food Chute Slice/Shred Disc Discharge Disc (FP1400) Chopping Blade Hi/Lo Speed Control On/Off/Pulse Control Base 8-cup (1920 ml) Bowl Disc Stem TAMPER-RESISTANT SCREW This appliance is equipped with a tamper-resistant screw to prevent removal of the bottom cover. To reduce the risk of fire or electric shock, do not attempt to remove the bottom cover.
CONTROLS On — When this button is pressed, the unit will run continuously until the Off button is pressed. Use the On position for longer processing tasks, such as making dressings, smooth spreads, peanut butter, dips, etc. Off — The Processor should always be left in the Off position when the unit is not in use. Pulse — The Pulse position must be pressed and held for the unit to operate. When it is released, the unit will stop.
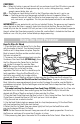
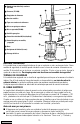
stop rotating. Twist the Food Chute/Cover toward UNLOCK to remove the Cover. 8. Carefully pull the Slice/Shred Disc (and in the case of the FP1400, the Discharge Disc) off the Stem, remove the Stem, unlock the Bowl by turning it away from its Base, and lift the Bowl off. How To Use The Chopping Blade The Chopping Blade speeds up many everyday tasks and is designed to chop, crumb, grind, mince and mix quickly. 1. Place the Bowl over the Center Post in the Base with the handle at the left.
. Do not fill the Bowl with boiling water or place any of the parts in boiling water. Some foods, such as carrots, may temporarily stain the Bowl. To remove stains, make a paste of 1 tablespoon baking soda and two tablespoons warm water. Apply the paste to the stains and rub with a cloth. Rinse in sudsy water and dry. 7. Do not allow the Chopping Blade, Slice/Shred Disc or Discharge Disc (FP1400 Only) to soak in water for long periods of time.
FOODS TO SHRED FOOD CABBAGE SPEED HI CARROTS CHEESE, CHEDDAR CHEESE, MOZZARELLA HI HI HI POTATOES ZUCCHINI HI LOW COMMENTS Use shredding disc for very fine cabbage or slaw. Cut into pieces to fit chute. Shred using light pressure. Empty Bowl as cabbage reaches disc. Position in chute and shred. Cut to fit chute. Cheese must be well chilled. Cut to fit chute. Cheese must be chilled in freezer for 30 minutes prior to shredding. Use light pressure. Position in chute.
FOODS TO SLICE FOOD APPLE CABBAGE SPEED HI HI CARROTS HI CELERY CUCUMBER MUSHROOMS HI HI LOW NUTS ONIONS HI HI PEACHES/PEARS LOW PEPPERS, GREEN LOW PEPPERONI HI POTATOES HI STRAWBERRIES TOMATOES LOW HI TURNIPS HI ZUCCHINI LOW COMMENTS Quarter and stack horizontally in chute. Use firm pressure. For coarsely shredded results, use slicing side of disc. Cut into pieces to fit chute. Empty Bowl as cabbage reaches disc. Cut into 4” (10.
INSTRUCCIONES DE SEGURIDAD Cuando se usan aparatos electrónicos, deben tomarse algunas precauciones incluyendo las siguientes: ■ Por favor lea todas las instrucciones. ■ Para protegerse contra el riesgo de un choque eléctrico, no coloque la base, el cable, ni el enchufe en agua ni en ningín otro líquido. ■ Se requiere la supervisión de cerca de un adulto al usarse esta unidad por, o cerca de un niño.
Conducto lateral de flujo continuo (FP 1400) Protector (FP 1400) Empujador de alimentos Gancho metálico Tapa con conducto de alimentos Disco con guía para rebanar Disco separador(FP1400) Cuchilla para picar Control de velocidad Hi/Lo (alta/baja) Control de pulso, encendido, y apagado Base Recipiente de 1920 ml (8 tazas) Vástago del disco ENCHUFE POLARIZADO Esta unidad tiene un enchufe polarizado en el que un contacto es más ancho que el otro.
limpieza” para que aprenda los métodos correctos y necesarios para desarmar la unidad y como limpiarla. NOTA CON RESPECTO AL USO: No trate de picar hielo en este procesador de alimentos; dañará el recipiente y hará que pierda el filo la cuchilla para picar. Esta unidad no bate crema, no bate las claras de huevo a punto de nieve, no muele café ni especies con alto contenido de aceite, no rebana huevos cocidos, dulces de malvavisco, ni quesos suaves.
la base. Gire la tapa para adentro hacia la base a la posición LOCK hasta escuchar un clic indicando que está en su lugar. 4. Enchufe el cable a una toma de corriente. 5. Use la tabla como guía para procesar alimentos rebanados o desmenuzados. Llene el conducto con los alimentos a procesar y sobre los alimentos coloque el empujador. 6. Seleccione la velocidad alta o baja, después aplique presión ligera pero firme sobre el empujador mientras oprime el control deseado ya sea el de pulso o de encendido.
3. Limpie la base y el inferior con un paño humedecido y séquelos bien. Las manchas persistentes pueden eliminarse frotando un paño humedecido con un limpiador suave, noabrasivo. No sumerja la base en ningún líquido. 4. Todas las partes removibles pueden lavarse a mano o en la máquina lavaplatos. Para retirar el gancho metálico, simplemente deslícelo hacia arriba. ■ Si se lavan a mano, hágalo en agua caliente con jabón, enjuáguelas y séquelas bien.
normal que algunos alimentos caigan dentro del recipiente del procesador. ■ Use un recipiente grande de servir para recoger los alimentos que salpiquen del conducto y gírelo a medida se va llenando a fin de prevenir que los alimentos se acumulen dentro del conducto. ■ Asegúrese de usar el disco separador por el lado correcto. La guía alta debe estar hacia arriba para los vegetales de hoja (lechuga, repollo, etc.) y para desmenuzar (zanahorias, zucchini, papas, etc.).
USOS DE LA CUCHILLA PARA PICAR ALIMENTO COMIDA PARA BEBE CANTIDAD Hasta 23⁄4 de taza VELOCIDAD Alta MIGAJAS DE PAN Hasta 4 tazas Alta MIGAJAS DE GALLETAS DULCES O SALADAS Hasta 2 tazas Alta HUEVOS COCIDOS, PICADOS Hasta 6 Baja AJOS, PICADOS Hasta 5 Alta CARNE PICADA Hasta 1 taza (CRUDA O COCIDA) NUECES, PICADAS 2 tazas CEBOLLAS, PICADAS 1 Alta Alta Baja QUESO PARMESANO Hasta 148 ml (5 oz) O ROMANO, RALLADO PEREJIL, PICADO Hasta 2 tazas Alta PIMIENTOS VERDES, PICADOS MASA DE PASTEL Hasta
ALIMENTOS PARA DESMENUZAR ALIMENTO REPOLLO VELOCIDAD Alta ZANAHORIAS QUESO, CHEDDAR Alta Alta QUESO, MOZZARELLA Alta PAPAS Alta ZUCCHINI Baja OBSERVACIONES Use el disco para desmenuzar para un repollo bien fino o para ensalada. Parta el repollo en pedazos y acomódelos dentro del conducto. Desmenuce aplicando presión ligera. Vacíe el recipiente a medida alcanza el nivel del disco. Colóquelas dentro del conducto y desmenúcelas. Parta para acomodar el queso en el conducto.
■ Éloigner les mains et les ustensiles des disques ou du couteau en mouvement afin d’éviter les risques de blessures graves ou de dommages importants. On peut utiliser une spatule uniquement lorsque le robot ne fonctionne pas. ■ Le couteau et les disques sont très tranchants; il faut donc les manipuler avec précaution. ■ Se servir des moyeux pour installer ou retirer le couteau ou le disque afin d’éviter les risques de blessures.
Orifice latéral à débit continu (modèle FP1400) Écran (modèle FP1400) Poussoir pour les aliments Doigts de retenue des aliments Couvercle avec entonnoir Disque éminceur-déchiqueteur avec moyeu Disque de décharge (modèle FP1400) Couteau Commande de vitesses – basse ou élevée Commande de marche – arrêt – marche intermittente Socle Bol de 1 920 ml (8 t) Tige du disque NOTE RELATIVE À L’UTILISATION DU ROBOT : Il ne faut pas l’utiliser pour piler la glace car cela abî
Utilisation du robot culinaire Utilisation du disque éminceur-déchiqueteur 1. Placer le bol sur l’axe d’entraînement du socle avec la poignée à gauche. Faire tourner le bol vers le socle jusqu’à ce qu’il glisse en place. Enclencher le bol dans le socle en s’assurant que les ergots de verrouillage sont en place (A). 2.
2. Saisir la tige centrale du couteau et le faire glisser sur l’axe d’entraînement (B). 3. Placer l’entonnoir-couvercle sur le bol de sorte que l’ergot soit face au socle. Faire tourner l’entonnoir-couvercle vers la mention LOCK du socle jusqu’à ce qu’il s’enclenche en place. 4. Brancher la fiche. 5. Consulter le tableau d’utilisation afin de faciliter le traitement des aliments à hacher, à émietter, à moudre et à mélanger. Remplir le bol d’aliments. 6.
Techniques d’utilisation Liquides ■ On peut traiter des liquides et des aliments chauds, mais pas brûlants, dans le bol. ■ Ne pas traiter plus de 720 ml (3 tasses) de liquides à la fois. Sinon, il risque d’y avoir des fuites entre le bol et le couvercle. Taille, préparation et chargement des aliments ■ Commencer par traiter les ingrédients secs puis les ingrédients humides lorsque la recette comporte plusieurs types d’aliments. On minimise ainsi le nombre de lavages du bol.
Mettre l’appareil hors tension et le débrancher, puis dévisser le couvercle-entonnoir afin de nettoyer le blocage.
ALIMENTS À ÉMINCER ALIMENT POMMES VITESSE ÉLEVÉE CHOU ÉLEVÉE CAROTTES ÉLEVÉE CÉLERI ÉLEVÉE CONCOMBRES CHAMPIGNONS ÉLEVÉE BASSE NOIX OIGNONS ÉLEVÉE ÉLEVÉE PÊCHES, POIRES BASSE POIVRONS, VERTS BASSE PEPPERONI ÉLEVÉE POMMES DE TERRE ÉLEVÉE FRAISES BASSE TOMATES ÉLEVÉE RUTABAGAS ÉLEVÉE COURGETTE (ZUCCHINI) BASSE CONSEILS PRATIQUES Empiler les quartiers à l’horizontale. Appuyer fermement sur le poussoir Pour hacher grossièrement, utiliser le disque éminceur.
FULL ONE-YEAR WARRANTY Household Products warrants this product against any defects that are due to faulty material or workmanship for a one-year period after the original date of consumer purchase or receipt as a gift. This warranty does not include damage to the product resulting from accident or misuse. If the product should become defective within the warranty period, we will repair it or elect to replace it free of charge.