TR|MMEPJEDGER INSTRUCTIONMANUAL CATALOGNUMBER GH3000
e 0 f" \ f. \ / / 'o ,, /./ . {'/, 'j %_ -'-_'t. .
O O j ----. L____..L SAFETY GUiDELiNES - DEFiNiTiONS It is important for you to read and understand this manual. The information it contains relates to protecting YOUR SAFETY and PREVENTING PROBLEMS. The symbols below are used to help you recognize this information. ,/_,DANG ER: Indicates an imminently hazardous situation which, if not avoided, will result in death or serious injury. /_,WARN_NG: Indicates a potentially hazardous situation which, if not avoided, could result in death or serious injury.
ZLWARNING: When using electric gardening appliances, basic safety precautions should always be followed to reduce risk of fire, electnc shock, andpersonal injury, including the following. iMPORTANT SAFETY WARNINGS AND iNSTRUCTiONS TO REDUCE RiSK OF iNJURY: • Before .any use, be sure everyone using this ap.p[iance reads and understands all safety lns[ruc[tons and otner information contained in [nts manual. • Save these instructions and review frequently prior to use and in instructing others. Z_C.
• • • • • • • circuit(s) oroutlet(s) tobeusedfortheappliance. Receptacles areavailable having built-in GFCI protection andmaybeusedforthismeasure ofsafety. DON'T ABUSECORD - Nevercarryappliance bycordoryankittodisconnect from receptacle. Keepcordfromheat,oil,andsharp edges. REPLACEMENT PARTS - Whenservicing useonlyidentical replacement parts. MAINTAIN APPLIANCES WITHCARE- Followinstructions inmaintenance section. Keep handles dry,cleanandfreefromoilandgrease.
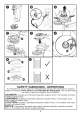
heavy enough to carry the current your product will draw. An undersized cord will cause a drop in line voltage resulting in loss of power and overheating. The table shows the correct size to use depending on cord length and nameplate ampere rating. If in doubt, use the next heavier gauge. The smaller the gauge number, the heavier the cord. If the extension will be used outside, the cord must be suitable for outdoor work. The letters "WA" on the cord jacket indicate that the cord is suitable for outdoor use.
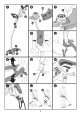
• To use the cord retainer as shown in fiaure I feed the extension cord into the cord retainer housing (11}. Eoop the extension cord around th'e cord retainer (]2) so tt rests tn the cord retainer. Then plug the extension cord into the power head. OPERATING z_WARNING: THE TRIMMER (FIGURES J, K) Disconnect the plug from the power source before making any adjustments. • Connect power cord plug to an electric outlet, then connect power cord to the trimmer.
become clogged with sap or other material and the line will become jammed as a result. To clear the jam, follow the steps listed below. • Disconnect the plug from the power source. • Press the release tabs on the line spool cap, as shown in figure N and remove the cap by pulling it straight off. • Pull the nylonqine spool out and clear any broken line or cutting debris from the spool area. • Place spool and line into spool cap with line "parked" in slots provided as shown in figure O1.
TROUBLESHOOTING Problem • Unit will not start. PossJbJe Cause • Cord not plugged in. • Circuit fuse is blown. Possible Solution • Plug appliance into a working outlet. • Replace circuit fuse. (If the product repeatedly causes the circuit fuse to blow, discontinue use immediately and have it serviced at a Black & Decker service center or authorized servicer.) • Circuit breaker is tripped. • Reset circuit breaker.
TA|LLE-BORDURE / COUPE-BORDURE MODED'EMPLOI 10
LIGNES DIRECTRICES EN MATIERE DE SECURITI_ = DC=FINITIONS It est important que vous lisiez et compreniez ce mode d'emptoi. Les informations qu'il contient concernent VOTRE SECURITE et visent & EVlTER TOUT PROBLEME. Les symboles ci-dessous servent & vous aider & reconnaftre cette information. Z_ DANG ER " Indique une situation dangereuse imminente qui, si erie n'est pas evit6e, causera la mort ou des graves blessures.
• FIL EN NYLON - Tenir le visage, les mains et pieds IQindu fil de nylon rotatif en tout temps. • LE FIL EN ROTATION EXECUTE UNE COUPE - Etre attentif Iors de tailtage autour de gritlages et de plates-bandes. • TENIR ELOIGNE TOUSLES SPECTATEURS - A une distance securitaire de I'aire de travail, particulierement les enfants. • AVERTISSEMENT IMPORTANT : Iorsque l'outil est utilise comme coupe bordure, des pierres, morceaux de metal et autres objets peuvent etre projetes A haute vitesse par le fil.
fonctionnement de I'outil. Un dispositif de protection endommage, ou toute autre piece endommagee, doit _tre repare ou remptace adequatement par un centre de reparation autorise & moins d'un avis contraire indique dans le present mode d'emploi. z_AVERTISSEMENT : Pour reparer tout outil a double isolation, VEUILLEZ UTILISER DES PIECES DE RECHANGE IDENTIQUES. Remptacer ou reparer les cordons endommages.
MONTAGE OUTILS REQUIS POUR L'ASSEMBLAGE (NON FOURNIS) : Toumevis cruciforme ,,_AVERTISSEMENT : DEBRANCHER L'OUTIL AVANT D'INSTALLER LE PARE-MAIN. FiXATiON DU PARE-MAIN (FIGURES ,,._AVERTISSEMENT : JAMAIS UTILISER B, C) L'OUTIL SANS LE PARE-MAIN SOLIDEMENT FIX€. Le pare-maindolt toujours _tre attachecorrectement& I'outilpour proteger I'utilisateur. • Retirer la vis du pare-main. Tout en maintenant le pare-main a. I'equerre de la t_te de coupe, le glisser en place de mani@e a.
FONCTIONNEMENT _AVERTISSEMENT DU TAILLE=BORDURE (FIGURES J, K) : Debrancher la fiche du bloc d'atimentation avant de faire quelque ajustement que ce soit. • Brancher/a fiche du cordon d'alimentation dans une prise de courant, puis raccorder le cordon au taille-bordure. • Maintenir un angle de coupe entre 5° et 10° comme le montre la figure J1. Ne pas exceder 10° (figure J2). Couper avec te bout du ill.
REMARQUE : UTtLtSER UNtQUEMENT UN FtL DE NYLON ROND (MONOFILAMENT) DE 2,0 mm (0,080 po) DE DtAMETRE. Ne pas utiliser de fil dentele ou de plus gros calibre, car ces fils surchargeront le moteur et provoqueront une surchauffe. Votre taille-bordure utilise un fil de nylon ROND de 2,0 mm (0,080 po) de diametre. En cours d'utilisation, les extremites des fils de nylon s'effilocheront et s'useront.
• Faire attention & ce que le fit ne se prenne pas sous la bobine. Aligner les languettes du couvercle de la bobine sur les encoches du boitier de la bobine (figure P). • Enclencher de nouveau le couvercle comme il est montre & la figure P. It suffit d'appuyer sur les pattes, puis d'enfoncer le couvercle dans le bottler de labobine. REMARQUE • Le fil dolt sortir d'environ 122 mm (4 13/16 po) du boitier.
BLACK & DECKER au 1=800=544-6986. ENTRETIEN /_AVERTISSEMENT: avant d'effectuer Pour eviter des blessures toute operation d'entretien. graves, eteindre et debrancher I'outit Z_MISE EN GARDE : Pour garantir la SECURITE et la FIABILITE du produit, les reparations, I'entretien et le reglage doivent 6tre realises par un centre de reparation autorise ou tout autre centre de reparation professionnel, et des pieces de rechange identiques doivent 6tre utilisees. 1.
DE PODADORA/ BORDEADORA IViANUAL DEiNSTRUCCIONES CATALOGO No GH3000 19
PAUTAS DE SEGURIDAD/DEFINICIONES Es importante que lea y comprenda este manual. La ir}formaci6n que contiene se relaciona con la protecci6n de SU SEGURIDAD y la PREVENCION DE PROBLEMAS. Los simbolos que slguen se utilizan para ayudarlo a reconocer esta informaci6n. /_ PELIGRO: indica una situaci6n de peligro inminente que, si no se evita, provocara, la muerte o lesiones graves. %ADVERTENCIA: indica una situaci6n de peligro potencial que, si no se evita, provocara, la muerte o lesiones graves.
los bordes afilados. • PIEZAS DE REPUESTO: al realizar el mantenimiento, utilice Qnicamente piezas de repuesto identicas. • DANO A LA UNIDAD: si golpea la herramienta o esta se atasca con un objeto extra5o, detengala de inmediato, desenchQfela, verifique que no se haya da5ado y repare cualquier daSo antes de seguir utitiz&ndola. No opere la herramienta si la bobina o el carrete est&n daSados. • DESCONECTE LA HERRAMIENTA: cuando no la utitice, al reemplazar la cuerda o antes de limpiarla.
Z_ADVERTENClA: At realizar el mantenimiento de las herramientas con dobte aistamiento, UTILICE SOLO PIEZAS DE REPUESTO IDENTICAS. Repare o reemplace los cables dafiados. _ADVERTENCIA: Para evitar el riesgo de descargas electricas, sCIo utilice con un cable de protongaciCn adecuado para uso en exteriores. Siempre conecte los cables prAol_onqa_dores__a__un&lin_ea con fusible o a unaproteqida por un interruptor de circuitos. Z&ADVERTENCIA: ADICiONALES PARA PODADORES DE CADENA 1.
INSTALACION DEL PROTECTOR (FIGURAS B Y C) /_ADVERTENCIA: NUNCA USE LA HERRAMIENTA SIN EL PROTECTOR INSTALADO FIRMEMENTE. El protector siempre debe estar correctamente instalado en la herramienta para proteger at usuario. , Quite el tornillo del protector.
de alimentaci6n a la podadora. • Mantenga un a.ngulo de corte de 5 a 10 grados como se muestra en la Figura J1. No exceda los 10 grados (Figura J2). Corte con la punta de la cuerda. • Mantenga una distancia minima de 609,6 mm (24 putgadas) entre et protector y sus pies como se muestra en la Figura K. Para Iograr esta distancia, ajuste la altura total de la podadora como se muestra en la Figura G.
especial de autoalimentacion alimentara, y recortar_tautoma.ticamente un nuevo trozo de cuerda. NO GOLPEE la unidad contra el suelo en un intento para alimentar la cuerda ni para ningt3notro prop6sito. La cuerda de corte se desgastara ma.sr@ido y necesitar_, mas alimentacion si el corte o el bordeado se realizan a Io largo de aceras u otras superficies abrasivas, o si se cortan malezas ma.sfrondosas.
REBOBINADO DEL CARRETE (FIGURAS R Y S) z_ADVERTENCIA: Antes de reaNzar cualquier ensamblaje, ajuste o cambio de accesorios, desconecte el enchufe de ta fuente de aNmentaci6n. Dichas medidas de seguridad preventiva reducen el riesgo de encender la herramienta en forma accidental. AVISO: UTILICE 0NICAMENTE CUERDA.DE MONOFILAMENTO REDONDO DE NAILON DE 2,0 mm (0,080 pulgadas) DE DIAMETRO. No utilice cuerdas dentadas o de ma_or, c_libre ya que sobrecargara.n et motor y provocara.n sobrecalentamiento.
IVlANTENllVllENTO /_ADVERTENCIA: Para evitar lesiones graves, apague y desenchufe la herramienta antes de realizar cuatquier tipo de mantenimiento. IMPORTANTE: Para garantizar la SEGURIDAD y la CONFIABILIDAD del producto, las reparaciones, el mantenimiento y los ajustes se deben reaNzar en los centros de mantenimiento autorizados o en otras organizaciones de mantenimiento calificadas, utiNzando siempre piezas de repuesto identicas. 1.
- GARANT{A BLACK & DECKER - BLACK & DECKER . SOLAMENTE PARA PROPOSITOS DE MEXICO WARRANTY Distributor Name • Sello firma de# distribuidor Date of purchase • Fecha de compra PRODUCT invoice No. • No. de factura INFOIVlATION - IDENTIFICACION Cat. No. • Catalogo 6 Modelo DEL PRODUCTO Serial Number Name • Nombre • No. de serie Last Name • Apeilido Address •Direccion City • Ciudad State • Estado Postal Code • Codigo Telephone. Postal Country • Pals No.
SOLAMENTE PARA PROPOSITOS Grupo Realsa en herramientas, S.A. de C.V. SQper Manzana 69 MZ.01 Lote 30 (Av. Torcasita) Cot. Puerto Ju&rez CancQn, Quintana Roo Tel. 01 998 884 72 27 Herramientas y Equipos Profesionales Av. Col6n 2915 Ote. Col. Francisco I. Madero Monterrey, Nvo. Le6n Tel. 01 81 83 54 60 06 Htas. Portatiles de Chihuahua, S.A. de C.V. Av. Universidad No. 2903 Cot. Fracc. Universidad Chihuahua, Chihuahua Tel. 01 614 413 64 04 Ferre Pat de Puebla, S.A. de C.V. 16 de Septiembre No. 6149 Col.
Form # 90590353 rev02 Printed in China Catalog Number GH3000 NOVEMBER 2012 32