
Quick Start Guide


14
ENGLISH
How to test the anti-kickback chainbrake
◆ Grip the tool firmly in both hands on a firm
surface - make sure the chain is clear of the
ground and switch on (see „How to switch your
chainsaw on“).
◆ Rotate your left hand forward around the front
handle so that the back of your hand comes in
contact with the front guard and pushes it
backwards (fig. G). The chain should stop
within a few fractions of a second.
To reset after the operation of the chainbrake
◆ Follow the instructions for setting the chainbrake.
Notes:
◆ It will not be possible to switch the tool on if
the front guard is not in the „set“ position.
◆ Avoid re-starting the tool until you hear the
motor come to a complete rest.
◆ If the chain does not come to rest immediately
then this indicates that it needs tensioning
(see „Fitting the guide bar and chain“).
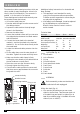
How to switch the tool on (fig. A)
◆ Grip your chainsaw firmly with both hands.
Push the lock-off button (2) forward and then
push the on/off switch (1) to start.
◆ When the motor starts, remove your thumb
from the lock button and grip the handle firmly.
Do not force the tool - allow it to do the work.
It will do a better and safer job at the speed for
which it is designed. Excessive force will stretch
the chain.
If the saw chain or bar becomes jammed:
◆ Switch the tool off.
◆ Disconnect the tool from the mains supply.
◆ Open the cut with wedges to relieve the strain
on the guide bar. Do not try to wrench the saw
free. Start a fresh cut.
Felling (fig. H - J)
◆ Pre-plan a safe exit from falling trees or branches.
◆ Cut one third of the diameter of the tree (Fig. H).
Then cut down from above to make a notch of
about 45°. This way you will avoid pinching the
saw.
◆ Make a single felling cut from the other side
but stop before you cut through to the notch
(fig. I).
◆ Drive a wedge or wedges into the felling cut to
open it and drop the tree (fig. J).
Logging (fig. K - M)
How you should cut depends on how the log is
supported. Use a saw horse whenever possible.
Always start a cut with the chain running and the
spiked bumper (17) in contact with the wood (fig. K).
To complete the cut use a pivoting action of the
spiked bumper against the wood.
When supported along its whole length
◆ Make a downward cut, but avoid cutting the
earth as this will blunt your saw quickly.
When supported at both ends
◆ First, cut one third down to avoid splintering
and second, cut again to meet the first cut.
When supported at one end
◆ First, cut one third up to avoid splintering and
second, cut down to prevent splintering.
When on a slope (fig. L)
◆ Always stand on the uphill side.
When using a saw horse (fig. M)
This is strongly recommended whenever possible.
◆ Position the log in a stable position. Always cut
on the outside of the saw horse arms.
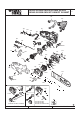
MAINTENANCE (fig. N)
Regular maintenance ensures a long effective life
for the tool. We recommend you make the
following checks on a regular basis.
Oil level
The level in the reservoir should not be allowed to
fall below a quarter full.
Chain and guide bar
◆ After every few hours of use, remove the guide
bar and chain and clean thoroughly.
◆ Ensure the hole between the tensioning/oil
hole (18) and the bar groove is clear.