
Technical data


12
ENGLISH
X Under extreme conditions, battery leakage may occur.
When you notice liquid on the batteries, carefully wipe
the liquid off using a cloth. Avoid skin contact.
X I
n case of skin or eye contact, follow the instructions below.
Warning! The battery fluid may cause personal injury or
damage to property. In case of skin contact, immediately
rinse with water. If redness, pain or irritation occurs seek
medical attention. In case of eye contact, rinse immediately
with clean water and seek medical attention.
Chargers
Your charger has been designed for a specific voltage.
Always check that the mains voltage corresponds to the
voltage on the rating plate.
Warning! Never attempt to replace the charger unit with
a regular mains plug.
X Use your Black & Decker charger only to charge the
battery in the appliance/tool with which it was supplied.
Other batteries could burst, causing personal injury
and damage.
X Never attempt to charge non-rechargeable batteries.
X If the supply cord is damaged, it must be replaced by the
manufacturer or an authorised Black & Decker Service
Centre in order to avoid a hazard.
X Do not expose the charger to water.
X Do not open the charger.
X Do not probe the charger.
X The appliance/tool/battery must be placed in a well
ventilated area when charging.
Electrical safety
Your charger is double insulated; therefore no earth
wire is required. Always check that the power supply
corresponds to the voltage on the rating plate.
Warning! Never attempt to replace the charger unit with
a regular mains plug.
X If the supply cord is damaged, it must be replaced by the
manufacturer or an authorised Black & Decker Service
Centre in order to avoid a hazard.
Using an extension cable
Always use an approved extension cable suitable for the
power input of this tool (see technical data). The extension
cable must be suitable for outdoor use and marked
accordingly. Up to 30 m of 1.5 mm² HO5VV-F extension
cable can be used without loss of product performance.
Before use, inspect the extension cable for signs of damage,
wear and ageing. Replace the extension cable if damaged
or defective. When using a cable reel, always unwind the
cable completely.
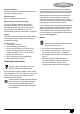
Features
1. Top jaw
2. Lower jaw
3. Chain guide bar
4. Oiling cover
5. Latch
6. Battery
7. On/off switch actuators
8. Chipping ejection point
9. Charger
10. Charger receptacle
Assembly
Warning! Before assembly, remove the battery (6) from
the tool.
Fitting and removing the battery (fig. A)
X To fit the battery (6), line it up with the receptacle on the
tool. Slide the battery (6) into the receptacle and push
until the battery (6) snaps into place.
X To remove the battery (6), push the release button (18)
while at the same time pulling the battery (6) out of
the receptacle.
Fitting the battery cap (fig. K)
Warning! Fit the cap (17) to the battery (6) for transportation
and storage.
Opening the handles (fig. B)
X To open the handles, slide the latch (5) backwards and
pull the handles apart.
X After use, close the handles and slide the latch (5)
forward to the lock position. The handles should be
locked during transportation and storage.
Chain tension adjustment (fig. C)
Warning! Before adjusting the chain tension or any other
adjustments, make sure that the tool is switched off and the
battery removed.
Warning! The chain guide bar and the saw chain may
be hot after use. Allow to cool before adjustment.
The product comes ready assembled. However we
recommend that you check the tension of the saw chain (14),
and chain access cover retention bolts before use and adjust
if required.
Checking and adjusting the saw chain tension (fig. C)
To tension the saw chain (14) slacken the two chain cover
retention bolts (12) with the spanner (13) and the chain
tensioning device will push the chain guide bar (3) out,
setting the correct tension. Retighten the two retention
bolts (12) securely.
The charger is intended for indoor use only.