GL225 1
English 6 Deutsch 13 Français 20 Italiano 27 Nederlands 33 Español 39 Português 46 EÏÏËÓÈη 52 Copyright Black & Decker 2
2 1 3 4 5 6 7 A 8 4 9 B C 3
B C A 13 10 12 14 11 14 15 D E 16 16 F 4 15
20° G 5
ENGLISH STRIMMER GL225 CONGRATULATIONS! You have chosen a Black & Decker tool. Our aim is to provide quality tools at an affordable price. We hope that you will enjoy using this tool for many years.
ENGLISH Work area ◆ Do not expose the appliance to rain. Do not use the appliance in damp or wet conditions. ◆ Only use the appliance in daylight or good artificial light. Personal protection ◆ Wear stout shoes or boots to protect your feet. Do not operate the appliance wearing opentoed sandals or when barefoot. ◆ Wear long trousers to protect your legs. Using your appliance ◆ Be sure that the appliance is switched off when plugging in. ◆ Stay alert. Watch what you are doing. Use common sense.
ENGLISH Switch off, remove the plug from the socket and ensure that moving parts have stopped rotating before leaving the appliance unattended and before changing, cleaning or inspecting any parts of the appliance. This appliance is double insulated in accordance with EN 60335; therefore no earth wire is required. ◆ ◆ ◆ ◆ ◆ ◆ ◆ ◆ ◆ ◆ ◆ ◆ Before using the appliance, check that your cutting path is free from sticks, stones, wire and any other objects.
ENGLISH Never use a light socket. Using an extension cable Always use an approved extension cable suitable for the power input of this appliance (see rating plate). The extension cable must be suitable for outdoor use. ◆ Before use, inspect the cable for signs of damage, wear and ageing. Replace the extension cable if damaged or defective. ◆ When using a cable reel, always unwind the cable completely. ◆ Take care to keep the cable away from the cutting line. Always be aware of the position of the cable.
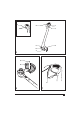
ENGLISH ◆ ◆ Loop the cable through the cable restraint (9) as shown to prevent the extension cable from becoming detached during use. Insert the mains plug into a mains outlet. ◆ ◆ ◆ The extension cable must be suitable for outdoor use. USE Let the tool work at its own pace. Do not overload. Switching on and off (fig. A) ◆ To switch the tool on, push the on/off switch (1). ◆ To switch the tool off, release the the on/off switch. Never attempt to lock a switch in the on position.
ENGLISH Tool does not start ◆ Check that the power cables are properly connected. ◆ Check the mains fuses. Tool vibrates strongly ◆ Carefully clean the spool housing. ◆ Remove the spool and re-fit in a new position. ◆ If this does not solve the problem, unwind the line from the spool and rewind it more tightly. PROTECTING THE ENVIRONMENT Should you find one day that your tool needs replacement, or if it is of no further use to you, think of the protection of the environment.
ENGLISH String trimmers Cordless shear Lawnmowers Leafbusters Chainsaws Hedgetrimmers Lawnrakers Shredders Not all products are available in all countries.
DEUTSCH RASENTRIMMER GL225 HERZLICHEN GLÜCKWUNSCH! Sie haben sich für ein Gerät von Black & Decker entschieden. Wir möchten Qualitätsgeräte zu einem erschwinglichen Preis bieten. Wir hoffen, daß Sie dieses Gerät viele Jahre mit Freude verwenden werden.
DEUTSCH ◆ Das Verwenden anderer als der in dieser Anleitung empfohlenen Vorsatzgeräte und Zubehörteile oder die Ausführung von Arbeiten mit diesem Gerät, die nicht der bestimmungsgemäßen Verwendung entsprechen, kann zu Unfallgefahren führen. Bewahren Sie diese Anleitung auf. Arbeitsbereich ◆ Setzen Sie das Gerät keinem Regen aus. Verwenden Sie das Gerät nicht in einer feuchten oder nassen Umgebung. ◆ Verwenden Sie das Gerät nur bei Tageslicht oder guter künstlicher Beleuchtung.
DEUTSCH Zusätzliche Sicherheitshinweise für Rasentrimmer Das Gerät ist mit folgendem Symbol versehen: ◆ ◆ Tragen Sie bei der Verwendung dieses Geräts eine Schutzbrille! ◆ Nach dem Ausschalten des Gerätes läuft der Schneidfaden noch einige Sekunden lang nach. Versuchen Sie nie, den Schneidfaden anzuhalten. 360˚ ◆ 6m/20ft Halten Sie Umstehende und Tiere dem Arbeitsbereich mindestens 6 m fern. Setzen Sie das Gerät keinem Regen oder hoher Feuchtigkeit aus.
DEUTSCH ◆ ◆ ◆ Überprüfen Sie vor dem Gebrauch das Netzkabel auf Beschädigung, Alterung und Verschleiß. Tauschen Sie ein beschädigtes oder defektes Verlängerungskabel aus. Rollen Sie das Kabel bei Verwendung einer Kabelrolle immer völlig aus. Halten Sie das Kabel dem Schneidfaden fern. Achten Sie immer auf die Position des Kabels. INHALT DER VERPACKUNG Die Verpackung enthält: 1 Rasentrimmer 1 Schutzhaube mit Befestigungsschraube 1 Fadenspule mit Schneidfaden 1 Bedienungsanleitung ◆ 1. 2. 3. 4. 5. 6. 7.
DEUTSCH Anschließen an die Stromversorgung (Abb. A & C) ◆ Schließen Sie die Steckerbuchse eines geeigneten Verlängerungskabels an den Netzanschluß (3) an. ◆ Haken Sie eine Schleife des Kabels wie abgebildet hinter die Zugentlastung (9), damit das Verlängerungskabel sich während des Gebrauchs nicht lösen kann. ◆ Stecken Sie den Netzstecker in eine Steckdose. Ein dauerhafter, einwandfreier Betrieb setzt eine regelmäßige Reinigung voraus.
DEUTSCH ◆ ◆ Achten Sie darauf, daß Sie den Faden sauber und in Schichten aufwickeln. Vermeiden Sie ein kreuzweises Aufwickeln. Wenn die Spule voll ist, klemmen Sie den Faden in die Nut (12) und schneiden Sie ihn ab. Lassen Sie den Faden mindestens 5 cm von der Spule hervorstehen. Um die Spule am Gerät anzubringen, gehen Sie vor, wie im vorigen beschrieben. Verwenden Sie nur Black & Decker Schneidfaden mit 1,5 mm Durchmesser.
DEUTSCH KUNDENDIENST Einzelheiten zum Black & Decker Kundendienst finden Sie im Internet unter www.2helpU.com. Sie können sich auch über die Adresse hinten in dieser Anleitung an unseren Kundendienst oder an Ihren Händler wenden. Sollte Ihr Gerät einen Defekt aufweisen, so schicken Sie es bitte mit einer genauen Fehlerbeschreibung an unseren Zentralkundendienst. Falls Sie Anspruch auf Garantieleistungen machen, legen Sie dem Gerät bitte unbedingt einen Kaufbeleg bei.
FRANÇAIS COUPE BORDURES GL225 FELICITATIONS ! Vous avez choisi un outil Black & Decker. Notre but est de fournir des outils de qualité au meilleur prix. Nous espérons que vous profiterez de cet outil pendant de longues années. UTILISATION PREVUE Votre coupe bordures Black & Decker GL225 a été conçu pour tailler et arranger les coins de pelouse et pour couper l’herbe dans des espaces réduits. Cet outil a été conçu pour une utilisation exclusivement domestique.
FRANÇAIS Aire de travail ◆ N’exposez pas l’outil à la pluie. N’exposez pas l’outil à l’humidité. ◆ N’utilisez l’outil qu’à la lumière du jour ou sous un éclairage artificiel suffisant. Protection ◆ Portez des chaussures ou des bottes renforcées pour vous protéger les pieds. N’utilisez pas l’outil pied nus ou en ne portant que des sandales. ◆ Portez un pantalon long pour vous protéger les jambes. Utilisation de votre outil ◆ Assurez-vous que l’outil est en position d’arrêt avant de le brancher.
FRANÇAIS ◆ Le fil de coupe continuera de fonctionner pendant quelques secondes après l’arrêt de l’outil. Ne tentez jamais de forcer sur le fil pour qu’il s’arrête. 360˚ ◆ 6m/20ft Les personnes et les animaux doivent se tenir à une distance d’au moins 6 m de la zone de coupe. N’exposez pas l’outil à la pluie ou à l’humidité. Prenez garde à ne pas vous blesser avec la lame de coupe du fil. Ne touchez pas la lame.
FRANÇAIS CONTENU DE LA BOITE La boîte contient : 1 Coupe bordures 1 Carter protecteur avec vis de fixation 1 Bobine avec fil de coupe 1 Manuel d’instructions ◆ 1. 2. 3. 4. 5. 6. 7. ◆ Poussez (A) sur la bobine en le faisant tourner dans le sens des aiguilles d’une montre (B) jusqu’à ce qu’elle s’enclenche sur la position. Si le fil de coupe dépasse de la lame de coupe (5), coupez-le afin qu’il atteigne juste la lame. Déballez soigneusement toutes les pièces. APERÇU (fig.
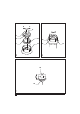
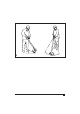
FRANÇAIS ◆ N’essayez jamais de bloquer l’interrupteur en position marche. ◆ Conseils pour une utilisation optimale ◆ Tenez l’outil comme indiqué sur la fig. G. ◆ Déplacez lentement le coupe bordures d’un côté sur l’autre comme indiqué sur la fig. G. ◆ Lorsque vous coupez des hautes herbes, travaillez par étapes en commençant par le haut. ◆ Veillez à ne pas approcher l’outil des objets durs et des plantes délicates. ◆ Si l’outil commence à fonctionner lentement, réduisez la charge.
FRANÇAIS L’outil vibre trop. ◆ Nettoyez soigneusement le boîtier de la bobine. ◆ Enlevez la bobine et replacez-la sur une position différente. ◆ Si cette action ne résout pas le problème, dévidez le fil de la bobine et enroulez-le de nouveau en serrant plus. PROTECTION DE L’ENVIRONNEMENT Si vous décidez de remplacer votre outil, ou si vous n’en avez plus l’utilité, pensez à la protection de l’environnement avant de le jeter.
FRANÇAIS Tronçonneuses Cisaille à gazon sans fil Coupe bordures Taille-haies à fil ou sans fil Tondeuses Aspirateur/souffleur/broyeur Broyeurs Aérateur Démousseur Tous les produits ne sont pas disponibles dans tous les pays.
ITALIANO TOSAERBA GL225 CONGRATULAZIONI! Lei ha scelto un utensile Black & Decker. Il nostro obiettivo é fornire utensili di qualità ad un prezzo contenuto. Desideriamo che questo utensile sia di suo gradimento e lo possa usare per molti anni.
ITALIANO ◆ Conservare queste istruzioni per utilizzarle in futuro. Area di lavoro ◆ Non lasciare l’utensile sotto la pioggia. Non usare l’utensile in ambienti carichi di umidità. ◆ Usare l’utensile solo alla luce naturale oppure con una buona illuminazione artificiale. Protezione personale ◆ Indossate scarpe robuste o scarponi per prottegervi i piedi. Non azionare l’utensile se si indossano sandali aperti o a piedi scalzi. ◆ Indossate pantaloni a gamba lunga per prottegervi le gambe.
ITALIANO Indossate sempre occhiali di protezione quando fate funzionare questo utensile. Il filo di taglio continuerá a girare per alcuni secondi dopo aver spento l’utensile. Non cercate mai di forzare il fermo del filo. ◆ ◆ 360˚ 6m/20ft Non fate avvicinare persone o animali a meno di 6 m. dall’area di taglio. Non esponete l’utensile alla pioggia od a condizioni di alta umidità. Fare attenzione a evitare lesioni provocate dalla lama di tosatura. Non toccare la lama.
ITALIANO ◆ Attenzione a tenere il cavo dell’alimentazione lontano dal filo di taglio. Tenere sempre sotto controllo la posizione del cavo. CONTENUTO DELLA SCATOLA La scatola contiene: 1 Tosaerba 1 Protezione con vite di montaggio 1 Bobino con filo di taglio 1 Libretto d’istruzioni ◆ 1. 2. 3. 4. 5. 6. 7. ◆ ◆ Verificare che dalla bobina sporgano almeno 5 cm di filo. Afferrare la bobina con una mano e con l’altra sostenere l’alloggiamento (14) della bobina.
ITALIANO Avviamento e spegnimento (fig. A) ◆ Per accendere l’utensile, premere l’interruttore di accensione/spegnimento (1). ◆ Per spegnere l’utensile, premere di nuovo l’interruttore di accensione/spegnimento. Non cercare di bloccare un interruttore in posizione di accensione. Consigli per un’ottima utilizzazione ◆ Sostenete l’utensile come raffigurato nella fig. G. ◆ Spostare con delicatezza la tosatrice, da un lato all’altro, come illustrato nella fig. G.
ITALIANO Prima di procedere, estrarre la spina dalla presa di alimentazione. L’utensile non si mette in moto ◆ Controllare che i cavi di alimentazione siano collegati correttamente. ◆ Controllare i fusibili principali. L’utensile vibra molto ◆ Pulire accuratamente l’alloggio della bobina. ◆ Rimuovere la bobina e reinstallarla in una posizione diversa. ◆ Se il problema persiste, svolgere il filo dalla bobina e riavvolgerlo più strettamente.
NEDERLANDS GRASSTRIMMER GL225 GEFELICITEERD! U heeft gekozen voor een machine van Black & Decker. Ons doel is om kwaliteitsproducten te leveren tegen een betaalbare prijs. Wij hopen dat u aan het gebruik van deze machine jarenlang plezier zult beleven. EG-VERKLARING VAN OVEREENSTEMMING GEBRUIK VOLGENS BESTEMMING Uw Black & Decker strimmer GL225 is ontworpen voor het strimmen van graskanten alsmede voor het strimmen van gras in besloten ruimtes. Deze machine is uitsluitend bedoeld voor consumentengebruik.
NEDERLANDS ◆ Gebruik de machine uitsluitend volgens bestemming. Bewaar deze instructies zorgvuldig! ◆ ◆ Werkomgeving ◆ Stel de machine niet bloot aan regen. Gebruik de machine niet in een vochtige of natte omgeving. ◆ Gebruik de machine alleen bij daglicht of goede kunstmatige verlichting. Persoonlijke bescherming ◆ Draag stevige schoenen of laarzen om uw voeten te beschermen. Gebruik de machine niet met open sandalen of blootsvoets. ◆ Draag een lange broek om uw benen te beschermen.
NEDERLANDS Aanvullende veiligheidsinstructies voor strimmers De machine is voorzien van de volgende pictogrammen: Draag een veiligheidsbril als u deze machine bedient. Het snijdraad draait nog een aantal seconden rond nadat de machine is uitgeschakeld. Probeer nooit om het draad zelf tot stilstand te brengen. ◆ ◆ ◆ ◆ 360˚ 6m/20ft Houd mensen en dieren tenminste 6 m uit de buurt van de snijdraad. Stel de machine niet bloot aan regen.
NEDERLANDS INHOUD VAN DE VERPAKKING De verpakking bevat: 1 Grasstrimmer 1 Beschermkap met montageschroef 1 Spoel met snijdraad 1 Handleiding ◆ 1. 2. 3. 4. 5. 6. 7. Breng de spoel aan door hem naar beneden te drukken (A) en rechtsom te draaien (B), totdat hij op zijn plaats klikt. Knip het snijdraad af als het verder dan het snijmes (5) uitsteekt zodat het draad het mes net raakt. Pak zorgvuldig alle onderdelen uit. OVERZICHT (fig.
NEDERLANDS ◆ Om de machine uit te schakelen, laat u de aan/uit-schakelaar (1) los. ◆ ◆ Probeer nooit om de schakelaar in de ingeschakelde stand te blokkeren. Tips voor optimaal gebruik ◆ Houd de machine vast zoals afgebeeld in fig. G. ◆ Zwaai de strimmer langzaam heen en weer zoals afgebeeld in fig. G. ◆ Ga bij het bewerken van lang gras laag voor laag te werk vanaf de bovenkant. ◆ Houd de machine uit de buurt van harde voorwerpen en fijne beplanting.
NEDERLANDS ◆ Als dit het probleem niet oplost, wikkel dan de draad van de spoel en wikkel het strakker op. GEBRUIKTE MACHINES EN HET MILIEU Wanneer uw oude Black & Decker machine aan vervanging toe is, breng deze dan naar een Black & Decker servicecenter voor milieuvriendelijke verwerking. GARANTIE Black & Decker biedt u een garantie van 12 maanden. Een aankoopbewijs is vereist.
ESPAÑOL RECORTADORA GL225 ¡ENHORABUENA! Ha escogido una herramienta Black & Decker. Nuestro objetivo es ofrecerle herramientas de calidad a un precio asequible y estamos seguros que podrá disfrutar de esta herramienta durante muchos años. FINALIDAD Su recortadora Black & Decker GL225 está diseñada para el acondicionamiento y recorte de los bordes del cesped y para el corte de la hierba en espacios reducidos. Esta herramienta está pensada únicamente para consumo doméstico.
ESPAÑOL ◆ ◆ En este manual se explica para qué uso está destinada la herramienta. El uso de otros accesorios, adaptadores, o la propia utilización de la herramienta en cualquier forma diferente de las recomendadas en este manual de instrucciones puede constituir un riesgo de lesiones a las personas. Mantenga a mano este manual para consultas posteriores. Área de trabajo ◆ No exponga herramientas a la humedad. ◆ Utilice la herramienta sólo a la luz del día o con una buena iluminación artificial.
ESPAÑOL ◆ ◆ ◆ ◆ Antes de utilizar la herramienta, revise el cable de alimentación de corriente para ver si presenta señas de daños, envejecimiento o desgaste. No utilice la herramienta si el cable de alimentación de corriente está dañado o defectuoso. Si el cable eléctrico está estropeado, hay que sustituirlo en un agente de reparaciones autorizado con el fin de evitar un accidente. No intente nunca extraer o remplazar ninguna de las piezas que no sean las especificadas en este manual.
ESPAÑOL ◆ Se puede incrementar la seguridad eléctrica utilizando disyuntores de alta sensibilidad (30 mA/30 mS) para detectar corrientes de fuga. Utilización de un cable de prolongación Utilice siempre un cable alargador homologado, apropiado para el consumo de corriente de esta herramienta (ver placa de datos de la herramienta). El cable alargador debe ser adecuado para uso en exteriores.
ESPAÑOL Si el cable de corte sobresale más allá de la cuchilla picadora (5), recórtelo de forma tal que solamente llegue hasta la cuchilla. Conexión de la herramienta a la alimentación de corriente (fig. A & C) ◆ Conecte el enchufe hembra de una cable alargador adecuado a la toma de corriente (3). ◆ Enlace el cable a través del limitador (9) como se indica para evitar que se suelte el alargador durante su empleo. ◆ Conecte el enchufe a una toma de corriente.
ESPAÑOL ◆ ◆ ◆ ◆ Coloque un extremo del cable de corte en una de las ranuras (16) del conjunto rotor tal como se muestra en las ilustraciones. Arrolle el cable de corte en el carrete, siguiendo la dirección de la fecha. Asegúrese de arrollar el cable de corte cuidadosamente, formando capas. Evite que el cable de corte se cruce consigo mismo en una capa al ser arroyado en el carrete. Cuando el carrete esté lleno, fije el cable en la ranura (12) y córtelo.
SERVICIO POSTVENTA Hay disponible en Internet información completa sobre nuestro servicio postventa en www.2helpU.com. Como alternativa, puede ponerse en contacto con nuestro Centro de Servicio e Información en la dirección que figura al final de este manual. Black & Decker le ofrece una extensa red de servicios postventa en todo el país. Nuestro objetivo es ofrecerle el mejor servicio, reparaciones rápidas, todos los repuestos disponibles y un completo surtido de accesorios.
PORTUGUÊS APARADOR DE RELVA GL225 PARABÉNS! Você escolheu uma ferramenta Black & Decker. O nosso objectivo é fornecer ferramentas de qualidade a um preço acessível. Esperamos que a utilize por muitos anos. FINALIDADE DA FERRAMENTA O aparador da Black & Decker GL225 foi projectado para aparar orlas, bem como cortar relva em espaços limitados. Esta ferramenta destina-se apenas para uso doméstico.
PORTUGUÊS Área de trabalho ◆ Não exponha a ferramenta à chuva. Não utilize a ferramenta em situações onde haja humidade ou água. ◆ Utilize a ferramenta apenas durante o dia ou com boa iluminação artificial. Protecção pessoal ◆ Utilize botas ou sapatos resistentes para proteger os pés. Não a opere descalço ou se estiver a utilizar sandálias. ◆ Vista calças compridas para proteger as pernas. Utilização da ferramenta ◆ Assegure-se de que a ferramenta esteja desligada quando for ligá-la à tomada.
PORTUGUÊS ◆ Utilize óculos de segurança durante o funcionamento da ferramenta. Desligada a ferramenta, o fio de nylon continuará a funcionar por alguns segundos. Nunca tente forçar a sua paralisação. ◆ 360˚ 6m/20ft Mantenha as pessoas a uma distância mínima de 6 m da área de corte. Não exponha a ferramenta à chuva e humidade excessiva. SEGURANÇA ELÉCTRICA A ferramenta foi concebida para uma única tensão. Verifique sempre se a tensão da rede corresponde à voltagem indicada na placa de identificação.
PORTUGUÊS CONTEÚDO DA CAIXA A caixa contém: 1 Aparador de relva 1 Resguardo com parafuso de montagem 1 Bobina com fio de nylon 1 Manual de instruções ◆ 1. 2. 3. 4. 5. 6. 7. Retire todas as peças da embalagem, com cuidado. VISÃO GERAL (fig. A) Interruptor Cabo Entrada de energia Resguardo Lâmina limitadora do fio de nylon Compartimento da bobina Fio de nylon MONTAGEM Antes da montagem, certifique-se de que a ferramenta está desligada da corrente eléctrica. Instalação do resguardo (fig.
PORTUGUÊS Nunca tente travar a chave na posição ligada. Sugestões para uma melhor utilização ◆ Segure a ferramenta conforme a fig. G. ◆ Incline o aparador com cuidado de um lado para o outro, conforme mostrado na fig. G. ◆ Ao cortar relva longa, trabalhe em etapas, partindo do topo. ◆ Mantenha-a afastada de objectos duros e plantas delicadas. ◆ Se a ferramenta começar a funcionar lentamente, reduza a carga. ◆ Para obter óptimos resultados, corte apenas relva seca.
PORTUGUÊS A ferramenta não funciona ◆ Verifique se os cabos de força estão correctamente conectados. ◆ Verifique os fusíveis. A ferramenta vibra muito ◆ Limpe com cuidado o compartimento da bobina. ◆ Remova a bobina e instale-a novamente em uma nova posição. ◆ Se isso não resolver o problema, retire o fio e recoloque-o mais firmemente na bobina.
∂§§∏¡π∫∞ ª∏Ã∞¡∏ ºπ¡πƒπ™ª∞∆√™ Ã√ƒ∆√À GL225 ™À°Ã∞ƒ∏∆∏ƒπ∞! E¯ÂÙ ÂÈϤÍÂÈ ¤Ó· ÂÚÁ·ÏÂ›Ô Ù˘ Black & Decker. ™Ùfi¯Ô˜ Ì·˜ Â›Ó·È Ó· Û·˜ ÚÔÛʤÚÔ˘Ì ÂÚÁ·Ï›· ÔÈfiÙËÙ·˜ Û ÚÔÛÈÙ¤˜ ÙÈ̤˜. E˘ÂÏÈÛÙԇ̠fiÙÈ ı· ·ÔÏ·‡ÛÂÙ ÙË ¯Ú‹ÛË ·˘ÙÔ‡ ÙÔ˘ ÂÚÁ·Ï›Ԣ ÁÈ· ÔÏÏ¿ ¯ÚfiÓÈ·. E¡¢E¢Eπ°ªE¡∏ Ã∏™∏ ∏ Ì˯·Ó‹ ÊÈÓÈÚ›ÛÌ·ÙÔ˜ ¯fiÚÙÔ˘ GL225 Ù˘ Black & Decker ¤¯ÂÈ Û¯Â‰È·ÛÙ› ÁÈ· ÙÔ ÊÈÓ›ÚÈÛÌ· ¯fiÚÙÔ˘ Î·È ¿ÎÚˆÓ (ÌÔÚÓÙÔ‡Ú·), ηıÒ˜ Î·È ÁÈ· ÙËÓ ÎÔ‹ ¯fiÚÙÔ˘ Û ÂÚÈÔÚÈṲ̂ÓÔ˘˜ ¯ÒÚÔ˘˜.
∂§§∏¡π∫∞ ◆ ◆ ∏ ÂӉ‰ÂÈÁ̤ÓË ¯ÚËÛÈÌÔÔ›ËÛË ·Ó·Ê¤ÚÂÙ·È Û ·˘Ù¤˜ ÙȘ Ô‰ËÁ›Â˜ ¯Ú‹Ûˆ˜. ∆fiÛÔ Ë ¯Ú‹ÛË ÂÍ·ÚÙËÌ¿ÙˆÓ ‹ ÚÔÛıËÎÒÓ fiÛÔ Î·È Ë Ú·ÁÌ·ÙÔÔ›ËÛË ÂÚÁ·ÛÈÒÓ Ô˘ ‰ÂÓ Û˘ÓÈÛÙÒÓÙ·È ÛÙȘ Ô‰ËÁ›Â˜ ·˘Ù¤˜ ÂÁ΢ÌÔÓ› ΛӉ˘ÓÔ ÙÚ·˘Ì·ÙÈÛÌÔ‡. Ê˘Ï¿ÍÙ ÙȘ Ô‰ËÁ›Â˜ ηϿ. ÃÒÚÔ˜ ÂÚÁ·Û›·˜ ◆ ªËÓ ÂÎı¤ÙÂÙ ËÏÂÎÙÚÈο ÂÚÁ·Ï›· Û ˘ÁÚ·Û›·. ◆ ÃÚËÛÈÌÔÔț٠ÙÔ ÂÚÁ·ÏÂ›Ô ÌfiÓÔ ÛÙÔ Êˆ˜ Ù˘ Ë̤ڷ˜ ‹ Û ηÏfi Ù¯ÓËÙfi ʈ˜. ∞ÙÔÌÈ΋ ÚÔÛÙ·Û›· ◆ ºÔÚ¤ÛÙ ¯ÔÓÙÚ¿ ˘Ô‰‹Ì·Ù· ‹ ÌfiÙ˜, ÁÈ· Ó· ÚÔÛٷ٤„ÂÙ ٷ fi‰È· Û·˜.
∂§§∏¡π∫∞ ¶ÚÈÓ ·fi ÙË ¯Ú‹ÛË, ÂϤÁÍÙ ÚÔÛÂÎÙÈο ÙÔ Î·ÏÒ‰ÈÔ ÙÚÔÊÔ‰ÔÛ›·˜ ÁÈ· ÛËÌ¿‰È· ˙ËÌÈ¿˜, ·Ï·›ˆÛ˘ Î·È ÊıÔÚ¿˜. ªË ¯ÚËÛÈÌÔÔț٠ÙÔ ÂÚÁ·ÏÂ›Ô ·Ó ÙÔ Î·ÏÒ‰ÈÔ ÙÚÔÊÔ‰ÔÛ›·˜ ÙÔ˘ ¤¯ÂÈ ¿ıÂÈ ˙ËÌÈ¿ ‹ ·ÚÔ˘ÛÈ¿˙ÂÈ ÂÏ¿Ùو̷. E¿Ó ÙÔ Î·ÏÒ‰ÈÔ ÙÚÔÊÔ‰ÔÛ›·˜ Â›Ó·È Î·ÙÂÛÙÚ·Ì̤ÓÔ, Ú¤ÂÈ Ó· ·ÓÙÈηٷÛÙ·ı› ·fi ÂÍÔ˘ÛÈÔ‰ÔÙË̤ÓÔ Î¤ÓÙÚÔ ÂÈÛ΢‹˜, ÒÛÙ ӷ ÌËÓ ÚÔ·„ÂÈ Î›Ó‰˘ÓÔ˜. ¶ÔÙ¤ ÌËÓ ÂȯÂÈÚ›Ù ӷ ·Ê·ÈÚ¤ÛÂÙ ‹ Ó· ·ÓÙÈηٷÛÙ‹ÛÂÙ ÂÍ·ÚÙ‹Ì·Ù· ¿ÏÏ· ·fi ·˘Ù¿ Ô˘ ÚÔÛ‰ÈÔÚ›˙ÔÓÙ·È Û ·˘Ùfi ÙÔ ÂÁ¯ÂÈÚ›‰ÈÔ.
∂§§∏¡π∫∞ ∆Ô ÂÚÁ·ÏÂ›Ô Û·˜ ʤÚÂÈ ‰ÈÏ‹ ÌfiÓˆÛË Î·Ù¿ EN 60335. ∫·Ù¿ Û˘Ó¤ÂÈ· ‰Â ¯ÚÂÈ¿˙ÂÙ·È Î·ÏÒ‰ÈÔ Á›ˆÛ˘. ◆ ◆ ∞ÔʇÁÂÙ ÙË ÛˆÌ·ÙÈ΋ ·ʋ Ì ÁÂȈ̤Ó˜ ‹ Û˘Ó‰Â‰Â̤Ó˜ Ì ÙÔ ¤‰·ÊÔ˜ ÂÈÊ¿ÓÂȘ (.¯. ÌÂÙ·ÏÏÈο ÎÈÁÎÏȉÒÌ·Ù·, Ͽ̘ Î.Ï.). ∏ ËÏÂÎÙÚÈ΋ ·ÛÊ¿ÏÂÈ· ÌÔÚ› Ó· ‚ÂÏÙȈı› ·Ó ¯ÚËÛÈÌÔÔÈËı› Û˘Û΢‹ ·Ú·Ì¤ÓÔÓÙÔ˜ Ú‡̷ÙÔ˜ (RCD) ˘„ËÏ‹˜ ¢·ÈÛıËÛ›·˜ (30 mA/30 mS).
∂§§∏¡π∫∞ ◆ ◆ ◆ EÓÒ Îڷٿ٠ÛÙ·ıÂÚ¿ ÙÔ ÂÚ›‚ÏËÌ· Ù˘ Ơ̂ӷ˜ (14) Ì ÙÔ ¤Ó· ¯¤ÚÈ, ·Ó·ÛËÎÒÛÙ ÙÔ Ó‹Ì· Î·È ·Ê·ÈÚ¤ÛÙ ÙÔ ·fi ÙË Û¯ÈÛÌ‹ (15) Ì ÙÔ ¿ÏÏÔ. ¶ÚÔˆı‹ÛÙ ÙÔ Ó‹Ì· ÙÚ·‚ÒÓÙ·˜ ÙÔ ÚÔ˜ ÙËÓ Î·Ù‡ı˘ÓÛË ÙÔ˘ ‚¤ÏÔ˘˜ ¤ˆ˜ fiÙÔ˘ ÊÙ¿ÛÂÈ ÛÙË Ï›‰· ·ÔÎÔ‹˜ Ó‹Ì·ÙÔ˜. √Ù·Ó ÚÔÂͤ¯ÂÈ ·ÚÎÂÙfi Ó‹Ì· ·fi ÙËÓ Ơ̂ӷ, ÛÙÂÚÂÒÛÙ ÙÔ Ó‹Ì· ÛÙËÓ ÂfiÌÂÓË Û¯ÈÛÌ‹ (15) ÛÙÔ ÂÚ›‚ÏËÌ· Ù˘ Ơ̂ӷ˜. ∞Ó ÙÔ Ó‹Ì· ÎÔ‹˜ Âͤ¯ÂÈ ¤Ú· ·fi ÙË Ï›‰· ·ÔÎÔ‹˜ Ó‹Ì·ÙÔ˜ (5), Îfi„Ù ÙÔ ¤ÙÛÈ ÒÛÙ ÌfiÏȘ Ó· ÊÙ¿ÓÂÈ ÛÙË Ï›‰·.
∂§§∏¡π∫∞ ∆ÔÔı¤ÙËÛË ÌÈ·˜ Ó¤·˜ Ơ̂ӷ˜ Ó‹Ì·ÙÔ˜ ÎÔ‹˜ (ÂÈÎ. D) √ ·ÓÙÈÚfiÛˆfi˜ Û·˜ Ù˘ Black & Decker ‰È·ı¤ÙÂÈ ·ÓÙ·ÏÏ·ÎÙÈΤ˜ Ơ̂Ә Ó‹Ì·ÙÔ˜ ÎÔ‹˜ (Έ‰ÈÎfi˜ A6044). ◆ ∞Ê·ÈÚ¤ÛÙ ÙËÓ ÎÂÓ‹ Ơ̂ӷ Ȥ˙ÔÓÙ¿˜ ÙËÓ ÚÔ˜ Ù· οو (A) Î·È ÂÚÈÛÙÚ¤ÊÔÓÙ¿˜ ÙËÓ ·ÚÈÛÙÂÚfiÛÙÚÔÊ· (C). ◆ ™˘Ó·ÚÌÔÏÔÁ‹ÛÙÂ Î·È ÙÔÔıÂÙ‹ÛÙ ÙË Ó¤· Ơ̂ӷ fiˆ˜ ÂÚÈÁÚ¿ÊÂÙ·È ·Ú·¿Óˆ. ∆‡ÏÈÁÌ· Ó¤Ô˘ Ó‹Ì·ÙÔ˜ Û ¿‰ÂÈ· Ơ̂ӷ (ÂÈÎ. D & F) ªÔÚ›Ù ӷ Ù˘Ï›ÍÂÙÂ Ó¤Ô Ó‹Ì· ÎÔ‹˜ Û ¿‰ÂÈ· Ơ̂ӷ.
∂§§∏¡π∫∞ ∏ ÂÁÁ‡ËÛË ÚÔÛʤÚÂÙ·È ˆ˜ ÚfiÛıÂÙÔ ÏÂÔÓ¤ÎÙËÌ· Î·È ‰ÂÓ ÂËÚ¿˙ÂÈ Ù· ÓÔÌÔıÂÙË̤ӷ ‰ÈηÈÒÌ·Ù· Û·˜. ∏ ÔÏÈÙÈ΋ ÂÁÁ‡ËÛ˘ µÏ¿‚˜ Ô˘ ÔÊ›ÏÔÓÙ·È ÛÙȘ ·ÎfiÏÔ˘ı˜ ÂÚÈÙÒÛÂȘ ‰ÂÓ Î·Ï‡ÙÔÓÙ·È: ◆ ∏ ·ÓÙÈηٿÛÙ·ÛË ¯·Ï·ÛÌ¤ÓˆÓ ‹ Û·ÛÌ¤ÓˆÓ Ï›‰ˆÓ, ÁÚ·ÌÌÒÓ Ó¿˘ÏˆÓ Î·È ·Ï˘Û›‰ˆÓ, ‹ ηψ‰›ˆÓ Ô˘ ¤·ı·Ó ‚Ï¿‚Ë Î·Ù¿ ÙË ‰È¿ÚÎÂÈ· ·Ôı‹Î¢Û˘ ‹ ¯Ú‹Û˘. ∞˘Ù˜ ÔÈ ÂÚÈÙÒÛÂȘ ıˆÚÔ‡ÓÙ·È Â›‰Ë ·ÓÙÈηٿÛÙ·Û˘ Ô˘ Êı›ÚÔÓÙ·È ÏfiÁˆ ηÓÔÓÈ΋˜ ¯Ú‹Û˘. ◆ µÏ¿‚˜ ÏfiÁˆ ·ÈÊÓ›‰ÈÔ˘ ÙÚ·ÓÙ¿ÁÌ·ÙÔ˜ ‹ ÚÔÊ·ÓÔ‡˜ ηÎÔÌÂÙ·¯Â›ÚÈÛ˘.
TYP. GL20S/ GL225/ GL425 12 1 3 10 13 6 14 11 13 5 6 23 9 8 16 15 7 4 2 1 1 1 17 22 19 20 18 21 GL20S GL20SC E13003 GL225/225S/225SC/225C www.2helpU.
Australia Belgique/België Danmark Deutschland EÏÏ¿˜ España France Helvetia Italia Nederland New Zealand Norge Österreich Portugal South Africa Suomi Sverige Türkiye United Kingdom 62 574792-04 DEWALT Industrial Power Tool Company 7 Clarice Road, Box Hill, Victoria 3128 Black & Decker (Belgium) N.V. Weihoek 1, 1930 Zaventem Black & Decker Hejrevang 26B, 3450 Allerød Internet: www.blackdecker.dk Black & Decker GmbH Black & Decker Str. 40, D - 65510 Idstein Black & Decker (EÏÏ¿˜) ∞.E.
○ ○ ○ ○ ○ ○ ○ ○ ○ ○ ○ ○ ○ ○ ○ ○ ○ ○ ○ ○ ○ ○ ○ ○ ○ ○ ○ ○ ○ ○ ○ ○ ○ ○ ◆ Ei ............................................................ code ◆ Postleitzahl ◆ Code postal ◆ Codice postale ◆ Postcode ◆ Código ◆ Código postal ◆ Postnr. ◆ Postnr. ◆ Postnr. ◆ Postinumero ◆ ∫ˆ‰ÈÎfi˜ ◆ Postal ............................................................
○ ○ ○ ○ ○ ○ ○ ○ ○ ○ ○ ○ ○ ○ ○ ○ ○ ○ ○ ○ ○ ○ ◆ TAGLIANDO DI GARANZIA ◆ GARANTIBEVIS ◆ ∫∞ƒ∆∞ E°°À∏™∏™ ○ ○ ○ ○ ○ ○ ○ ○ ○ ○ ○ ○ ○ ○ ○ ○ ○ ○ ◆ CARTE DE GARANTIE ◆ CARTÃO DE GARANTIA ◆ TAKUUKORTTI ○ ○ ○ ○ ○ ○ ○ ○ ○ ○ ○ ○ ○ ○ ○ ○ ○ ◆ GARANTIEKARTE ◆ TARJETA DE GARANTÍA ◆ GARANTI KORT Español Português Svenska Norsk Dansk Suomi EÏÏËÓÈη Después de haber comprado su herramienta envíe usted, por favor, esta tarjeta a la central de Black & Decker en su pa