
Quick Start Guide

13
ENGLISH
◆ We recommend that you use only one brand
of oil during the lifetime of your chainsaw
because mixtures of different oils could lead to
the oil becoming degraded, which can
drastically shorten the lifetime of the saw chain.
◆ Never use waste oil, thick oil or very thin sewing
machine oil. These may damage your chainsaw.
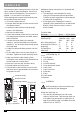
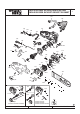
Fitting the guide bar and chain (fig. B, C & D)
Wear protective gloves.
◆ Place the saw onto a stable surface.
◆ Loosen and remove the chain cover bolt (7)
(fig. C).
◆ Remove the chain cover (6).
◆ Place the chain (9) over the guide bar (8),
making sure that the cutters on the upper part
of the guide bar face towards the front (fig. B).
◆ Guide the chain around the guide bar and pull
it to create a loop at the rear end of the guide
bar.
◆ Place the chain and guide bar onto the saw.
Guide the chain around the drive sprocket (12).
Place the guide bar onto the studs (13). Make
sure that the sliding nut peg (16) locates into
the tensioning hole (17).
◆ Place the chain cover (6) onto the saw.
◆ Fit the chain cover bolt (7) and tighten it finger
tight.
◆ Turn the screw (14) (fig. D) clockwise until the
chain is tight. Make sure that the chain is snug
around the guide bar. Do not overtighten.
◆ Tighten the chain cover bolt using the spanner
supplied.
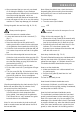
Checking and adjusting the chain tension (fig. D)
Before use and after every 10 minutes of use,
you must check the chain tension.
◆ Lightly pull on the chain as shown. The tension
is correct when the chain snaps back after
being pulled 3 mm away from the guide bar.
There should be no “sag” between the guide
bar and chain on the underside.
Note: Do not over-tension the chain as this will
lead to excessive wear and will reduce the life of
the bar and chain.
Note: When the chain is new, check the tension
frequently (after disconnecting from the mains)
during the first 2 hours of use as a new chain
stretches slightly.
To increase the tension:
◆ Turn the screw (14) clockwise.
USE
Let the tool work at its own pace. Do not
overload.
Filling oil into the reservoir (fig. E)
◆ Remove the oil cap (3) and fill the reservoir with
the recommended chain oil. You can see the oil
level in the indicator slot (4). Refit the oil cap.
◆ Periodically switch off and check the oil in the
indicator; if it is less than a quarter full,
disconnect your chainsaw from the mains and
refill with the correct oil.
Auto-stop chainbrake (fig. F & G)
This tool is fitted with an auto-stop chainbrake which
will stop the chain within 150 ms each time you
release the rear trigger, or if kickback should occur.
This brake should be tested before every use.
How to set the chainbrake
◆ Make sure that the tool is disconnected from
the mains supply.
◆ Pull the front guard (5) back into the “set”
position .
The tool is now ready to use.
How the anti-kickback chainbrake works
In the event of kickback, your left hand comes in
contact with the front guard, pushing it backwards,
and stops the tool within 150 ms.
How the inertia activated chainbrake works
The chainbrake is activated when the front hand
guard is pushed forward, either manually, by the
back of the users hand or by its own weight. The
advantage of the inertia brake is that it is activated
by a severe kickback, eg. when the chain hits metal,
even if the users hand does not contact the front
guard, ie. when the saw is in the felling position.