
Quick Start Guide

8
ENGLISH
(Original instructions)
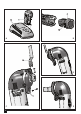
Fitting and removing the accessories (g. C - H)
Warning! Before tting an accessory, disconnect the tool from
the mains supply.
Fitting a Black & Decker / Piranha accessory (g. C - E)
u Hold the tool and squeeze the accessory clamping lever
(3).
u Slide the accessory (13) between the shaft and the acces-
sory holder making sure the accessory engages all eight
pins on the holder and is ush with the shaft.
u Release the accessory clamping lever.
Note: Some accessories, such as scrapers and blades can be
mounted at an angle if required (g. E).
Removing a Black & Decker / Piranha accessory (g. C)
u Hold the tool and squeeze the accessory clamping lever
(3).
u Pull the accessory from the tool making sure the acces-
sory dis-engages from all eight pins on the holder.
u Release the accessory clamping lever.
Warning: Gloves must be worn when removing accessories
as they may become hot during use.
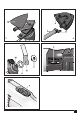
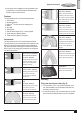
Fitting a sanding sheet (g. F)
u Line up the sanding sheet (14) with the sanding base (6)
as shown.
u Press the sheet rmly and evenly onto the sanding base,
making sure that the holes in the sheet coincide with the
holes in the base.
Removing a sanding sheet
u Pull the sanding sheet (14) off the sanding base (6).
Warning! Never use the sanding base without a sanding
sheet or accessory in place.
Fitting the dust extraction adaptor (g. G) (Where
supplied - Accessory part number : 'Item 58 from the
service sheet found at the end of this instruction manual')
u Line up the dust extraction adaptor (7) with the sanding
base (6) as shown.
u Press the adaptor rmly and evenly in to the sanding
base.
u Secure the adaptor by turning the locking nut (17) clock-
wise.
u Connect a vacuum cleaner to the dust extraction adaptor.
Removing the dust extraction adaptor
u Turn the locking nut (17) anti-clockwise.
u Pull the dust extraction adaptor (7) out of the sanding
base (6).
Fitting alternative accessories (g. H)
u Place the spacer (8) onto the collar (15).
u Place the alternative accessory (16) onto the collar (15).
u Firmly attach the xing bolt (9) into place to ensure a tight
t for the alternative accessory (16).
Note: The spacer and xing bolt are not used to attach Black
& Decker accessories. Black and Decker accessories are
attached using the Super-lok
TM
Tool free accessory clamping
lever.
Use
Warning! Let the tool work at its own pace. Do not overload.
Warning! Before cutting into walls, oors or ceilings, check for
the location of wiring and pipes.
Charging the battery (g. A)
The battery needs to be charged before rst use and whenev-
er it fails to produce sufcient power on jobs that were easily
done before. The battery may become warm while charging;
this is normal and does not indicate a problem.
Warning! Do not charge the battery at ambient temperatures
below 10 °C or above 40 °C. Recommended charging tem-
perature: approx. 24 °C.
Note: The charger will not charge a battery if the cell
temperature is below approximately 0 °C or above 40 °C.
The battery should be left in the charger and the charger
will begin to charge automatically when the cell tempera-
ture warms up or cools down.
u To charge the battery (4), insert it into the charger (10).
The battery will only t into the charger in one way. Do
not force. Be sure that the battery is fully seated in the
charger.
u Plug in the charger and switch on at the mains.
The charging indicator (11) will ash green continuously
(slowly).
The charge is complete when the charging indicator (11)
lights green continuously. The charger and the battery can be
left connected indenitely with the LED illuminated. The LED
will change to ashing green (charging) state as the charger
occasionally tops off the battery charge. The charging indica-
tor (11) will be lit as long as the battery is connected to the
plugged-in charger.
u Charge discharged batteries within 1 week. Battery life will
be greatly diminished if stored in a discharged state.
Leaving the battery in the charger
The charger and battery pack can be left connected with the
LED glowing indenitely. The charger will keep the battery
pack fresh and fully charged.