
Quick Start Guide


9
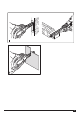
Fitting and removing the deector (g. D & E)
Warning! The deector must be used when sanding metal
workpieces.
u Fit the deector (11) over the dust extraction outlet.
u Slide the deector onto the tool and make sure that it is
securely located.
u To remove the deector, pull it to the rear and off the outlet.
Use
Warning! Let the tool work at its own pace. Do not overload.
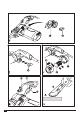
Variable speed control (g. G)
The variable speed control allows you to adapt the speed of
the tool to the workpiece material.
u Set the control knob (2) to the desired setting. Use a high
speed for wood, medium speed for veneer and synthetics
and low speed for acrylic glass, non-ferrous metals and for
removing paints.
Switching on and off (g. G)
u To switch the tool on, press the on/off switch (1).
u For continuous operation, press the lock-on button (2) and
release the on/off switch (1).
u To switch the tool off, release the on/off switch (1).
u To switch the tool off when in continuous operation, press
the on/off switch (1) once more and release it.
Emptying the dust cassette (g. F)
The dust cassette (10) should be emptied every 10 minutes of
use.
u Pull the dust cassette (10) to the rear and off the tool.
u Remove the cover (17) by twisting it counter-clockwise.
u Hold dust cassette (10) with the lter (18) facing down and
shake the cassette (10) to empty the contents.
u Shake the cover (17) to empty the contents.
u Ret the cover (17) onto the dust cassette (10), twisting it
clockwise until it locks into place.
u Ret the dust cassette (10) onto the tool.
Cleaning the dust cassette lter (g. F)
Warning! Do not brush or use compressed air or sharp
objects to clean the lter. Do not wash the lter.
u The dust cassette lter (18) is re-usable and should be
cleaned regularly.
u Empty the dust cassette (10) as described above.
u Pull the lter (18) off the dust cassette (14).
u Shake off the excess dust by tapping the lter (18) into a
dustbin.
u Replace the lter (18).
u Fit the cover (17).
u Slide the dust cassette (10) onto the tool and make sure
that it is securely located.
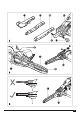
Special applications (g. H, I & J)
Cranked arm (g. H)
u Use section A for grooving or sanding in the centre of
workpieces and in conned areas.
u Use section B for curved surfaces.
Straight arm (g. I)
u Use the normal or narrow arms for general use, for slotting
and for making joints.
Narrow arm (g. J)
u Use the narrow arm for ner detail, for cutting and for carving.
Hints for optimum use
u Always hold the tool with both hands.
u Do not exert too much pressure on the tool.
u Regularly check the condition of the sanding belt (12).
Replace when necessary.
u Always sand with the grain of the wood.
u When sanding new layers of paint before applying another
layer, use extra ne grit.
u On very uneven surfaces, or when removing layers of
paint, start with a coarse grit. On other surfaces, start with
a medium grit. In both cases, gradually change to a ne
grit for a smooth nish.
u Consult your retailer for more information on available
accessories.
Maintenance
Your tool has been designed to operate over a long period of
time with a minimum of maintenance. Continuous satisfactory
operation depends upon proper tool care and regular cleaning.
Warning! Before performing any maintenance, switch off and
unplug the tool.
u Regularly clean the ventilation slots in your tool using a
soft brush or dry cloth.
u Regularly clean the motor housing using a damp cloth.
Do not use any abrasive or solvent-based cleaner.
Mains plug replacement (U.K. & Ireland only)
If a new mains plug needs to be tted:
u Safely dispose of the old plug.
u Connect the brown lead to the live terminal in the new plug.
u Connect the blue lead to the neutral terminal.
Warning! No connection is to be made to the earth terminal.
Follow the tting instructions supplied with good quality plugs.
Recommended fuse: 5 A.