MY23PG Microwave Oven First Use Safety Recommendation Please read through this booklet for safe and efficient use of the appliance. We urge you to read all the sections and also follow all detailed instructions even if you are familiar with a similar appliance. Keep this guide handy for future reference.
IMPORTANT SAFEGUARDS While using electrical appliances, in order to reduce the risk of fire, electric shock, and / or injury to persons, basic safety precautions should be followed, including the following: • Read all instructions carefully, even if you are familiar with the appliance. • To protect against the risk of electric shock, DO NOT IMMERSE the appliance, cord set or plug in water or other liquids. • To clean, wipe the exterior with a damp cloth.
Parts Identification 1. Door Safety Lock System 2. Oven Window 3. Oven Air Vent 5 4. Roller Ring 3 6 5. Glass Tray 6. Control Panel 7. Grill Rack 8. Shaft 10 Sec 1 Min 10 Min MICRO/GRILL START/RESET 4 8 1 1 2 Your 23 Litre Microwave Oven Features • 23 Litre capacity ideal for a large family • Quick Minute Buttons facilitates easy setting of time and power.
How to install your Microwave Oven:Make sure that the packaging material is removed from the inside of the door. WARNING: Check the microwave oven for any damage, such as misaligned or bent door, damaged door seals and sealing surface, broken or loose door hinges and latches and dents inside the cavity or on the door. The door should fit squarely, securely and close smoothly. The door seals must be free from food and have no burn marks.
How to use your Microwave Oven :The appliance is intended to heat, cook or dry food for indoor household use only. • Arrange the food carefully. Place the thickest area towards the outside of the dish. • Watch the cooking time. Cook for the shortest amount of time and add more as required. Food severely overcooked can smoke or ignite thereby causing damage. • Ensure that you cover your food while cooking. Covers prevent splattering and the food cooks evenly.
a. Set the time to "5:00" by pressing the 1 min. button five times. b. Press the Start/reset button. 10 Sec 10 Sec 1 Min 1 Min 10 Min MICRO/GRILL START/RESET 10 Min MICRO/GRILL START/RESET 2. Micro/Grill setting:You can press Micro/Grill button to select power. Press 1 2 3 4 5 Display P10 P7 P5 P3 P1 Micro Power 100% 70% 50% 30% 10% Eg : Select 70% power to cook foods for 10 minutes a. press "Micro/Grill" button to select 70% power b. press 10 min. time button once to set cooking time "10:00" c.
Mode 1 2 3 4 Grill Power 85% 50% Combination cook - 1 (55% Micro + 45% Grill) Combination cook - 2 (30% Micro + 70% Grill) Display G-1 G-2 C-1 C-2 Note: During bare Grill operation only, the oven will pause automatically and sound two beeps to remind you that the food needs to be turned at half the cooking time. Close the door after you have turned over the food, then press Start/reset button, cooking will resume.
• The roller ring and oven floor should be cleaned regularly to avoid excessive noise. Simply wipe the bottom surface of the oven with mild detergent. The roller ring may be washed in mild sudsy water or dishwasher. When removing the roller ring from the cavity floor for cleaning be sure to replace in the proper position. • Remove odours from your oven by combining a cup of water with juice and skin of lemon in a deep microwaveable bowl. Microwave for 5 minutes. Wipe thoroughly and dry with soft cloth.
12. Do not remove the outer panel from the oven. 13. Do not strike or hit the control panel. Damages can occur. 14. Oven gloves / Pot holders may be needed as heat from food is transferred to the cooking container and from the container to the glass tray. The glass tray can be very hot after removing the cooking container from the oven. 15. Cooking utensils may become hot because of the heat transferred from the heated food. Oven gloves / pot holder should be used needed to handle to utensils. 16.
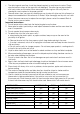
PROBLEM Oven will not turn on POSSIBLE CAUSE REMEDY The oven is not properly connected Remove the plug from the socket. Wait for 10 seconds and then reinsert. Circuit breaker or fuse is tripped Reset the circuit breaker or replace the fuse. The socket may not be working Test the socket with another appliance. Oven will not The door is not properly closed Close the door properly. start cooking START button was not pressed Press the START button.
BLACK & DECKER HOME APPLIANCE 2 YEAR WARRANTY Black & Decker provides a 2 Year Warranty for this product from the date of purchase against defects due to defective materials or workmanship. Motor/element burn-outs due to voltage fluctuations are not covered under warranty. If the product should become defective within the warranty period, Black & Decker will repair or (at Black & Decker's discretion) replace it free of charge.
Names & Addresses for Black & Decker Service Concessionaries Afghanistan: Ishan National Co., Opp. Ministry of Justice, Kabul. Tel.: +93-2-2101727. Algeria: SARL Outillage Corporation, 04 Route De Dely Brahim Cheraga, Alger. Tel.: +213-21-364363/508, Fax: +213-21-369667. Bahrain: Fawaz Al Zayani, P.O.Box 26563, Adliya, Manama. Tel.: +973-17-715252/712756, Fax: +973-17-713789. Bangladesh: Ultra Corporation, 8, Kushol Centre, Uttara, Dhaka 1230. Tel.: +880-2-8919272/9756 Ext.28, Fax: +880-2-9887167.