
Quick Start Guide
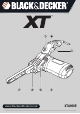


8
Labels on tools
The following symbols are marked on your appliance:
Electrical safety
This tool is double insulated; therefore no earth
wire is required. Always check that the power
supply corresponds to the voltage on the rating
plate.
If the supply cord is damaged, it must be replaced by the
manufacturer or an authorised Black & Decker Service
Centre in order to avoid a hazard.
Features
Your tool has some or all of the following features:
1. Variable speed control knob
2. On/off switch
3. Lock-on button
4. Secondary handle
5. Belt tensioning lever
6. Belt tracking knob
7. Straight arm
Assembly
Warning! Before assembly, make sure that the tool is switched
off and unplugged.
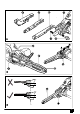
Fitting and removing sanding arms (fig. A)
Before first use, you must fit the sanding arm to the tool. A
straight arm (7, sanding width 13 mm) is supplied. The
following is also supplied:
a narrow arm (9, sanding width 6 mm) for intricate work
a cranked arm (10) for grooving and sanding in the centre
of workpieces and for reaching confined areas
These parts are also available as an accessory from your
Black & Decker dealer, (not available in Australia and New
Zealand).
Fitting
Make sure that the belt tensioning lever (5) is in the position
shown.
Loosen and remove the belt tracking knob (6).
Remove the tape retaining the spring (8) (if present).
Check that the spring (8) is located in its mounting hole.
Position the arm (7, 9 or 10) as shown.
Fit the belt tracking knob (6) and tighten it until the arm (7)
is aligned with the tool.
Removing
Remove the sanding belt (12) (if present) as described
below.
Loosen and remove the belt tracking knob (6).
Remove the arm (7, 9 or 10).
Warning! Be careful not to lose the spring (8).
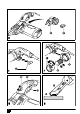
Fitting and removing sanding belts (fig. B)
Warning! The spring must be fitted. Be careful not to lose the
spring (8).
Fitting
Move the belt tensioning lever (5) to the front position (A).
Make sure that the arrows on the inside of the sanding belt
(12) face the same direction as the arrows (16) on the
housing.
Place the sanding belt (12) over the front pulley (11) and
the rear pulley (15), sliding it through the slot in the housing.
Move the belt tensioning lever (5) to the rear position (B).
Adjust the belt tracking as described below.
Removing
Move the belt tensioning lever (5) to the front position (A).
Slide the sanding belt (12) off the pulleys.
Adjusting the sanding belt tracking (fig. C)
Switch the tool on.
Turn the belt tracking knob (6) as required until the sanding
belt runs straight along the length of the arm.
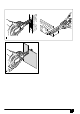
Fitting and removing the dust cassette
Warning! Always remove the dust cassette and fit the deflector
when using the tool on metal workpieces.
Fitting
Fit the dust cassette (13) over the dust extraction outlet.
Slide the item (13) onto the tool and make sure that it is
securely located.
Warning! To reduce the risk of injury, the user must
read the instruction manual.
Always wear gloves when working with metal
workpieces.
Wear safety glasses or goggles when using the tool.
Wear ear protection when using this tool.
Fit the dust cassette before using the tool
on wooden workpieces.
Remove the dust cassette and fit the
deflector before using the tool on
workpieces containing metal.