
Installation Instructions

8+
TOY RC X-TWIN EVO
a) It's better in a sunny day, and in calm wind or slight
breeze (Esp. no more than Beaufort scale 1 - light air
[smoke can float but leaf can't move].
Precaution: Because of its light weight, it may be blown
away under strong wind.
b) We suggest you can play it on grass to protect your
plane when it impacts on ground.
c) Do not play your plane when it is raining, snowing, or
near high power cable.
2.4 GHz technology allows for many plane to fly without signal interference. A connection, or
pairing, must be made between the plane and the transmitter to function. Sometimes, the pairing will
happen automatically. If it does not, or if the connection is lost then follow these steps to sync the
plane and the transmitter.
1. Make sure the throttle stick is at the minimum position.
2. Turn the Power Switch button to 'ON' position on the plane, Red LED will then gloom.Then turn on the
Transmitter,
3. The Synchronize/Pairing procedure is automatically COMPLETED when you can see the Red LED light
up solid (not blinking) on both plane and Transmitter.
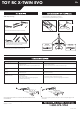
1. Firstly finished pairing transmitter and plane.
2. Point the plane toward the wind blowing direction and throw it out horizontally. Immediately
afterwards, push the throttle stick up to the full speed.
3. Trimming the plane :
If the plane turns left involuntarily, press the right side of the yaw trimmer (”R”) repeatedly until the
plane flies straight. Likewise, if the plane turns right involuntarily, press the left side of the yaw trimmer
(”L”) repeatedly.
4. Push the direction stick toward left to turn the plane anticlockwise, and push the direction stick toward
right to turn it clockwise. The plane turns depending on the speed difference between the left
propellers and the right propellers.
5. Push the throttle stick up to increase the flying speed and push the throttle stick down to decrease the
speed.
6. Pull the throttle stick down slowly to stop the propellers and land the plane.
7. If the plane has been spoiled a little, you can fix it with adhesive tape.
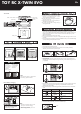
Transmitter
SYNC / Power indicator
Throttle stick
Charging wire
Minimum Throttle position
Battery cover
Direction stick
Trimmer
Power switch
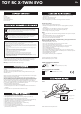
Transmitter Battery Installation (*Make sure the power switch is on “OFF” position.)
Note:
When the power indicator on the transmitter
starts blinking, replace the batteries.
4 x AA
Remove these
batteries from the
unit by pulling up
on one end of
each battery
positive by hand.
DO NOT remove
or install batteries
using sharp or
metal tools.
Warning!
OFF/CHG
ON
Plane battery charging
1. Take out the charging wire.
2. Turn off the plane. Insert the charging plug
into the socket.
Note:
1. The plane can operate for about 5 minutes
per every 25 - 40 minutes charging.
2. Before recharging the battery, wait 10 - 15
minutes for it to cool down.
3. Turn on the transmitter the charging process
will begin automatically and the green
charging indicator will light up.Unplug the
charging plug after the charging indicator
turns off, charging is completed.
OFF/CHG
ON
Wind
Correct
Wind
Wrong
Wind
Wrong
Take off or ascending
Turn left
Turn right
Maintaining height
Maintaining height
Landing or descending
Movement
Throttle control Yaw control
plane turns left
plane turns right
Tape