
Service manual


9
8/14/02
9
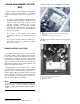
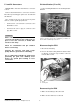
3. Align the latch groove and tab on the ECU socket.
Rotate the latch in direction (b) until the latch is
locked by the locking tab. The latch should oper-
ate freely with your fingers; do not force it.
SERVICING CONNECTORS AND
COUPLERS
Many electrical problems could be caused by faulty
electrical connectors or couplers. Check for the fol-
lowing conditions before beginning any diagnostics:
• wet terminals/pins
• dirty or corroded terminals/pins
• broken bent cable pins within multi-plug
couplers
• terminal pins backing out of the connector or
coupler
Connector - a single male lead that connects into a
single female lead.
Coupler - multi-pins and usually have some sort of
locking device (e.g., barb, hook, eye) which must be
released before the two halves can be separated.
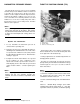
Cleaning
1. Wipe the connector or coupler with a clean, lint-
free rag and blow off any moisture using
compressed air.
2. Remove corrosion, rust, stains or other foreign
material by using contact cleaner on the termi-
nals.
3. Apply a water-displacement chemical on connec-
tor seals.
4. Apply a light coat of dielectric grease onto the ter-
minals/pins, and properly connect the halves.
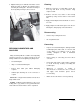
Disconnecting
• Release any locking device first.
• Do not pull the leads.
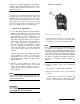
Connecting
• Inspect for bent terminals/pins, damaged cable
terminal/pin joints, water, dirt, or corrosion, and
secure wiring. If a terminal or pin is bent,
carefully straighten it with a thin-blade
screwdriver.
• Before joining or connecting, check for dirt or
corrosion
• Push male and female ends together squarely
to avoid incorrectly locating or bending the
terminal pins.
• Whenever a connector or coupler is
disconnected or checked, be sure to clean it
and apply some dielectric grease before
reconnecting.
• Make sure the two halves connect positively.
1. Latch
2. Tab
1
2