
Owner`s manual

34
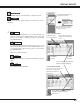
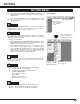
DISPLAY ADJUST
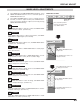
Reset all adjustment to previous figure.
Reset
Store
Closes IMAGE MENU.
Quit
Other icons operates as follows.
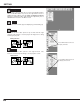
To store manually preset image, move a red frame pointer to Store
icon and press SELECT button. Image Level Menu will appear.
Move a red frame pointer to Image 1 to 10 where you want to set and
then press SELECT button.
Message "OK?" is displayed. Move
pointer to [Yes] and then press SELECT button.
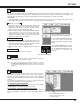
Press POINT LEFT/RIGHT button(s) to change progressive scan
mode. Dialog box display is changed to “Off” and progressive scan
mode to off. Press POINT LEFT/RIGHT button(s) again, progressive
scan mode to on.
Press POINT LEFT/RIGHT button(s) to change noise reduction
mode. Dialog box display is changed to “Off”, “L1”, “L2” or “L3” to
reduce noise (rough parts) of image.
Off ······· Noise reduction OFF position.
L1 ········ Noise reduction LEVEL 1 position.
L2 ········ Noise reduction LEVEL 2 position.
L3 ········ Noise reduction LEVEL 3 position.
Noise reduction
Progressive scan
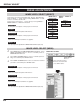
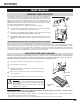
Image Level Menu
Move a red frame pointer to
any of Image 1 to 10 where you
want to set and then press
SELECT button.
Store icon
Press SELECT button at this
icon to store the adjustment.
Press POINT LEFT/RIGHT buttons
to change position.
Press SELECT button at this icon
to display first items.
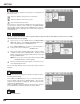
Auto picture control
Press either POINT LEFT button or POINT RIGHT button to Auto
picture control position that you want to select . (Off, L1 or L2)
Off ······· Auto picture control OFF position.
L1 ········ Auto picture control LEVEL 1 position.
L2 ········ Auto picture control LEVEL 2 position.
Auto lamp control
The projector reduce the brightness and set into the low power
consumption mode. When this function is “On”, the brightness is
adjusted automatically to a level that is suitable for the screen.
Press SELECT button at this icon
to display previous items.