Installation and Operation Manual Blackmagic Web Presenter February 2017
English Welcome! Thank you for purchasing your Blackmagic Web Presenter! With Blackmagic Web Presenter, our design goal was to make Internet based broadcasting and even calling using video for presentations dramatically easier. Unlike our traditional capture cards, which are designed for post production, Blackmagic Web Presenter is quite different because it transforms the SDI and HDMI video inputs into USB video that uses the webcam driver that’s built into your computer.
Contents Blackmagic Web Presenter Getting Started 4 Plugging in Power 4 Plugging in Video 4 Plugging in Audio 5 Connecting to your Computer 5 Setting Blackmagic Web Presenter as your Webcam 5 Using Blackmagic Web Presenter with Third Party Software 6 Using Blackmagic Web Presenter with Skype 6 Using Blackmagic Web Presenter to Stream with YouTube Live 7 To set your Web Presenter as a new device 7 Setting up a YouTube Live streaming channel 9 Using Teranex Mini Smart Panel 11 Instal
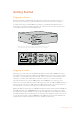
Getting Started Plugging in Power Getting started with your Blackmagic Web Presenter is quick and easy! All you need to do is connect power, connect your video and audio, then connect the unit to your computer. To supply power, plug a standard IEC power cable into your Blackmagic Web Presenter’s power input on the rear panel. When powered, the status indicator at the bottom right corner of your Web Presenter’s front panel will illuminate.
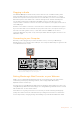
Plugging in Audio The SDI and HDMI inputs include audio, however there are also 2 additional analog audio Blackmagic inputs. The XLR audio input is a mono input that lets you plug in microphones. It’s a single channel mono input because microphones are mono and when you connect to this balanced Web Presenter XLR audio input the audio will be sent to both left and right audio channels internally. The second analog audio input is a HiFi input using RCA connectors.
Using Blackmagic Web Presenter with Third Party Software Using Blackmagic Web Presenter with Skype To use Blackmagic Web Presenter with Skype, first download the Skype software and install it on your computer. The Skype software is free and can be downloaded from www.skype.com 1 Once installed on your computer, launch Skype. 2 Open the preferences under Skype>Preferences and select ‘audio/ video’.
4 In the ‘Microphone’ drop down menu, select Blackmagic Web Presenter as your audio source. That’s all you need to do, and if you make a Skype call you will be using the source video that you have connected to Blackmagic Web Presenter. NOTE The process of setting up Skype to work with Blackmagic Web Presenter is the same on both a macOS and Windows computer. For more information refer to the Skype website: www.skype.
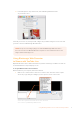
2 Select ‘create new’ in the pop up dialog box and click ‘ok’. 3 In the properties window for the new device, select your Blackmagic Web Presenter from the ‘device’ drop down menu and click ‘ok’. 4 Follow the same process for audio. Click on the ‘+’ button in the sources box to add a source and select ‘audio input capture’. Select ‘create new’ in the pop up dialog box and click ‘ok’.
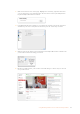
Setting the base ‘canvas’ and ‘scaled’ resolution to 1280 x 720 lets you view the input video full screen Setting up a YouTube Live streaming channel Now you need to create a YouTube live streaming channel. In your browser, go to www.youtube.com/live_dashboard and sign in or create a new Google account. 1 Select live streaming on the left hand side, and then click ‘get started’. 2 Type in the details about your stream and choose if you would like to make it a public or a private stream.
3 Click ‘reveal’ at the bottom of the page. Highlight the stream key, right click and select copy. It’s important to copy this information because in the next step we will paste this key into the Open Broadcaster software. 4 In the Open Broadcaster software, go to preferences and select the stream tab. Select YouTube as your service and paste the stream key into the ‘stream key’ text field.
NOTE The process of setting up the Open Broadcaster software to work with Blackmagic Web Presenter is the same on both a macOS and Windows computer. For more information refer to https://obsproject.com/ Using Teranex Mini Smart Panel An optional Teranex Mini Smart Panel can be mounted to the front of your Web Presenter, replacing the original front panel.
Smart Panel Features Control Buttons 1 and 2 buttons When the smart panel is attached, the switching feature is enabled on your Blackmagic Web Presenter. This means when you are broadcasting, you can press buttons 1 and 2 to switch between the SDI and HDMI input sources. Pressing ‘1’ will select the SDI input, and pressing ‘2’ will select the HDMI input. 1 MENU 2 VIDEO SET Source Video Format USB HDMI 525i59.
Using the Built In Switcher Blackmagic Web Presenter features a built in 2 input live switcher. However, to take advantage of this feature you need to install the Teranex Mini Smart Panel. This panel adds an LCD screen and pushbutton controls that you can use to control the built in switcher. Once the Teranex Mini Smart Panel is installed, the switcher feature will be enabled.
Set the camera number to ‘1’ for Blackmagic Studio Camera connected via SDI in the ‘studio’ tab of the LCD menu Set the camera number to ‘1’ for Blackmagic URSA Mini connected via SDI in the ‘setup’ tab of the LCD menu If you are doing a presentation, it can be extremely helpful for the presenter to see a nice clear red tally indicator on the camera they are using when they are on air. This makes it easy for them to know when they are live.
Appendix Blackmagic Embedded Tally Control Protocol Version 1.0 (30/04/14) This section is for third party developers or users who may wish to add support for the Blackmagic Embedded Tally Control Protocol to their products or system. It describes the protocol for sending tally information embedded in the non active picture region of a digital video stream.
uint8[0] bit 0: bit 1: bit 2-3: bit 4: bit 5: bit 6-7: slave device 1 program tally status (0=off, 1=on) slave device 1 device preview tally status (0=off, 1=on) reserved (0b00) slave device 2 program tally status (0=off, 1=on) slave device 2 preview tally status (0=off, 1=on) reserved (0b00) uint8[1] bit 0: bit 1: bit 2-3: bit 4: bit 5: bit 6-7: ...
Help Getting Help The fastest way to obtain help is to go to the Blackmagic Design online support pages and check the latest support material available for your Blackmagic Web Presenter. Blackmagic Design Online Support Pages The latest manual can be found at the Blackmagic Design support center at www.blackmagicdesign.com/support. Blackmagic Design Forum The Blackmagic Design forum on our website is a helpful resource you can visit for more information and creative ideas.
Regulatory Notices and Safety Information Regulatory Notices Disposal of waste of electrical and electronic equipment within the European union. The symbol on the product indicates that this equipment must not be disposed of with other waste materials. In order to dispose of your waste equipment, it must be handed over to a designated collection point for recycling.
Warranty 36 Month Limited Warranty Blackmagic Design warrants that Blackmagic Web Presenter will be free from defects in materials and workmanship for a period of 36 months from the date of purchase excluding connectors, cables, fiber optic modules, fuses and batteries which will be free from defects in materials and workmanship for a period of 12 months from the date of purchase.