
User's Manual


Timecode cannot be a negative value, so don’t set the start frame to zero. Another common
organizational technique is to change the hour number whenever you change rolls, to coincide
with the film roll’s number, which makes it easy to identify a scanned clip with the corresponding
source roll and frame range.
NOTE Your Cintel Scanner has built in ‘Options Interface’ ports for adding optional
hardware in the future. This offers the ability to add optional features such as reading
KeyKode from the camera negative, or optical/magnetic audio. For more information,
see the ‘Optional Audio and KeyKode Reader’ section.
Choose a Location to Save the Scanned Frames
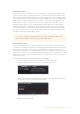
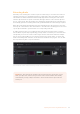
Once all this is done, scroll down to the ‘capture info’ controls in DaVinci Resolve’s film
scannerpanel, and click the ‘browse’ button to choose a location for the scanned files.
Youcanuse the other fields in this section to set what prefix you want to add to the name of the
scanned files and enclosing folders. The ‘file name prefix’ updates the file name preview that’s
shown at the top in the header. The header also shows the file path, resolution, frame rate,
duration, and the format. Specify what roll, reel, clip, and program information you want
associated with the scanned media. The ‘timestamp prefix’ checkbox in the ‘Capture info’
controls is selected by default and will save your clips to independent sub-folders within the
destination folder, together with a timecode prefix in the file name.
If you want to save all your clips together in one master destination folder, simply deselect
the checkbox.
NOTE When you capture an HDR clip, the scanner completes a high exposure scan
and saves it in a hidden folder named .HDR inside the same folder as the standard
scan. If you delete the .HDR folder, the scan converts to a normal clip after refreshing it
in the media storage and re-importing the clip into media pool. This is useful if there is
a problem with the HDR portion of the scan, as you can easily convert it to a
regular CRI clip.
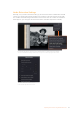
Check the Codec
DaVinci Resolve selects the ‘Cintel Raw’ codec by default, or you can choose ‘Cintel Raw 3:1’.
The Cintel Raw Format
The Cintel Raw Format Bayer pattern of each film frame scanned with your Cintel
scanner’s sensor is saved with embedded scanner metadata as a 12-bit linear Cintel
Raw Image, or CRI, image sequence. When grading in DaVinciResolve, CRIimages
areautomatically debayered as 12-bit log encoded image data.
The logarithmic encoding is similar, but not identical to Cineon encoding. Forexample,
negative film is encoded using a Gamma of 2.046 for density, while print film is encoded
using a full range Gamma 2.2 curve to ensure that no image data is clipped. Both of
these logarithmic encodings can be converted to a linear color space using the ‘Cintel
toLinear’ 1D LUT, before converting to other color spaces you may want to work in.
35Capturing from Cintel usingDaVinciResolve