
User's Manual


Audio extraction settings let you make the following manual adjustments:
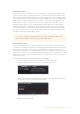
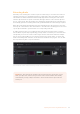
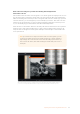
Show audio scan area
This checkbox turns the audio scan area guides on or off. The guides are displayed as a box on
the side of the frame covering the optical audio scan area and shows what optical information
will be used during extraction. The position of the guides will conform to the film type you have
selected. However, you can change the position manually if you need to. The audio scan area
guides are also great indicators to show you what is happening during the extraction process
so you can identify any potential troubles and make manual adjustments.
Inside the box is a thin red line. This line is the mid point detector which detects the separation
between stereo audio channels. When mono sound is detected during audio extraction, the
mid point detector disappears and the guides will adjust automatically to suit the width of the
mono optical track.
TIP If you need a closer inspection of the audio scan area guides, you can
zoom into the viewer and move the viewer position up or down, and left or
right. Simply choose the amount of zoom from the sizing options at the top
leftcorner of the viewer, then click and drag the viewer with your mouse or
track pad.
When ‘show audio scan area’ setting is turned on, the audio area guides will be visible so
you can see exactly what information is being used and monitor the extraction process.
41Capturing from Cintel usingDaVinciResolve