
User's Manual

Tracking
As the positioning of optical soundtracks can vary slightly from print to print, it is important to
ensure that your reader is scanning the correct audio area on the film. The tracking feature on
the audio reader lets you make fine adjustments to the position of the optical audio scanning
head to ensure you are getting the best possible quality.
To use the tracking feature:
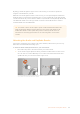
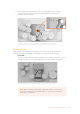
1 Plug a set of headphones or an audio analyzer into your reader’s 3.5mm headphone
jack. Lift open the rubber dust cover to access the connector.
2 With headphones on, or an analyzer plugged in, use your scanner’s transport controls
to shuttle to a place in the film where audio is present and play the film.
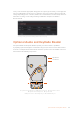
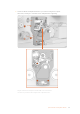
3 While listening to, or analyzing, the audio of your film, rotate the tracking knob
clockwise or counterclockwise. The tracking knob is located on the upper section of
your reader. As you adjust the tracking knob, the scanning head will move closer or
further away from the film’s edge so you can refine its position over the optical track.
You will also hear the loudness and clarity of the audio change as the tracking is
adjusted. An audio analyzer will operate on the same principle, but with more precision,
as you move the tracking knob.
For stereo tracks, simply make adjustments until you find the optimum position where both
channels are equally strong and clear with no distortion.
For mono audio, it’s effective to set the audio type to stereo when adjusting the tracking.
Thislets you use the left and right stereo channels to center the track, which will ensure the
mono track will scan at the best quality. However, don’t forget to reset the audio type to mono
after you have optimized the tracking.
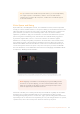
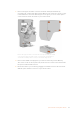
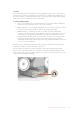
The Audio and KeyKode Reader’s headphone jack is behind
arubber dust cover at the bottom of the reader
51Optional Audio andKeyKode Reader