
User's Manual


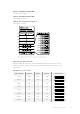
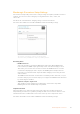
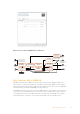
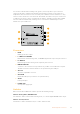
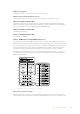
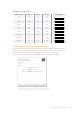
Table Of Contents
- English
- 日本語
- Français
- Deutsch
- Español
- 中文
- 한국어
- Русский
- Italiano
- Português
- Türkçe
- Getting Started
- Installing Administration Software
- Changing Settings
- Blackmagic Converter Models
- Teranex Mini Converters
- Blackmagic Micro Converters
- Blackmagic Mini Converters
- Mini Converter SDI to HDMI
- Mini Converter SDI to HDMI 4K
- Mini Converter SDI to HDMI 6G
- Mini Converter HDMI to SDI
- Mini Converter HDMI to SDI 4K
- Mini Converter HDMI to SDI 6G
- Mini Converter SDI to Analog
- Mini Converter SDI to Analog 4K
- Mini Converter Analog to SDI
- Mini Converter SDI to Audio
- Mini Converter SDI to Audio 4K
- Mini Converter Audio to SDI
- Mini Converter Audio to SDI 4K
- Mini Converter Optical Fiber
- Mini Converter Optical Fiber 4K
- Mini Converter Optical Fiber 12G
- Mini Converter Quad SDI to HDMI 4K
- Mini Converter SDI Distribution
- Mini Converter SDI Distribution 4K
- Mini Converter SDI Multiplex 4K
- Mini Converter Sync Generator
- Mini Converter UpDownCross
- Mini Converter UpDownCross HD
- Converter Setup Utility
- Blackmagic Battery Converters
- Help
- Warranty
- はじめに
- 管理ソフトウェアのインストール
- 設定の変更
- Blackmagic Converterモデル
- Teranex Mini Converters
- Blackmagic Micro Converters
- Blackmagic Mini Converters
- Mini Converter SDI to HDMI
- Mini Converter SDI to HDMI 4K
- Mini Converter SDI to HDMI 6G
- Mini Converter HDMI to SDI
- Mini Converter HDMI to SDI 4K
- Mini Converter HDMI to SDI 6G
- Mini Converter SDI to Analog
- Mini Converter SDI to Analog 4K
- Mini Converter Analog to SDI
- Mini Converter SDI to Audio
- Mini Converter SDI to Audio 4K
- Mini Converter Audio to SDI
- Mini Converter Audio to SDI 4K
- Mini Converter Optical Fiber
- Mini Converter Optical Fiber 4K
- Mini Converter Optical Fiber 12G
- Mini Converter Quad SDI to HDMI 4K
- Mini Converter SDI Distribution
- Mini Converter SDI Distribution 4K
- Mini Converter SDI Multiplex 4K
- Mini Converter Sync Generator
- Mini Converter UpDownCross
- Mini Converter UpDownCross HD
- Blackmagic Battery Converters
- ヘルプ
- 保証
- Mise en route
- Installer le logiciel d'administration
- Régler les paramètres
- Modèles de convertisseurs Blackmagic
- Teranex Mini Converters
- Blackmagic Micro Converters
- Blackmagic Mini Converters
- Mini Converter SDI to HDMI
- Mini Converter SDI to HDMI 4K
- Mini Converter SDI to HDMI 6G
- Mini Converter HDMI to SDI
- Mini Converter HDMI to SDI 4K
- Mini Converter HDMI to SDI 6G
- Mini Converter SDI to Analog
- Mini Converter SDI to Analog 4K
- Mini Converter Analog to SDI
- Mini Converter SDI to Audio
- Mini Converter SDI to Audio 4K
- Mini Converter Audio to SDI
- Mini Converter Audio to SDI 4K
- Mini Converter Optical Fiber
- Mini Converter Optical Fiber 4K
- Mini Converter Optical Fiber 12G
- Mini Converter Quad SDI to HDMI 4K
- Mini Converter SDI Distribution
- Mini Converter SDI Distribution 4K
- Mini Converter SDI Multiplex 4K
- Mini Converter Sync Generator
- Mini Converter UpDownCross
- Mini Converter UpDownCross HD
- Blackmagic Battery Converters
- Assistance
- Garantie
- Erste Schritte
- Installieren der Verwaltungssoftware
- Einstellungen ändern
- Blackmagic Konverterserien
- Teranex Mini Converters
- Blackmagic Micro Converters
- Blackmagic Mini Converters
- Mini Converter SDI to HDMI
- Mini Converter SDI to HDMI 4K
- Mini Converter SDI to HDMI 6G
- Mini Converter HDMI to SDI
- Mini Converter HDMI to SDI 4K
- Mini Converter HDMI to SDI 6G
- Mini Converter SDI to Analog
- Mini Converter SDI to Analog 4K
- Mini Converter Analog to SDI
- Mini Converter SDI to Audio
- Mini Converter SDI to Audio 4K
- Mini Converter Audio to SDI
- Mini Converter Audio to SDI 4K
- Mini Converter Optical Fiber
- Mini Converter Optical Fiber 4K
- Mini Converter Optical Fiber 12G
- Mini Converter Quad SDI to HDMI 4K
- Mini Converter SDI Distribution
- Mini Converter SDI Distribution 4K
- Mini Converter SDI Multiplex 4K
- Mini Converter Sync Generator
- Mini Converter UpDownCross
- Mini Converter UpDownCross HD
- Converters Setup Dienstprogramm
- Blackmagic Battery Converters
- Hilfe
- Garantie
- Primeros pasos
- Conexión del cable de alimentación
- Conexiones de video
- Conexiones de audio
- Instalación del programa utilitario
- Instalación del programa Blackmagic Converters Setup
- Actualización del software interno
- Actualización del modelo Mini Converter SDI Distribution 4K
- Configuración
- Configuración mediante interruptores
- Configuración mediante el programa Blackmagic Converters Setup
- Pestaña «About»
- Conversores Blackmagic
- Modelos Teranex Mini
- Modelos Micro Converter
- Micro Converter SDI to HDMI
- Micro Converter HDMI to SDI
- Micro Converter BiDirectional SDI/HDMI
- Modelos Mini Converter
- Mini Converter SDI to HDMI
- Mini Converter SDI to HDMI 4K
- Mini Converter SDI to HDMI 6G
- Mini Converter HDMI to SDI
- Mini Converter HDMI to SDI 4K
- Mini Converter HDMI to SDI 6G
- Mini Converter SDI to Analog
- Mini Converter SDI to Analog 4K
- Mini Converter Analog to SDI
- Mini Converter SDI to Audio
- Mini Converter SDI to Audio 4K
- Mini Converter Audio to SDI
- Mini Converter Audio to SDI 4K
- Mini Converter Optical Fiber
- Mini Converter Optical Fiber 4K
- Mini Converter Optical Fiber 12G
- Mini Converter Quad SDI to HDMI 4K
- Mini Converter SDI Distribution
- Mini Converter SDI Distribution 4K
- Mini Converter SDI Multiplex 4K
- Mini Converter Sync Generator
- Mini Converter UpDownCross
- Mini Converter UpDownCross HD
- Interruptores
- Modelos Battery Converter
- Battery Converter SDI to HDMI
- Battery Converter HDMI to SDI
- Ayuda
- Garantía
- 入门
- 安装管理软件
- 更改设置
- Blackmagic Converter系列型号
- Teranex Mini Converter系列
- Blackmagic Micro Converter系列
- Blackmagic Mini Converter系列
- Mini Converter SDI to HDMI
- Mini Converter SDI to HDMI 4K
- Mini Converter SDI to HDMI 6G
- Mini Converter HDMI to SDI
- Mini Converter HDMI to SDI 4K
- Mini Converter HDMI to SDI 6G
- Mini Converter SDI to Analog
- Mini Converter SDI to Analog 4K
- Mini Converter Analog to SDI
- Mini Converter SDI to Audio
- Mini Converter SDI to Audio 4K
- Mini Converter Audio to SDI
- Mini Converter Audio to SDI 4K
- Mini Converter Optical Fiber
- Mini Converter Optical Fiber 4K
- Mini Converter Optical Fiber 12G
- Mini Converter Quad SDI to HDMI 4K
- Mini Converter SDI Distribution
- Mini Converter SDI Distribution 4K
- Mini Converter SDI Multiplex 4K
- Mini Converter Sync Generator
- Mini Converter UpDownCross
- Mini Converter UpDownCross HD
- 转换器设置实用程序
- Blackmagic Battery Converter系列
- 帮助
- 保修
- 시작하기
- 관리용 소프트웨어 설치하기
- 설정 변경하기
- Blackmagic Converter 모델
- Teranex Mini 컨버터
- Blackmagic Micro Converter
- Blackmagic Mini Converters
- Mini Converter SDI to HDMI
- Mini Converter SDI to HDMI 4K
- Mini Converter SDI to HDMI 6G
- Mini Converter HDMI to SDI
- Mini Converter HDMI to SDI 4K
- Mini Converter HDMI to SDI 6G
- Mini Converter SDI to Analog
- Mini Converter SDI to Analog 4K
- Mini Converter Analog to SDI
- Mini Converter SDI to Audio
- Mini Converter SDI to Audio 4K
- Mini Converter Audio to SDI
- Mini Converter Audio to SDI 4K
- Mini Converter Optical Fiber
- Mini Converter Optical Fiber 4K
- Mini Converter Optical Fiber 12G
- Mini Converter Quad SDI to HDMI 4K
- Mini Converter SDI Distribution
- Mini Converter SDI Distribution 4K
- Mini Converter SDI Multiplex 4K
- Mini Converter Sync Generator
- Mini Converter UpDownCross
- Mini Converter UpDownCross HD
- 컨버터 셋업 유틸리티
- Blackmagic Battery Converter
- 지원
- 보증
- Подготовка к работе
- Установка программного обеспечения
- Изменение настроек
- Модели конвертеров Blackmagic
- Конвертеры Teranex Mini
- Blackmagic Micro Converter
- Blackmagic Mini Converter
- Mini Converter SDI to HDMI
- Mini Converter SDI to HDMI 4K
- Mini Converter SDI to HDMI 6G
- Mini Converter HDMI to SDI
- Mini Converter HDMI to SDI 4K
- Mini Converter HDMI to SDI 6G
- Mini Converter SDI to Analog
- Mini Converter SDI to Analog 4K
- Mini Converter Analog to SDI
- Mini Converter SDI to Audio
- Mini Converter SDI to Audio 4K
- Mini Converter Audio to SDI
- Mini Converter Audio to SDI 4K
- Mini Converter Optical Fiber
- Mini Converter Optical Fiber 4K
- Mini Converter Optical Fiber 12G
- Mini Converter Quad SDI to HDMI 4K
- Mini Converter SDI Distribution
- Mini Converter SDI Distribution 4K
- Mini Converter SDI Multiplex 4K
- Mini Converter Sync Generator
- Mini Converter UpDownCross
- Mini Converter UpDownCross HD
- Настройки утилиты Blackmagic Converters Setup
- Blackmagic Battery Converter
- Помощь
- Гарантия
- Operazioni preliminari
- Installare il software di amministrazione
- Cambiare le impostazioni
- I modelli dei convertitori Blackmagic
- I convertitori Teranex Mini
- I convertitori Micro Converter
- I convertitori Mini Converter
- Mini Converter SDI to HDMI
- Mini Converter SDI to HDMI 4K
- Mini Converter SDI to HDMI 6G
- Mini Converter HDMI to SDI
- Mini Converter HDMI to SDI 4K
- Mini Converter HDMI to SDI 6G
- Mini Converter SDI to Analog
- Mini Converter SDI to Analog 4K
- Mini Converter Analog to SDI
- Mini Converter SDI to Audio
- Mini Converter SDI to Audio 4K
- Mini Converter Audio to SDI
- Mini Converter Audio to SDI 4K
- Mini Converter Optical Fiber
- Mini Converter Optical Fiber 4K
- Mini Converter Optical Fiber 12G
- Mini Converter Quad SDI to HDMI 4K
- Mini Converter SDI Distribution
- Mini Converter SDI Distribution 4K
- Mini Converter SDI Multiplex 4K
- Mini Converter Sync Generator
- Mini Converter UpDownCross
- Mini Converter UpDownCross HD
- Utilità di sistema
- Blackmagic Battery Converter
- Assistenza
- Garanzia
- Instruções Preliminares
- Instalar o Software de Administração
- Alterar Configurações
- Modelos Blackmagic Converter
- Teranex Mini Converters
- Blackmagic Micro Converters
- Blackmagic Mini Converters
- Mini Converter SDI to HDMI
- Mini Converter SDI to HDMI 4K
- Mini Converter SDI to HDMI 6G
- Mini Converter HDMI to SDI
- Mini Converter HDMI to SDI 4K
- Mini Converter HDMI to SDI 6G
- Mini Converter SDI to Analog
- Mini Converter SDI to Analog 4K
- Mini Converter Analog to SDI
- Mini Converter SDI to Audio
- Mini Converter SDI to Audio 4K
- Mini Converter Audio to SDI
- Mini Converter Audio to SDI 4K
- Mini Converter Optical Fiber
- Mini Converter Optical Fiber 4K
- Mini Converter Optical Fiber 12G
- Mini Converter Quad SDI to HDMI 4K
- Mini Converter SDI Distribution
- Mini Converter SDI Distribution 4K
- Mini Converter SDI Multiplex 4K
- Mini Converter Sync Generator
- Mini Converter UpDownCross
- Mini Converter UpDownCross HD
- Utilitário Converters Setup
- Blackmagic Battery Converters
- Ajuda
- Garantia
- Başlarken
- Yönetim Yazılımının Yüklenmesi
- Ayarların Değiştirilmesi
- Blackmagic Converter Modelleri
- Teranex Mini Çeviriciler
- Blackmagic Micro Converter Cihazları
- Blackmagic Mini Converter Cihazları
- MINI Converter SDI to HDMI
- Mini Converter SDI to HDMI 4K
- MINI Converter SDI to HDMI 6G
- Mini Converter HDMI to SDI
- Mini Converter HDMI to SDI 4K
- Mini Converter HDMI to SDI 6G
- Mini Converter SDI to Analog
- Mini Converter SDI to Analog 4K
- Mini Converter Analog to SDI
- Mini Converter SDI to Audio
- Mini Converter SDI to Audio 4K
- Mini Converter Audio to SDI
- Mini Converter Audio to SDI 4K
- Mini Converter Optical Fiber
- Mini Converter Optical Fiber 4K
- Mini Converter Optical Fiber 12G
- Mini Converter Quad SDI to HDMI 4K
- Mini Converter SDI Distribution
- Mini Converter SDI Distribution 4K
- Mini Converter SDI Multiplex 4K
- Mini Converter Sync Generator
- Mini Converter UpDownCross
- Mini Converter UpDownCross HD
- Converter Setup Eklentisi
- Blackmagic Battery Converter Cihazları
- Yardım
- Garanti
Processing menu
33 Point 3D LUT
Your Mini Converter SDI to HDMI 6G supports .cube LUT files that can be created using
DaVinci Resolve software, or other color correction software that can export .cube files.
You can load 2 separate LUTs by clicking on the ‘load’ button for each LUT slot,
selecting the desired .cube file from your computer, and clicking ‘OK’. Click ‘save’ to
confirm your settings. The LUT filename will appear next to each ‘load’ button so you
know which LUT is being used for LUT 1 or LUT 2.
What is a 3D LUT?
A 3D LUT, or ‘3D Lookup Table’, is a file containing table of values that are used to
modify the video colorspace to a new set of color values in a 3D cube space.
The color cube contains all the variations between the mix of each primary color,
defined within three x, y, z spatial dimensions. This means the RGB channels in the SDI
input video can be remapped to any other RGB output color in the HDMI video output.
This is very powerful as it means any color can be mapped to any other color so you
can perform very precise color adjustments for calibrating displays, or loading log
gamma curves for display when working with different types of raw camera files on set
where you want to see linear gamma.
To show how powerful 3D LUTs can be, one of the default LUTs loaded can convert
your input video to black and white. This shows that all the input RGB colors are
remapped via the 3D LUT to black and white RGB output values via the HDMI output.
You can create your own 3D LUTs and upload them via the admin software and DaVinci
Resolve even allows you to convert a color grade setting to a 3D LUT that you can then
upload to your Mini Converter SDI to HDMI 6G. You can output the 3D LUT on the SDI
video loop output so you could even use your Mini Converter as a dedicated 3D LUT
color processor even if you don’t use the HDMI output!
For more information on how to create a 3D LUT .cube file, refer to the DaVinci Resolve
manual which you can download from the Blackmagic Design website at
www.blackmagicdesign.com/support.
Clip Video Output to Legal Levels
This checkbox controls clipping of your SDI input to ensure that it stays within HDMI
legal levels and should be kept on by default.
Output Levels menu
This menu allows you to adjust the gain on the audio output. You can adjust audio levels
independently per channel, or together by clicking the ‘link’ icon next to their sliders. To reset
all audio levels back to 0 dB click the ‘reset’ button at the top of the ‘output levels’ menu. The
‘audio’ tab for Mini Converter SDI to HDMI 6G contains the following settings.
30Blackmagic Mini Converters