
User Manual
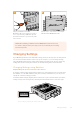


For a full description of the switches and their settings, refer to your converter model in this
manual. Even though switch settings are printed on the base of your converter, new features in
later updates can add new settings so it’s worth checking the latest version of this manual for
the most up to date information. You can download the latest version from the
Blackmagic Design support center at www.blackmagicdesign.com/support.
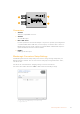
Changing Settings using Blackmagic Converters Setup
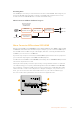
Once Blackmagic Converters Setup is installed on your computer, connect the setup utility
toyour Blackmagic Converter via USB.
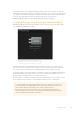
The Blackmagic Converters setup utility lets you
update your converter’s internal software and adjust
settings using a Mac OS X or Windows computer.
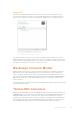
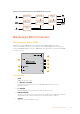
The first thing you’ll see when launching the software is the ‘home’ page. If you have more
thanone converter connected to your computer, select your desired converter by clicking
thearrows on the left and right side of the Blackmagic Converters Setup home page.
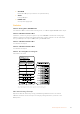
To change settings, click on the ‘settings’ icon below the image of your Blackmagic Converter.
Adjustments will be immediately saved to your converter. This means if power is lost, your
settings will be reestablished as soon as power is restored.
Even though most settings are configured using the built in switches, some settings can only
be set using the setup software, for example adjusting analog video or audio levels.
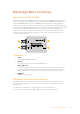
TIP Teranex Mini Converters are 12G-SDI converters that support even more video
formats including up to 4K DCI 60p. If you are looking for information on how to use
aTeranex Mini Converter, including how to change settings using the
BlackmagicTeranex Setup utility, refer to the Teranex Mini Converters manual.
You can download the most up to date manual from the Blackmagic Design support
center at www.blackmagicdesign.com/support
12Changing Settings