
User's Manual
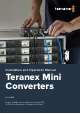
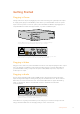
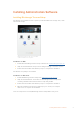
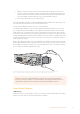

Table Of Contents
- Getting Started
- Installing Administration Software
- Changing Settings
- Changing Network Settings
- Teranex Mini Rack Shelf
- Teranex Mini Models
- Teranex Mini – SDI to DisplayPort 8K HDR
- Teranex Mini – SDI to HDMI 8K HDR
- Teranex Mini – IP Video 12G
- Teranex Mini – SDI to HDMI 12G
- Teranex Mini – HDMI to SDI 12G
- Teranex Mini – SDI to Analog 12G
- Teranex Mini – Analog to SDI 12G
- Teranex Mini – SDI to Audio 12G
- Teranex Mini – Audio to SDI 12G
- Teranex Mini – 12G–SDI to Quad SDI
- Teranex Mini – Quad SDI to 12G-SDI
- Teranex Mini – SDI Distribution 12G
- Teranex Mini – Optical to HDMI 12G
- Teranex Mini – HDMI to Optical 12G
- Teranex Mini – Optical to Analog 12G
- Teranex Mini – Analog to Optical 12G
- Teranex Mini – Optical to Audio 12G
- Teranex Mini – Audio to Optical 12G
- Help
- Regulatory Notices
- Safety Information
- Warranty
- English
- 日本語
- Français
- Deutsch
- Español
- 中文
- 한국어
- Русский
- Italiano
- Português
- Türkçe
- はじめに
- 管理ソフトウェアのインストール
- 設定の変更
- ネットワーク設定の変更
- Teranex Mini Rack Shelf
- Teranex Miniモデル
- Teranex Mini – SDI to DisplayPort 8K HDR
- Teranex Mini – SDI to HDMI 8K HDR
- Teranex Mini – IP Video 12G
- Teranex Mini - SDI to HDMI 12G
- Teranex Mini - HDMI to SDI 12G
- Teranex Mini - SDI to Analog 12G
- Teranex Mini - Analog to SDI 12G
- Teranex Mini - SDI to Audio 12G
- Teranex Mini - Audio to SDI 12G
- Teranex Mini - 12G-SDI to Quad SDI
- Teranex Mini - Quad SDI to 12G-SDI
- Teranex Mini - SDI Distribution 12G
- Teranex Mini - Optical to HDMI 12G
- Teranex Mini - HDMI to Optical 12G
- Teranex Mini - Optical to Analog 12G
- Teranex Mini - Analog to Optical 12G
- Teranex Mini - Optical to Audio 12G
- Teranex Mini - Audio to Optical 12G
- ヘルプ
- 規制に関する警告
- 安全情報
- 保証
- Mise en route
- Installer le logiciel d'administration
- Modifier les paramètres
- Modifier les paramètres réseau
- Teranex Mini Rack Shelf
- Les modèles Teranex Mini
- Teranex Mini - SDI to DisplayPort 8K HDR
- Teranex Mini – SDI to HDMI 8K HDR
- Teranex Mini - IP Video 12G
- Teranex Mini - SDI to HDMI 12G
- Teranex Mini - HDMI to SDI 12G
- Teranex Mini - SDI to Analog 12G
- Teranex Mini - Analog to SDI 12G
- Teranex Mini - SDI to Audio 12G
- Teranex Mini - Audio to SDI 12G
- Teranex Mini - 12G-SDI to Quad SDI
- Teranex Mini - Quad SDI to 12G-SDI
- Teranex Mini - SDI Distribution 12G
- Teranex Mini - Optical to HDMI 12G
- Teranex Mini - HDMI to Optical 12G
- Teranex Mini - Optical to Analog 12G
- Teranex Mini - Analog to Optical 12G
- Teranex Mini - Optical to Audio 12G
- Teranex Mini - Audio to Optical 12G
- Assistance
- Avis règlementaires
- Informations de sécurité
- Garantie
- Erste Schritte
- Installation der Verwaltungssoftware
- Einstellungen ändern
- Netzwerkeinstellungen ändern
- Teranex Mini Rackwanne
- Die Teranex Mini Modelle
- Teranex Mini – SDI to DisplayPort 8K HDR
- Teranex Mini – SDI to HDMI 8K HDR
- Teranex Mini – IP Video 12G
- Teranex Mini – SDI to HDMI 12G
- Teranex Mini – HDMI to SDI 12G
- Teranex Mini – SDI to Analog 12G
- Teranex Mini Analog to SDI 12G
- Teranex Mini – SDI to Audio 12G
- Teranex Mini – Audio to SDI 12G
- Teranex Mini – 12G-SDI to Quad SDI
- Teranex Mini – Quad SDI to 12G-SDI
- Teranex Mini – SDI Distribution 12G
- Teranex Mini – Optical to HDMI 12G
- Teranex Mini – HDMI to Optical 12G
- Teranex Mini – Optical to Analog 12G
- Teranex Mini – Analog to Optical 12G
- Teranex Mini – Optical to Audio 12G
- Teranex Mini – Audio to Optical 12G
- Hilfe
- Gesetzliche Vorschriften
- Sicherheitshinweise
- Garantie
- Primeros pasos
- Instalación del programa utilitario
- Modificación de ajustes
- Modificación de los ajustes de red
- Estante para bastidores
- Modelos Teranex Mini
- Teranex Mini SDI to DisplayPort 8K HDR
- Teranex Mini SDI to HDMI 8K HDR
- Teranex Mini IP Video 12G
- Teranex Mini SDI to HDMI 12G
- Teranex Mini HDMI to SDI 12G
- Teranex Mini SDI to Analog 12G
- Teranex Mini Analog to SDI 12G
- Teranex Mini SDI to Audio 12G
- Teranex Mini Audio to SDI 12G
- Teranex Mini 12G-SDI to Quad SDI
- Teranex Mini Quad SDI to 12G-SDI
- Teranex Mini SDI Distribution 12G
- Teranex Mini Optical to HDMI 12G
- Teranex Mini HDMI to Optical 12G
- Teranex Mini Optical to Analog 12G
- Teranex Mini Analog to Optical 12G
- Teranex Mini Optical to Audio 12G
- Teranex Mini Audio to Optical 12G
- Ayuda
- Normativas
- Seguridad
- Garantía
- 入门
- 安装管理软件
- 更改设置
- 更改网络设置
- Teranex Mini Rack Shelf
- Teranex Mini型号介绍
- Teranex Mini – SDI to DisplayPort 8K HDR
- Teranex Mini – SDI to HDMI 8K HDR
- Teranex Mini – IP Video 12G
- Teranex Mini - SDI to HDMI 12G
- Teranex Mini - HDMI to SDI 12G
- Teranex Mini - SDI to Analog 12G
- Teranex Mini - Analog to SDI 12G
- Teranex Mini - SDI to Audio 12G
- Teranex Mini - Audio to SDI 12G
- Teranex Mini - 12G-SDI to Quad SDI
- Teranex Mini - Quad SDI to 12G-SDI
- Teranex Mini - SDI Distribution 12G
- Teranex Mini - Optical to HDMI 12G
- Teranex Mini - HDMI to Optical 12G
- Teranex Mini - Optical to Analog 12G
- Teranex Mini - Analog to Optical 12G
- Teranex Mini - Optical to Audio 12G
- Teranex Mini - Audio to Optical 12G
- 帮助
- 监管声明
- 安全信息
- 保修
- 시작하기
- 관리용 소프트웨어 설치하기
- 설정 변경하기
- 네트워크 설정 변경하기
- Teranex Mini Rack Shelf
- Teranex Mini 모델
- Teranex Mini SDI to DisplayPort 8K HDR
- Teranex Mini - SDI to HDMI 8K HDR
- Teranex Mini IP Video 12G
- Teranex Mini - SDI to HDMI 12G
- Teranex Mini - HDMI to SDI 12G
- Teranex Mini – SDI to Analog 12G
- Teranex Mini – Analog to SDI 12G
- Teranex Mini – SDI to Audio 12G
- Teranex Mini – Audio to SDI 12G
- Teranex Mini – 12G-SDI to Quad SDI
- Teranex Mini – Quad SDI to 12G-SDI
- Teranex Mini – SDI Distribution 12G
- Teranex Mini – Optical to HDMI 12G
- Teranex Mini – HDMI to Optical 12G
- Teranex Mini – Optical to Analog 12G
- Teranex Mini – Analog to Optical 12G
- Teranex Mini – Optical to Audio 12G
- Teranex Mini – Audio to Optical 12G
- 도움말
- 규제 사항
- 안전 정보
- 보증
- Подготовка к работе
- Установка программного обеспечения
- Изменение настроек
- Изменение сетевых настроек
- Teranex Mini Rack Shelf
- Модели Teranex Mini
- Teranex Mini – SDI to DisplayPort 8K HDR
- Teranex Mini – SDI to HDMI 8K HDR
- Teranex Mini – IP Video 12G
- Teranex Mini – SDI to HDMI 12G
- Teranex Mini – HDMI to SDI 12G
- Teranex Mini – SDI to Analog 12G
- Teranex Mini – Analog to SDI 12G
- Teranex Mini – SDI to Audio 12G
- Teranex Mini – Audio to SDI 12G
- Teranex Mini – 12G-SDI to Quad SDI
- Teranex Mini – Quad SDI to 12G-SDI
- Teranex Mini – SDI Distribution 12G
- Teranex Mini – Optical to HDMI 12G
- Teranex Mini – HDMI to Optical 12G
- Teranex Mini – Optical to Analog 12G
- Teranex Mini – Analog to Optical 12G
- Teranex Mini – Optical to Audio 12G
- Teranex Mini – Audio to Optical 12G
- Помощь
- Соблюдение нормативных требований
- Правила безопасности
- Гарантия
- Operazioni preliminari
- Installare il software di amministrazione
- Cambiare le impostazioni
- Cambiare le impostazioni di rete
- Teranex Mini Rack Shelf
- I modelli Teranex Mini
- Teranex Mini – SDI to DisplayPort 8K HDR
- Teranex Mini - SDI to HDMI 8K HDR
- Teranex Mini - IP Video 12G
- Teranex Mini – SDI to HDMI 12G
- Teranex Mini HDMI to SDI 12G
- Teranex Mini – SDI to Analog 12G
- Teranex Mini – Analog to SDI 12G
- Teranex Mini – SDI to Audio 12G
- Teranex Mini – Audio to SDI 12G
- Teranex Mini - 12G-SDI to Quad SDI
- Teranex Mini - Quad SDI to 12G-SDI
- Teranex Mini - SDI Distribution 12G
- Teranex Mini – Optical to HDMI 12G
- Teranex Mini – HDMI to Optical 12G
- Teranex Mini - Optical to Analog 12G
- Teranex Mini - Analog to Optical 12G
- Teranex Mini - Optical to Audio 12G
- Teranex Mini - Audio to Optical 12G
- Approfondimento e domande frequenti
- Normative
- Sicurezza
- Garanzia
- Instruções Preliminares
- Instalando o Software de Administração
- Alterando Configurações
- Alterando Configurações de Rede
- Teranex Mini Rack Shelf
- Modelos Teranex Mini
- Teranex Mini – SDI to DisplayPort 8K HDR
- Teranex Mini – SDI to HDMI 8K HDR
- Teranex Mini – IP Video 12G
- Teranex Mini – SDI to HDMI 12G
- Teranex Mini – HDMI to SDI 12G
- Teranex Mini – SDI to Analog 12G
- Teranex Mini – Analog to SDI 12G
- Teranex Mini – SDI to Audio 12G
- Teranex Mini – Audio to SDI 12G
- Teranex Mini – 12G–SDI to Quad SDI
- Teranex Mini – Quad SDI to 12G-SDI
- Teranex Mini – SDI Distribution 12G
- Teranex Mini – Optical to HDMI 12G
- Teranex Mini – HDMI to Optical 12G
- Teranex Mini – Optical to Analog 12G
- Teranex Mini – Analog to Optical 12G
- Teranex Mini – Optical to Audio 12G
- Teranex Mini – Audio to Optical 12G
- Ajuda
- Informações Regulatórias
- Informações de Segurança
- Garantia
- Başlarken
- Yönetim Yazılımının Yüklenmesi
- Ayarların Değiştirilmesi
- Ağ Ayarlarının Değiştirilmesi
- Teranex Mini Rack Shelf
- Teranex Mini Modelleri
- Teranex Mini – SDI to DisplayPort 8K HDR
- Teranex Mini – SDI to HDMI 8K HDR
- Teranex Mini – IP Video 12G
- Teranex Mini – SDI to HDMI 12G
- Teranex Mini – HDMI to SDI 12G
- Teranex Mini – SDI to Analog 12G
- Teranex Mini – Analog to SDI 12G
- Teranex Mini – SDI to Audio 12G
- Teranex Mini – Audio to SDI 12G
- Teranex Mini – 12G–SDI to Quad SDI
- Teranex Mini – Quad SDI to 12G-SDI
- Teranex Mini – SDI Distribution 12G
- Teranex Mini – Optical to HDMI 12G
- Teranex Mini – HDMI to Optical 12G
- Teranex Mini – Optical to Analog 12G
- Teranex Mini – Analog to Optical 12G
- Teranex Mini – Optical to Audio 12G
- Teranex Mini – Audio to Optical 12G
- Yardım
- Mevzuata İlişkin Bildirimler
- Güvenlik Bilgileri
- Garanti

Getting Started
Plugging in Power
Getting started is as simple as plugging in power and connecting your signal input and output.
To supply power, plug in a standard IEC power cable to your Teranex Mini converter’s power
input on the rear panel. You can also power your Teranex Mini via Ethernet by plugging into a
compatible Ethernet switch that supports PoE+, or ‘power over Ethernet plus’.
SDI to HDMI 12G
Teranex Mini Converters support 12G-SDI data rates so will automatically
switch between SD, HD and Ultra HD all the way up to 2160p60.
ETHERNET PoE+ SDI IN
L - ANALOG
AES/EBU
R - ANALOG
AES/EBU - T/C
HDMI OUT
SDI LOOP OUT
Connect power to your Teranex Mini converter using a standard IEC power cable.
Power can also be supplied via a PoE+ compatible Ethernet switch.
Plugging in Video
Plug your source video into your Teranex Mini converter’s video input and plug the video output
into your destination equipment. Video input and output varies by converter. Depending on
your Teranex Mini model, you may have the option of SDI, HDMI, component, composite or
S-video input or output.
Plugging in Audio
If you’re using embedded audio in SDI or HDMI, audio is already transported via the video
input. If using external digital or analog audio, plug into the XLR connectors. The ‘R’ channel
XLR connector can be used for timecode. Some Teranex Mini devices support RCA analog
audio or optical audio. Refer to the individual converters detailed in this manual for
moreinformation.
SDI IN
L - ANALOG
AES/EBU
R - ANALOG
AES/EBU - T/C
OPTICAL
AUDIO
STEREO OUT
L R
SDI OUT
ETHERNET PoE+
Connect analog or digital audio to your Teranex Mini converter’s
optical audio, RCA, or balanced XLR connectors.
That’s all there is to getting started! Now you can change your conversion settings and start
using your Teranex Mini. See the ‘changing settings’ section to learn more.
5Getting Started